HULL GELMARINE RESTORATION · RIVER THAMES
Our work  /  Flagship restorations

A STEVENS STEEL CRUISER RESTORATION

Midnight Blue.
Behind the finish.

The finished paintwork tells one story. The skilled preparation, repairs and decisions beneath it tell another.
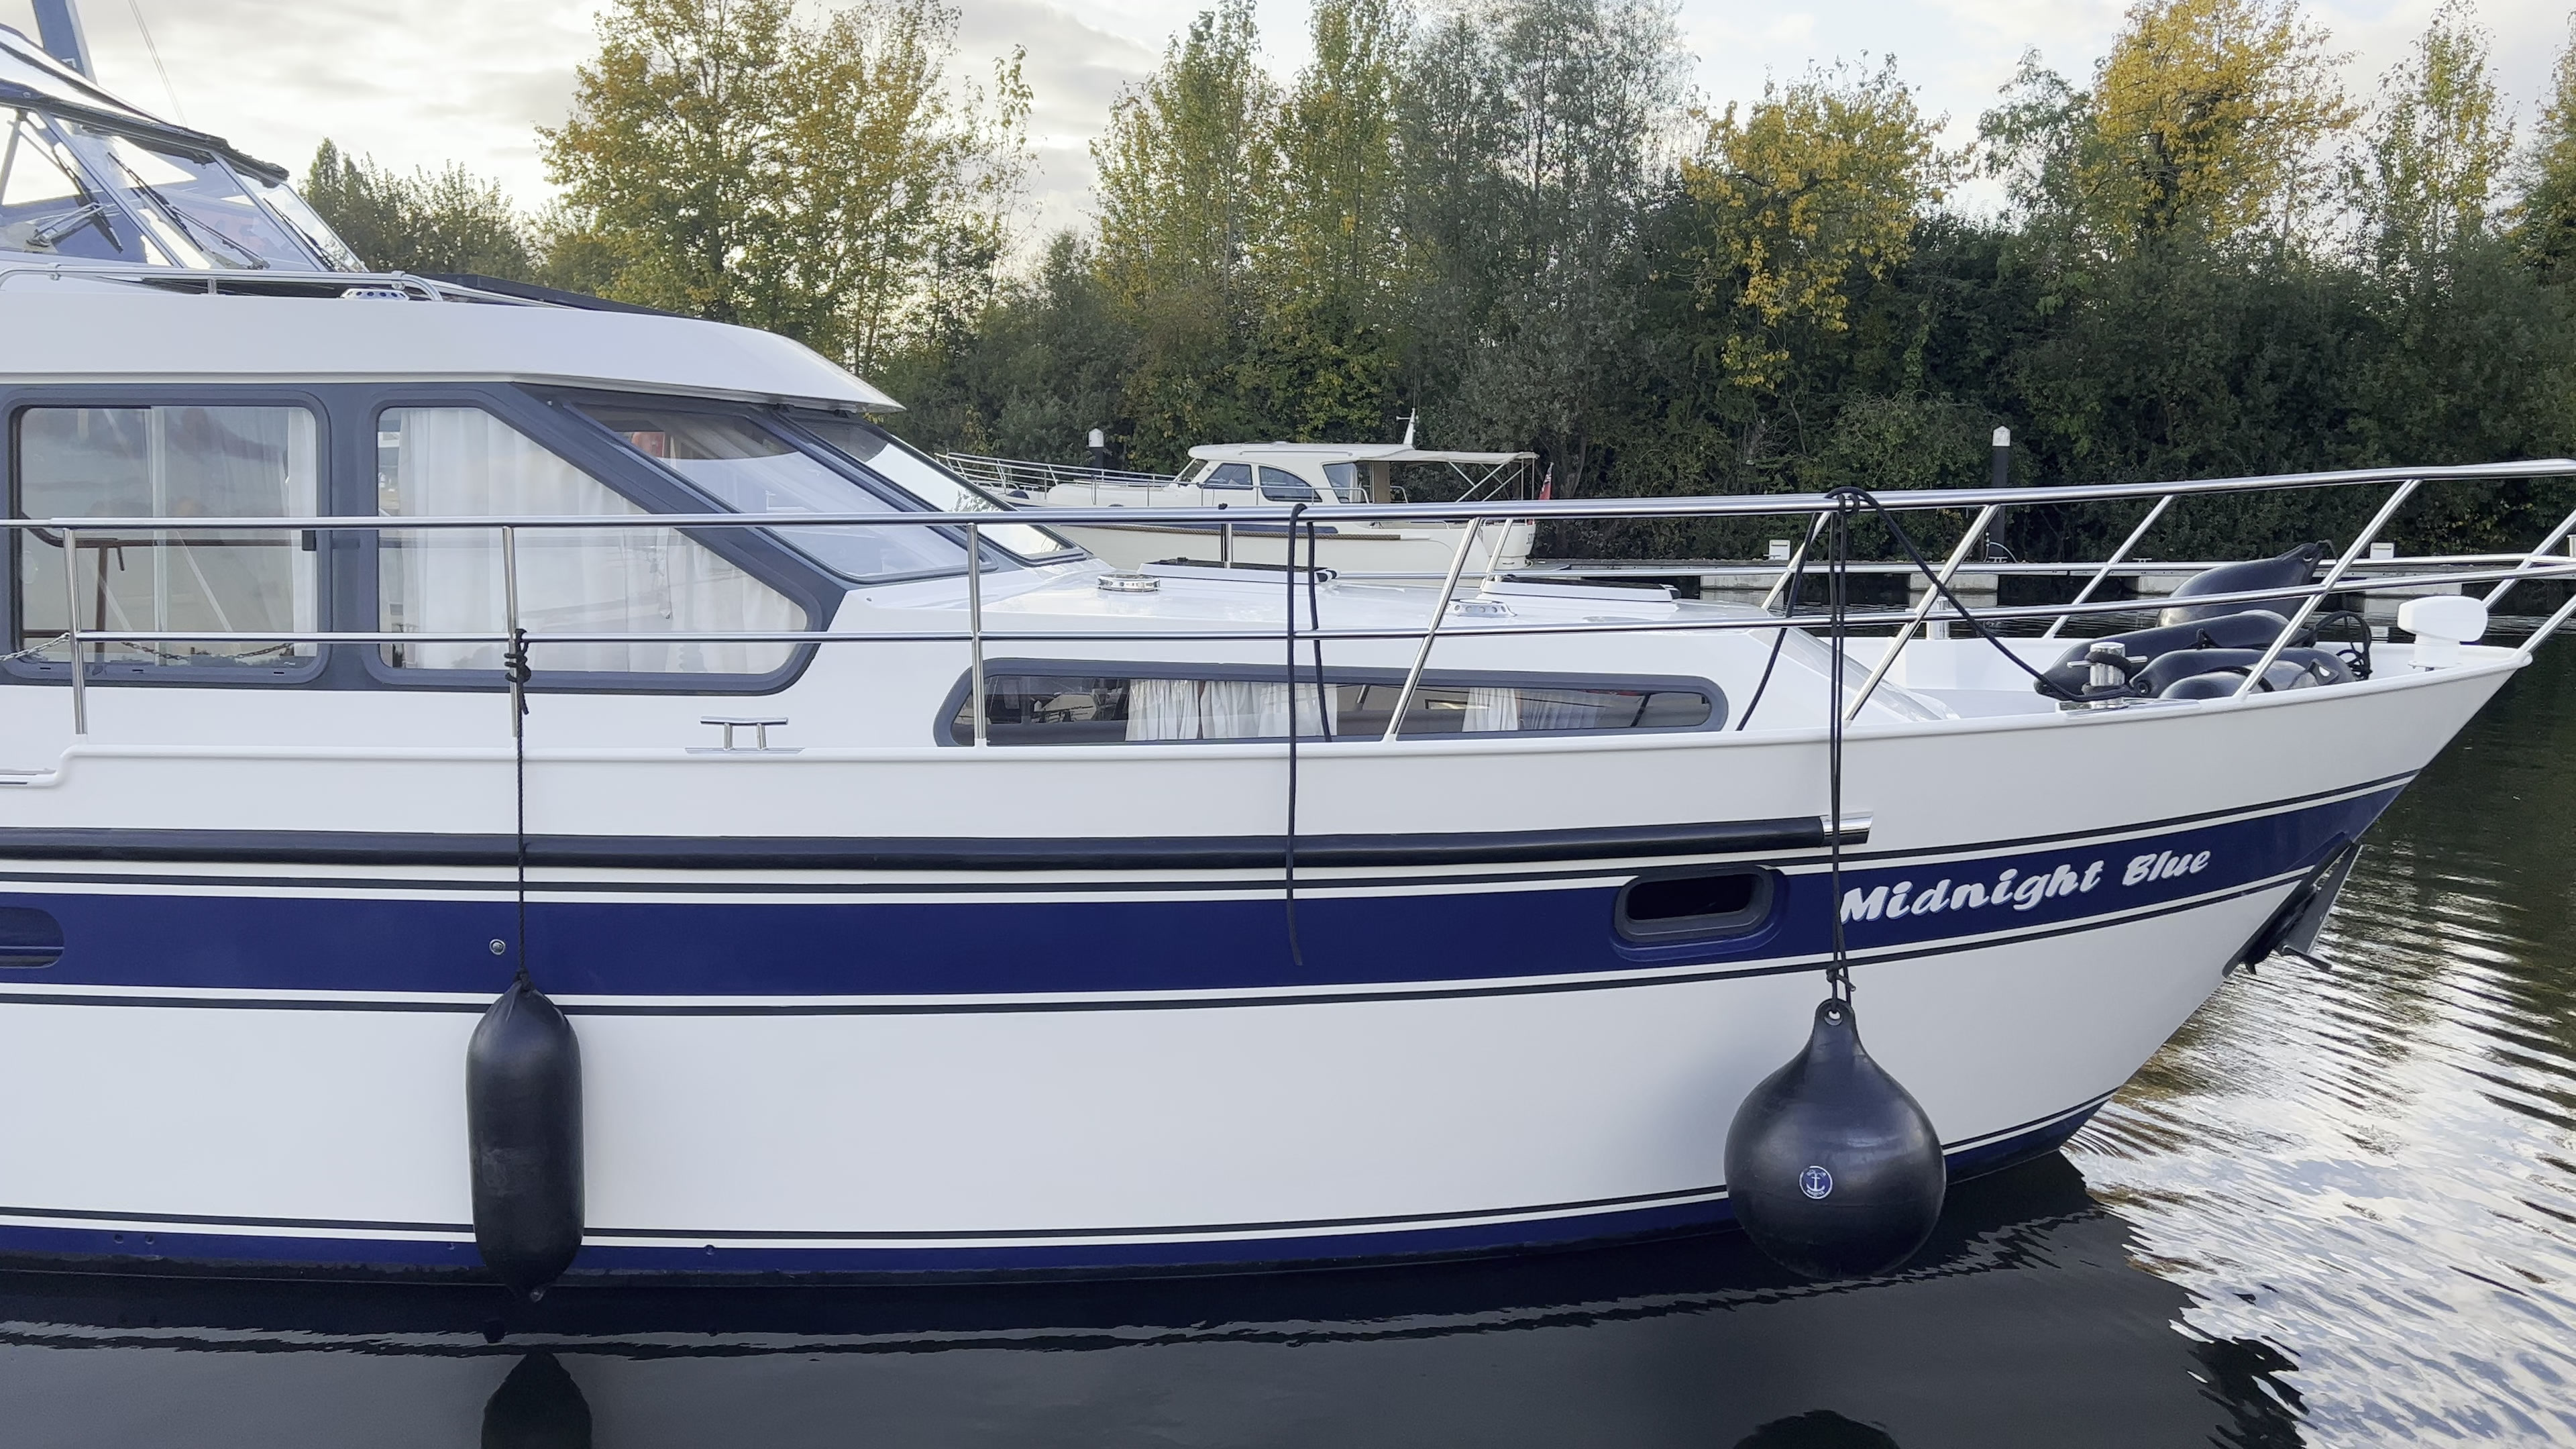
Midnight Blue, the finished Stevens steel cruiser, afloat after restoration by Hull GelTHE FINISHED VESSEL  ·  MIDNIGHT BLUE
The vesselStevens steel motor cruiser
The commissionExtensive cosmetic overhaul
The disciplinesSteel, aluminium, coatings & fairing
The settingPenton Hook Marina · River Thames
The project / 01

More than
a repaint.

Starting condition. An established Stevens steel cruiser with dull paintwork, areas of bubbling and corrosion, and impact damage to the rubbing strake. The radar arch, deck surfaces and exterior fittings also required attention.

Restoration undertaken. The rubbing-strake assembly was dismantled and repaired, affected steel prepared and recoated, and the radar arch and surrounding structures restored. The wider programme included renewed non-slip decking, exterior paint repairs, surface correction, polishing and underwater coatings.

The result. A coherent, renewed exterior finish that respects the cruiser's original character. The vessel was reassembled and relaunched. The chapters below show the faults, preparation and finishing details behind that result.

Chapter 01  /  Documented restoration

The rubbing strake.
Repairing what lies beneath.

A section of work that illustrates why successful refinishing begins with understanding and resolving the underlying problem.

Understanding the construction

Midnight Blue has an earlier Smelne rubbing-strake arrangement with an outer section and an inner retaining section, predating the later adoption of solid-block HAKORIT strakes on subsequent vessels.

Over years of use, impacts had distorted the assembly and some supporting bolts. The strake had lifted away from the hull in places, providing a route for water to reach the steel and fixings beneath.

The task was to retain and restore the vessel's original arrangement while dealing properly with the damage and corrosion.

01 / The original problem

Where water had found a way in.

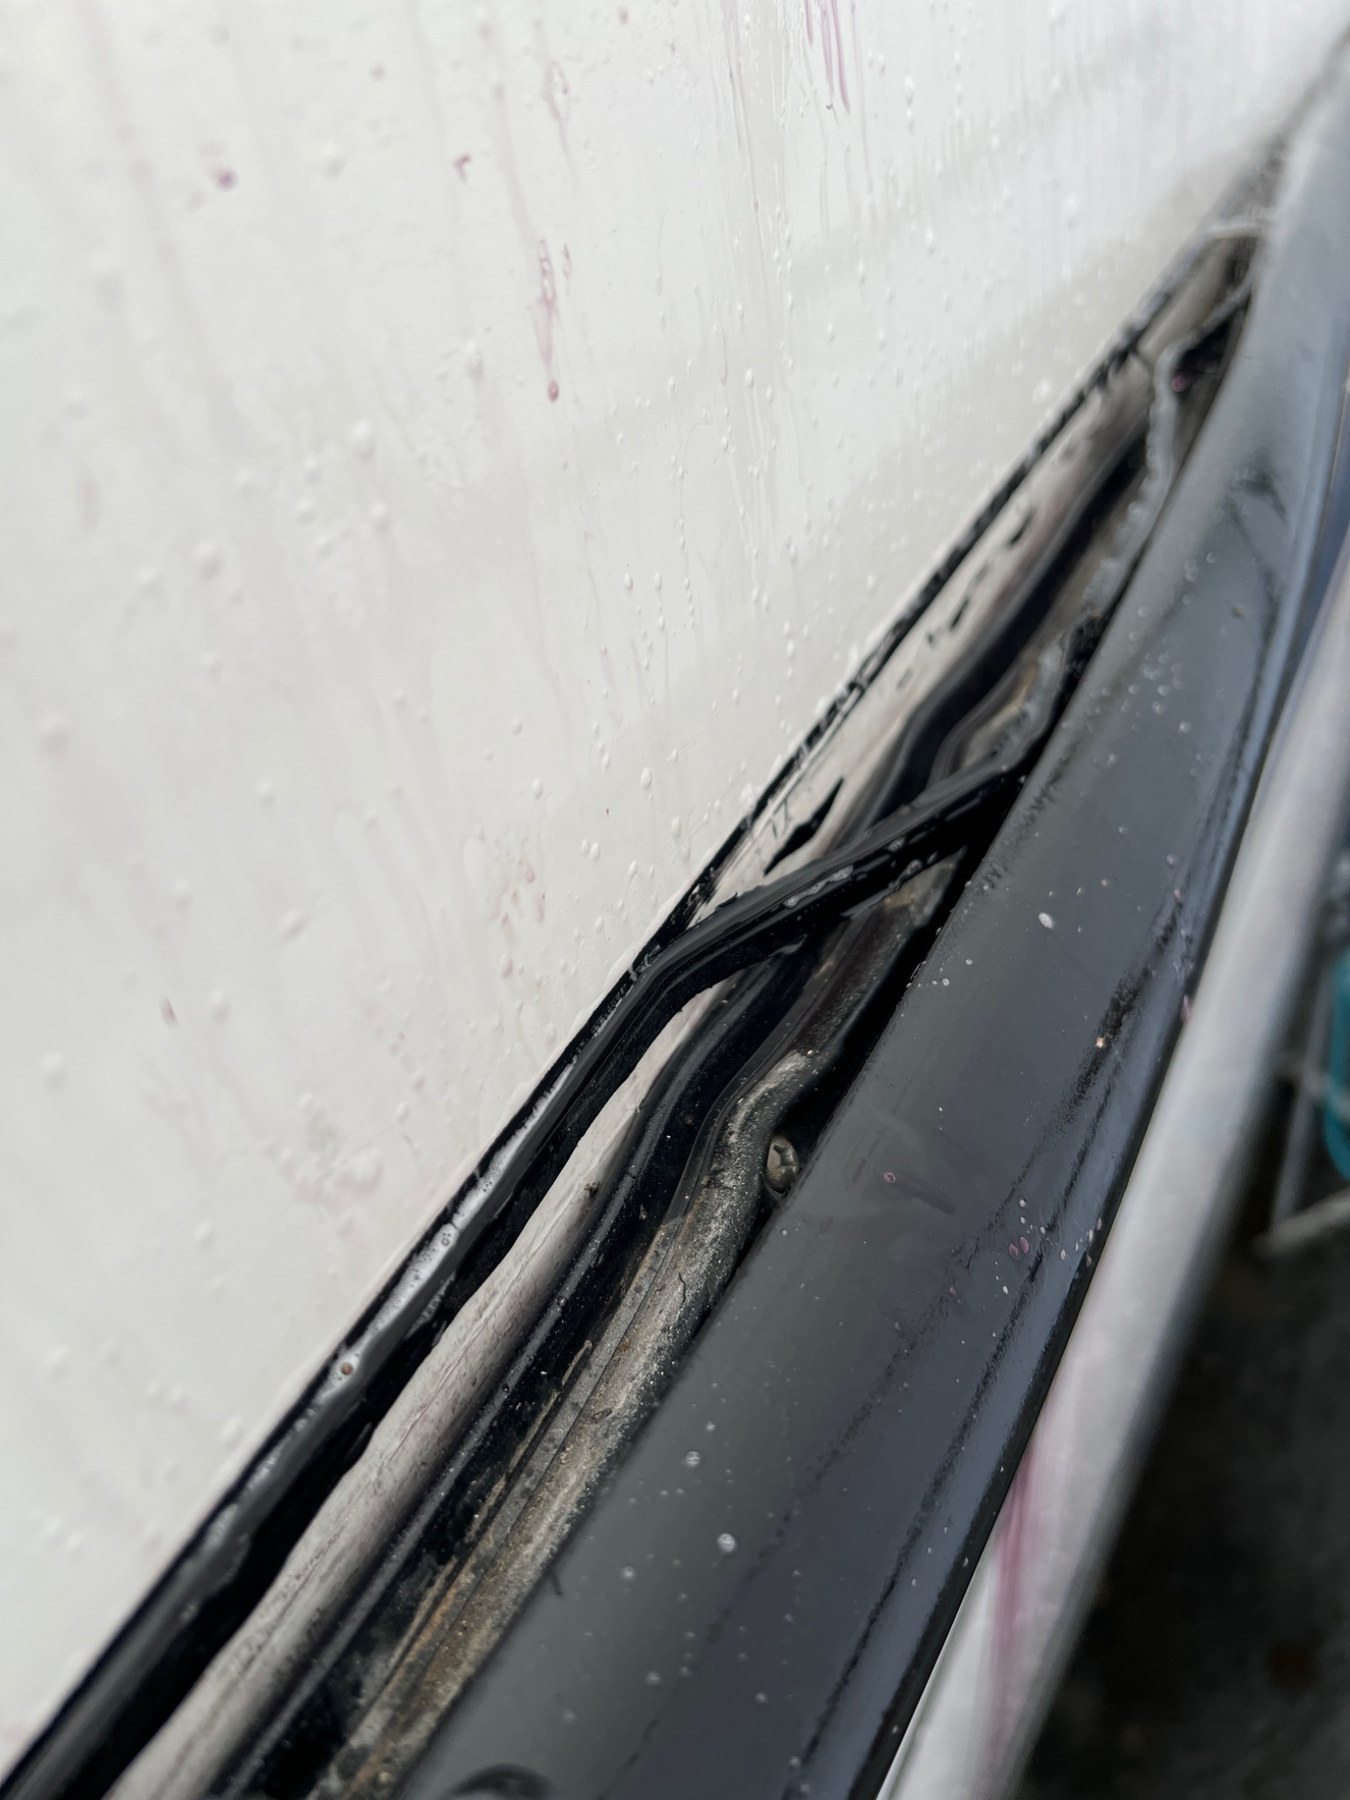
The strake had pulled away from the hull, creating a route for water to reach the mounting area.
Separated strakeThe strake had pulled away from the hull, creating a route for water to reach the mounting area.
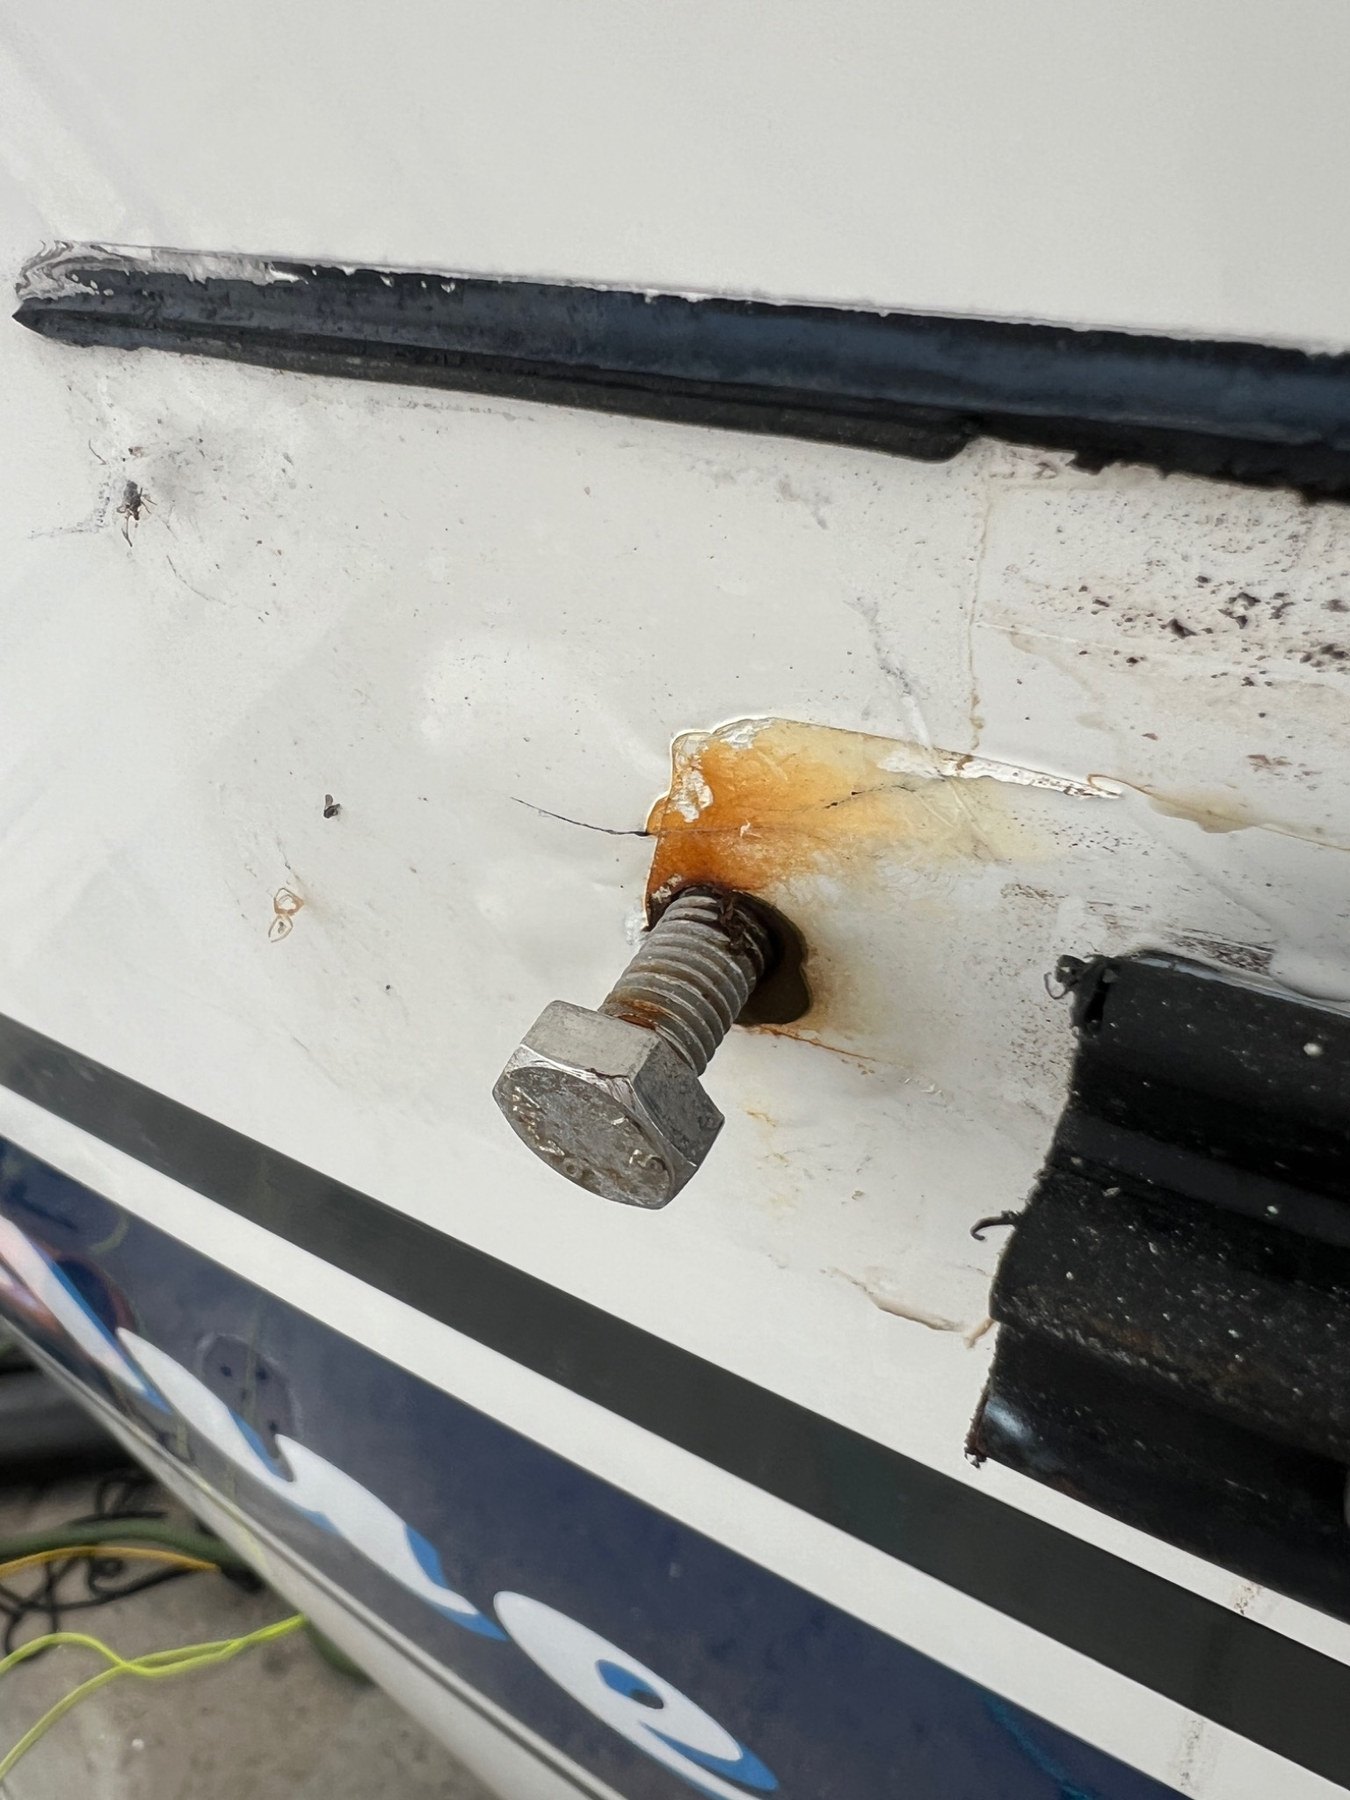
An end-cap fixing with rust staining, affected threads and bubbling paintwork.
Corrosion at the end capAn end-cap fixing with rust staining, affected threads and bubbling paintwork.
02 / Dismantling & assessment

Exposing the true extent.

With the outer strake removed, the inner retaining section and corrosion around the fixing positions could be inspected. The visible damage was only part of the problem.
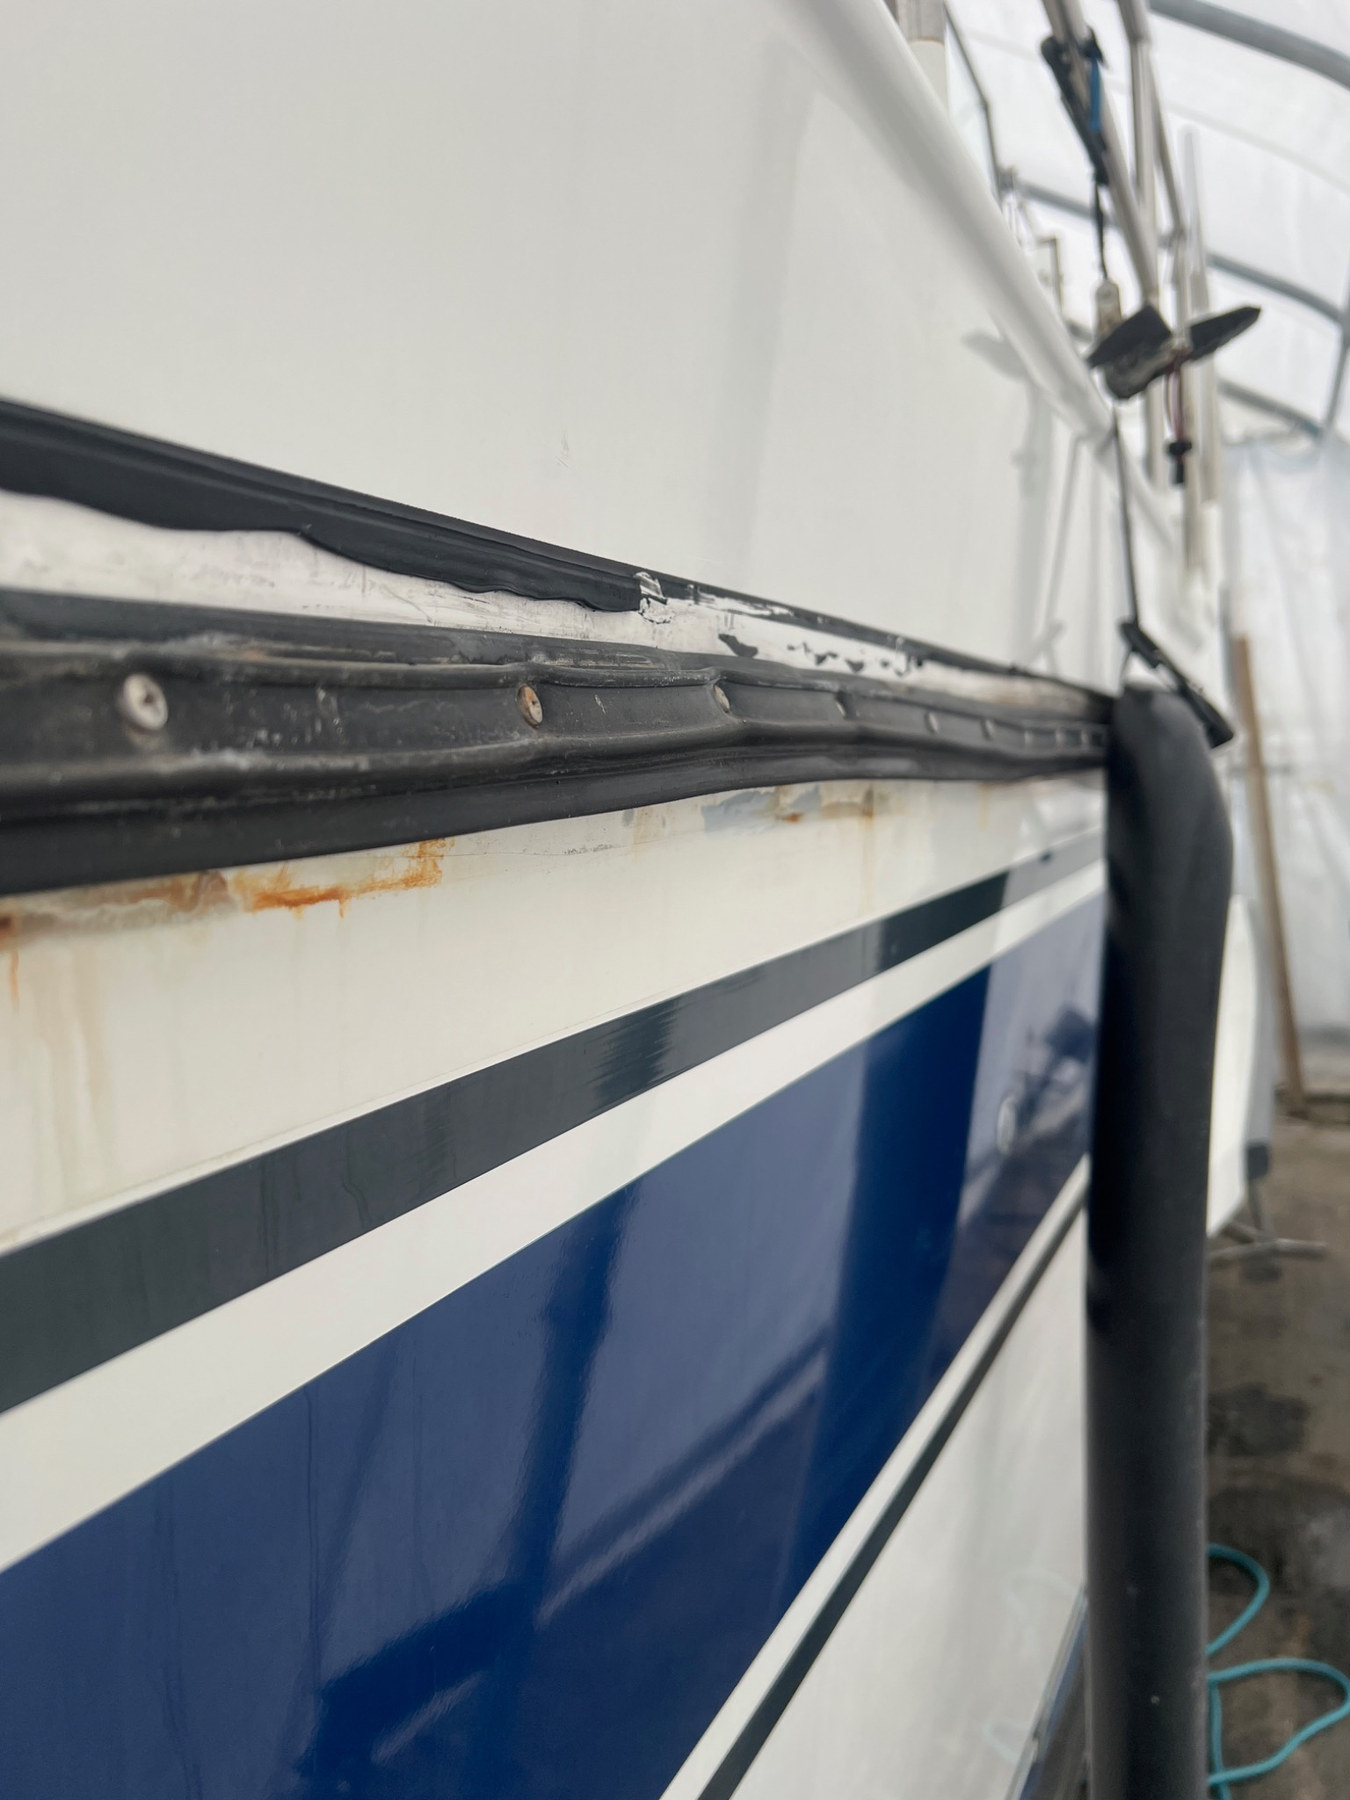
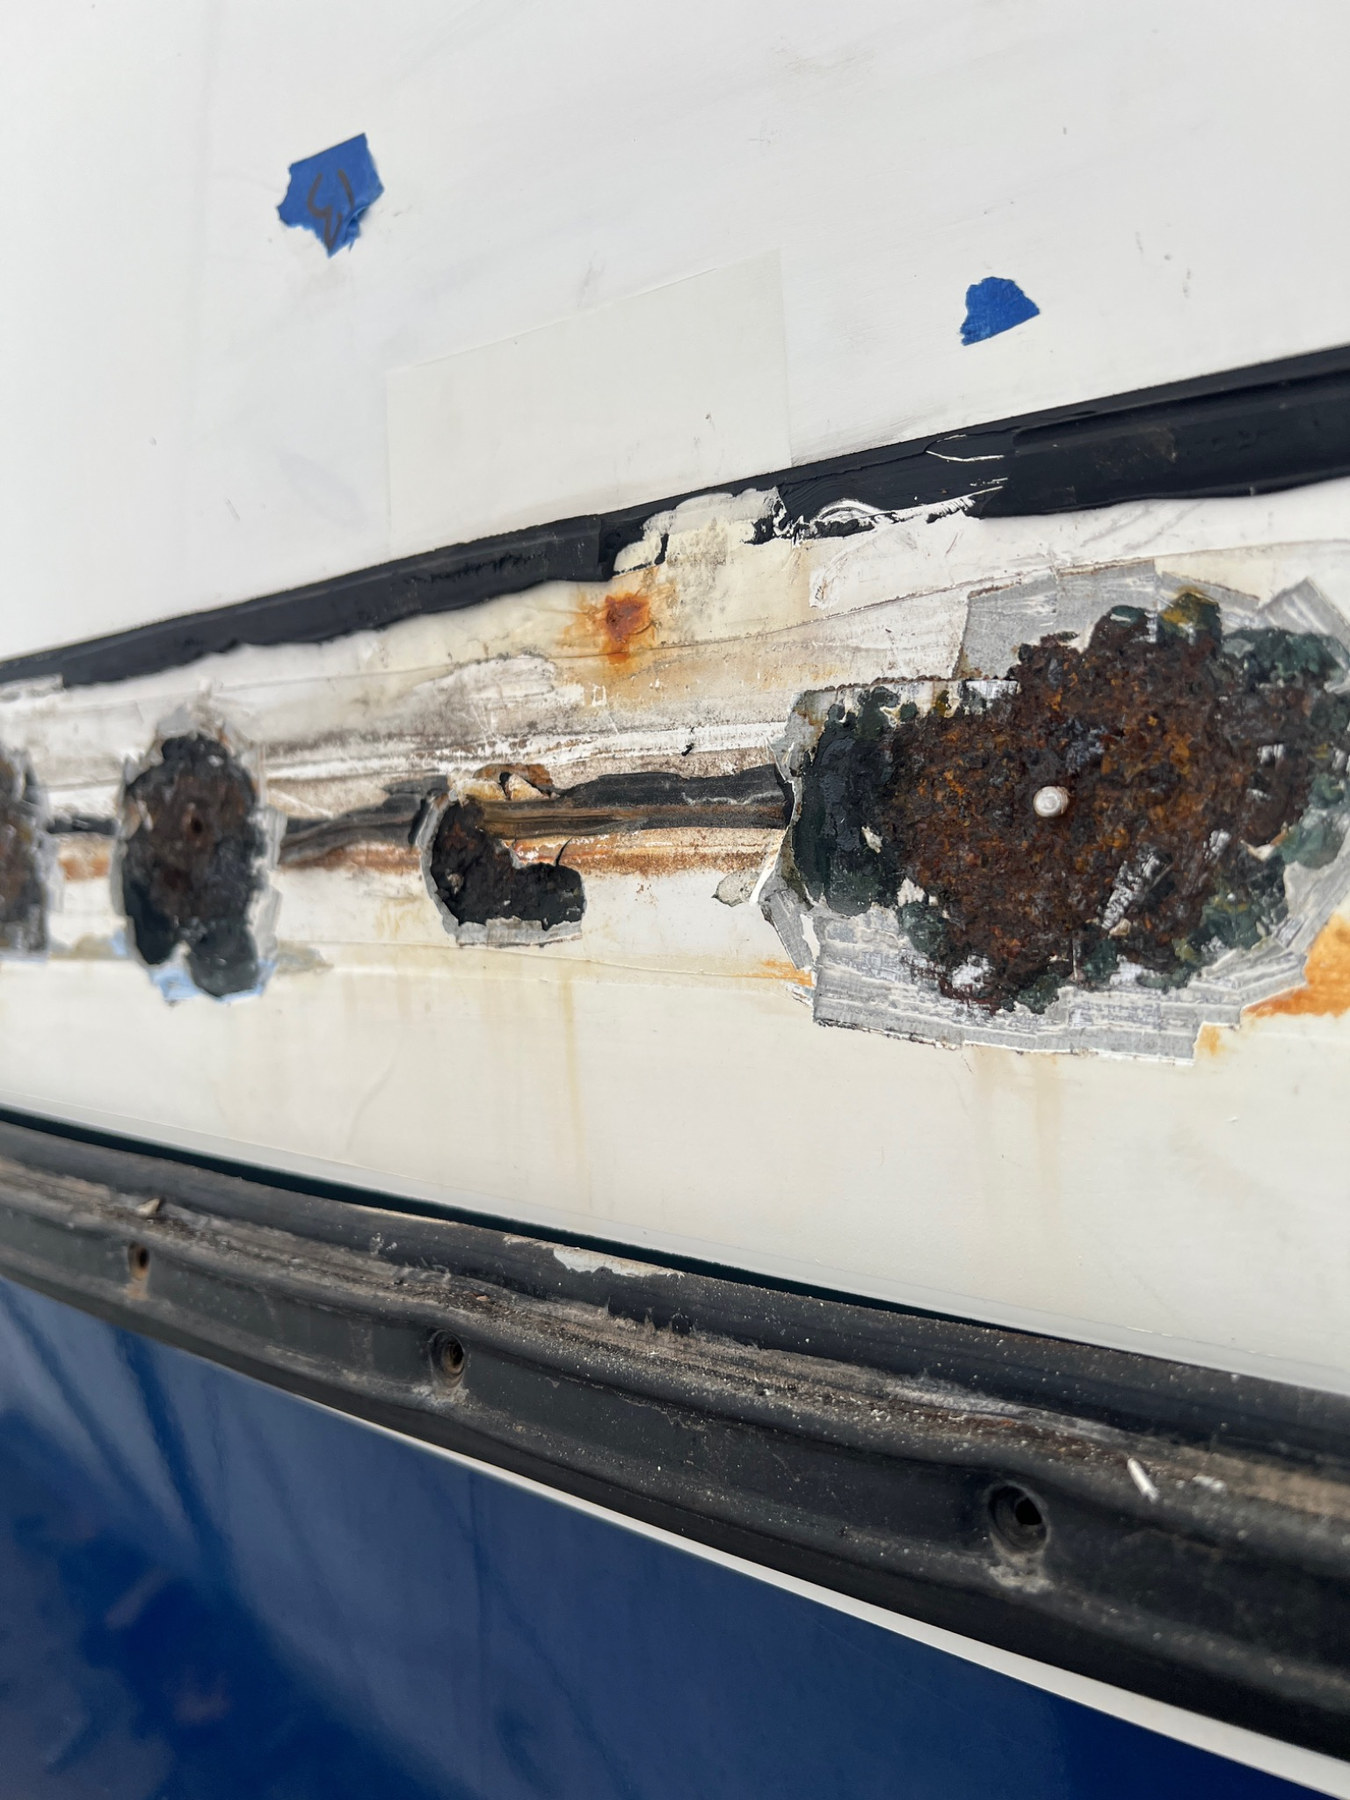
The outer rubber section removed, revealing the inner retaining arrangement and staining around the fixings.
Outer strake removedThe outer rubber section removed, revealing the inner retaining arrangement and staining around the fixings.
Concentrated corrosion became apparent around several mounting points as work began to return the steel to a sound surface.
Corroded steel exposedConcentrated corrosion became apparent around several mounting points as work began to return the steel to a sound surface.
03 / Steel preparation

From corrosion to a prepared substrate.

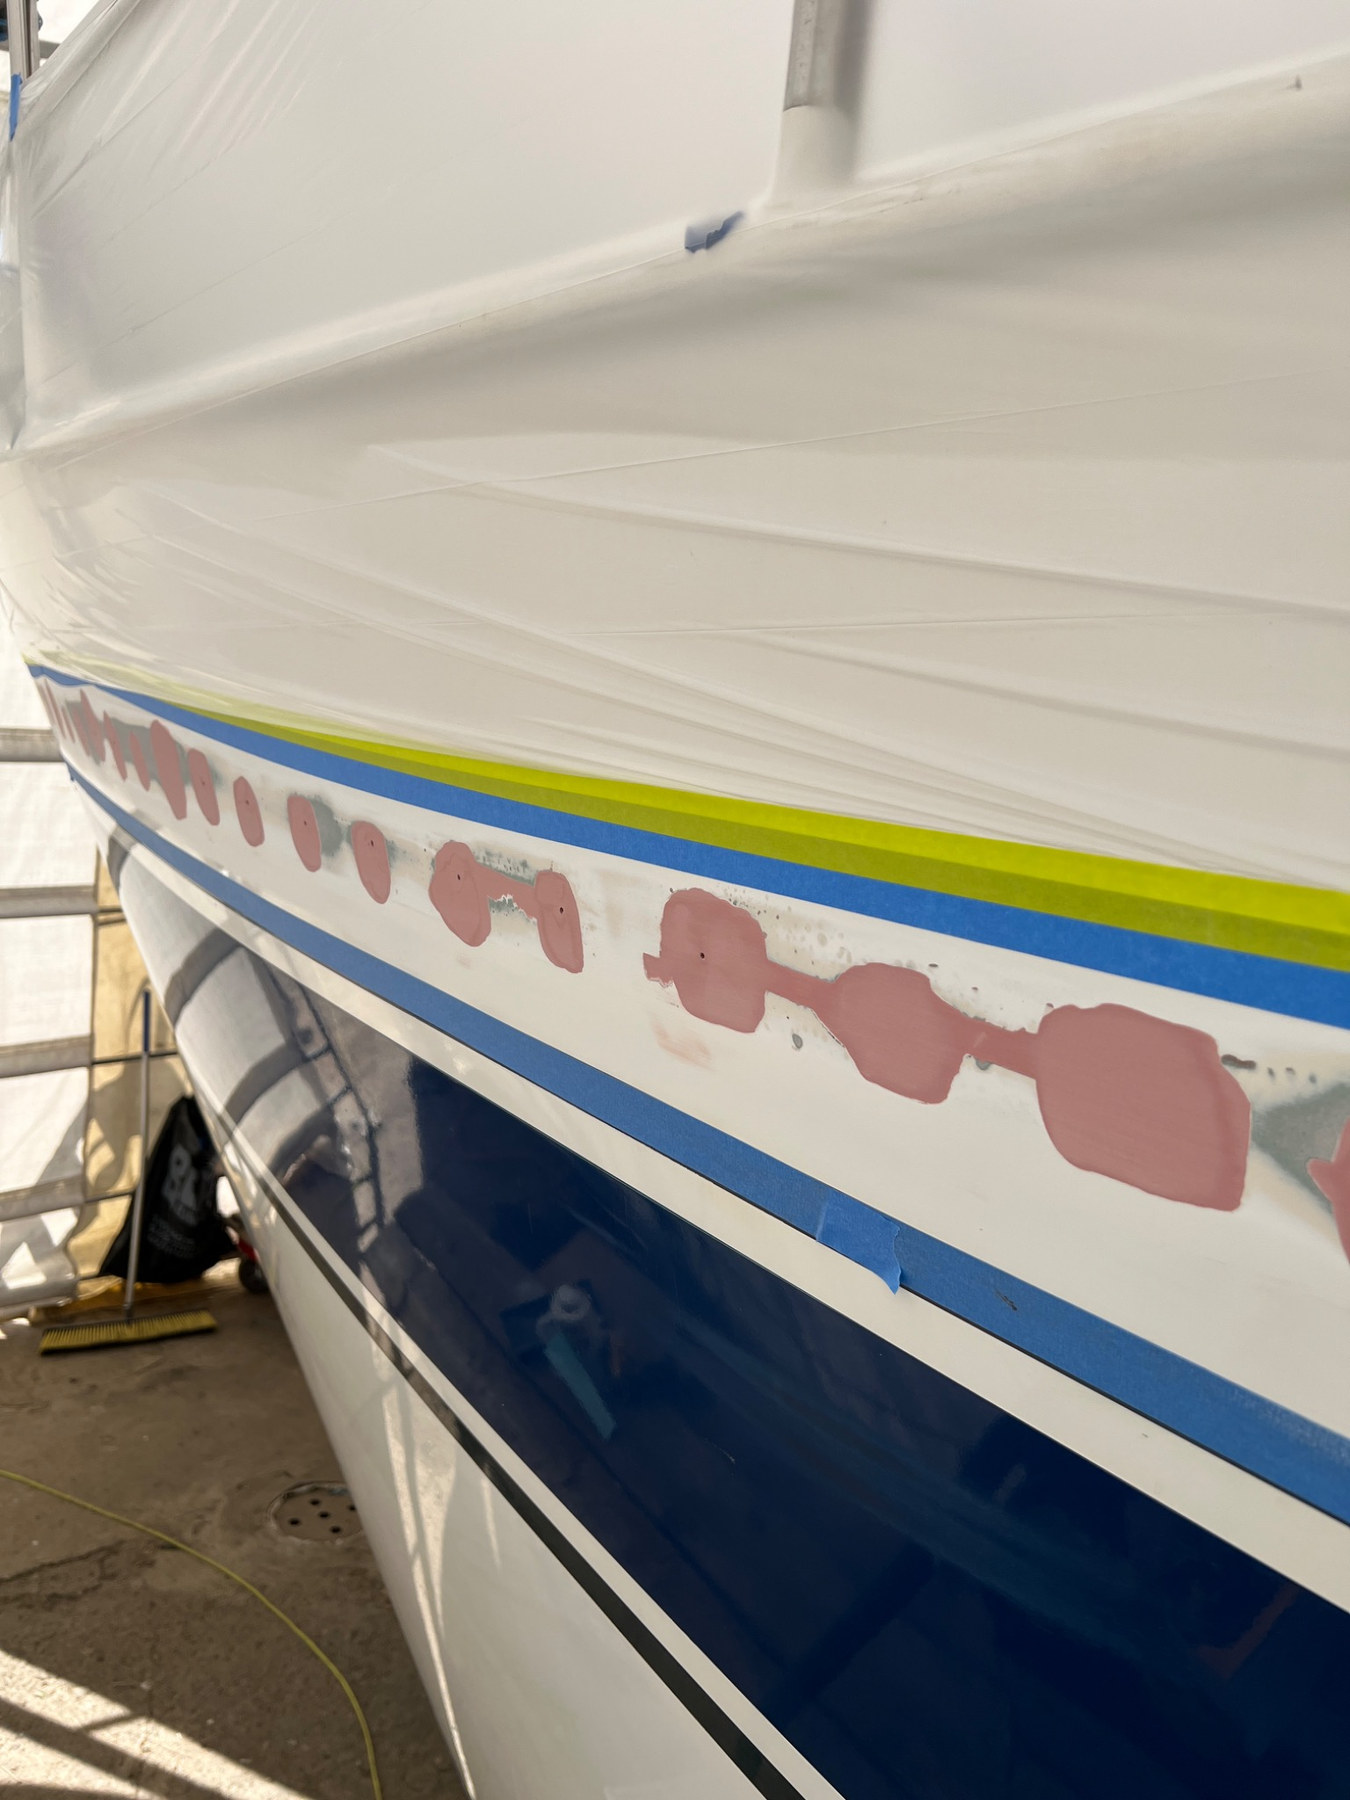
The affected areas were worked back to clean steel before receiving substrate primer. Filling and fairing followed to restore a level surface ready for the finishing system.
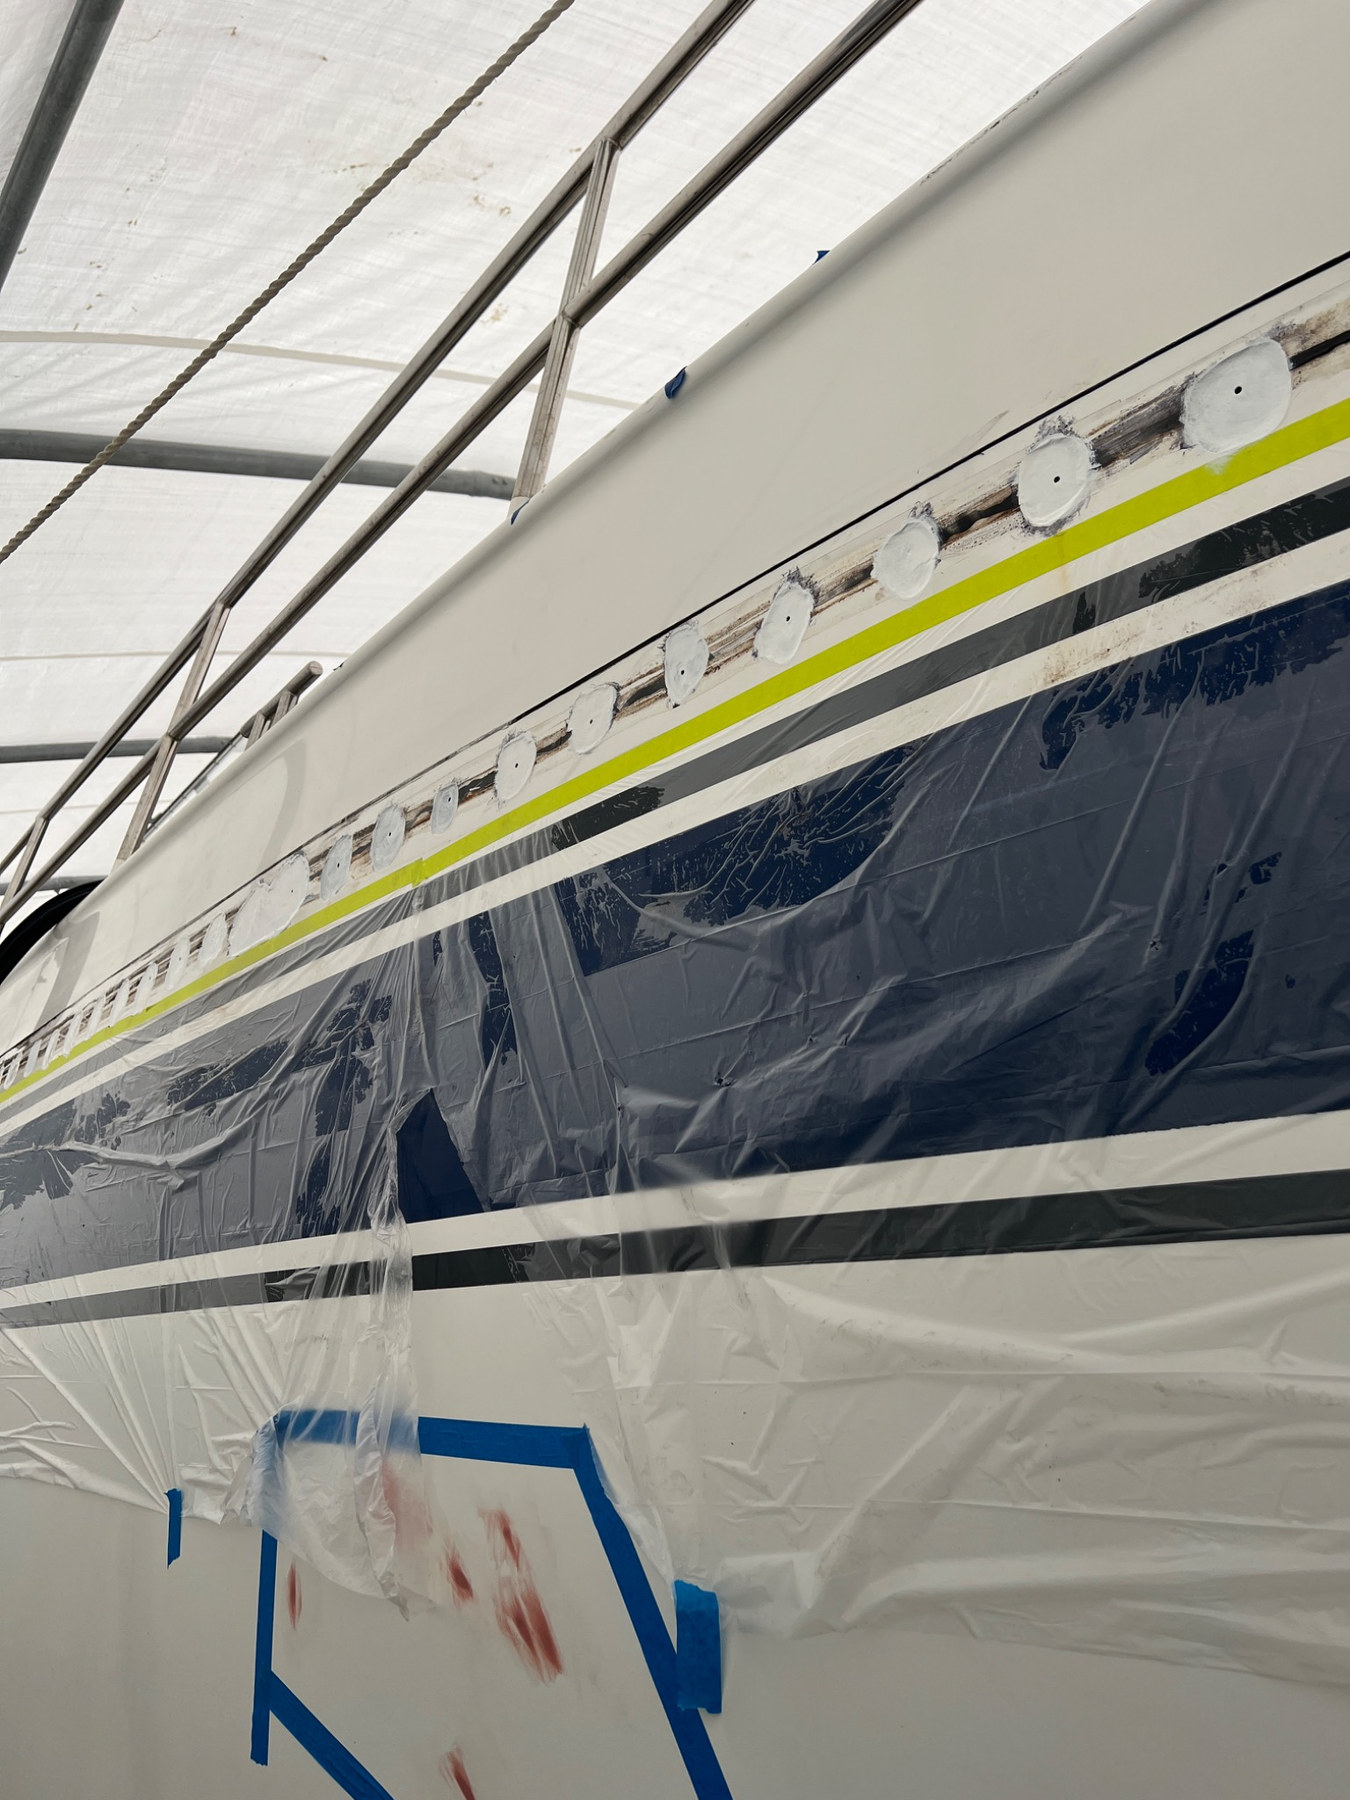
Corrosion-treated fixing positions after preparation and application of the initial substrate primer.
First substrate-primer coatsCorrosion-treated fixing positions after preparation and application of the initial substrate primer.
Localised filled areas after sanding, in preparation for subsequent coating stages.
Filling and fairingLocalised filled areas after sanding, in preparation for subsequent coating stages.
04 / The details that matter

Restoring the fixings. Preparing for paint.

Corrosion had affected the threaded mounting points. During fairing, a tap was used to rework the threads and keep them clear of filler. Further substrate preparation, including Awlgrip 545 primer on selected areas, brought the repair towards its paint-ready stage.
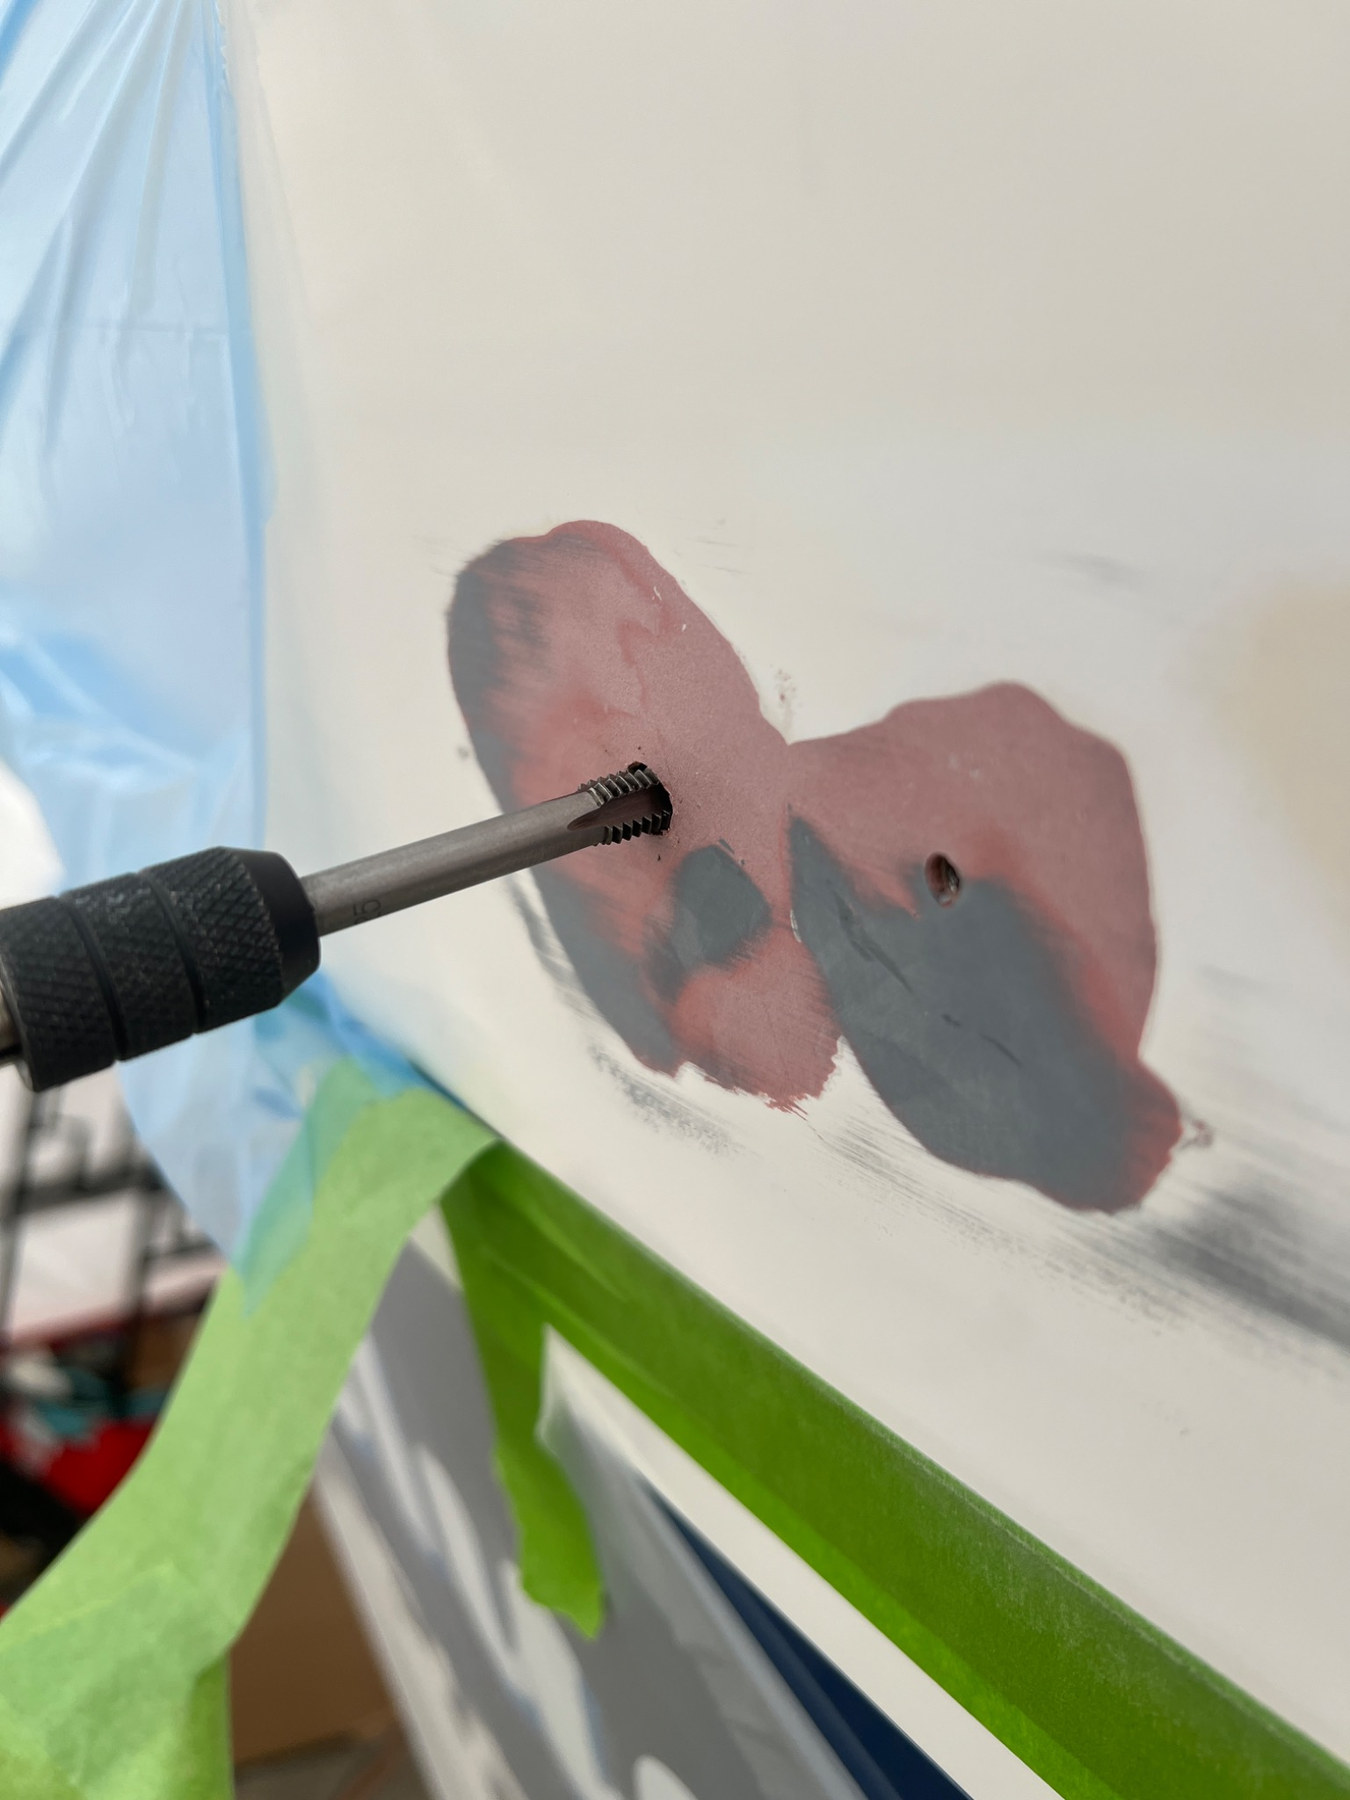
A tap being used to rework and clear the mounting threads during the fairing process.
Thread care during fairingA tap being used to rework and clear the mounting threads during the fairing process.
The longer run of prepared mounting positions, with substrate primer, filler and 545 primer stages.
Primer and coating preparationThe longer run of prepared mounting positions, with substrate primer, filler and 545 primer stages.
05 / Reassembly & the finished result

Original character. Renewed protection.

After refinishing, the original rubbing-strake assembly was reinstalled using a high-quality marine sealant to help prevent water getting behind it again. The completed detail preserves the vessel's design while addressing the corrosion beneath the surface.
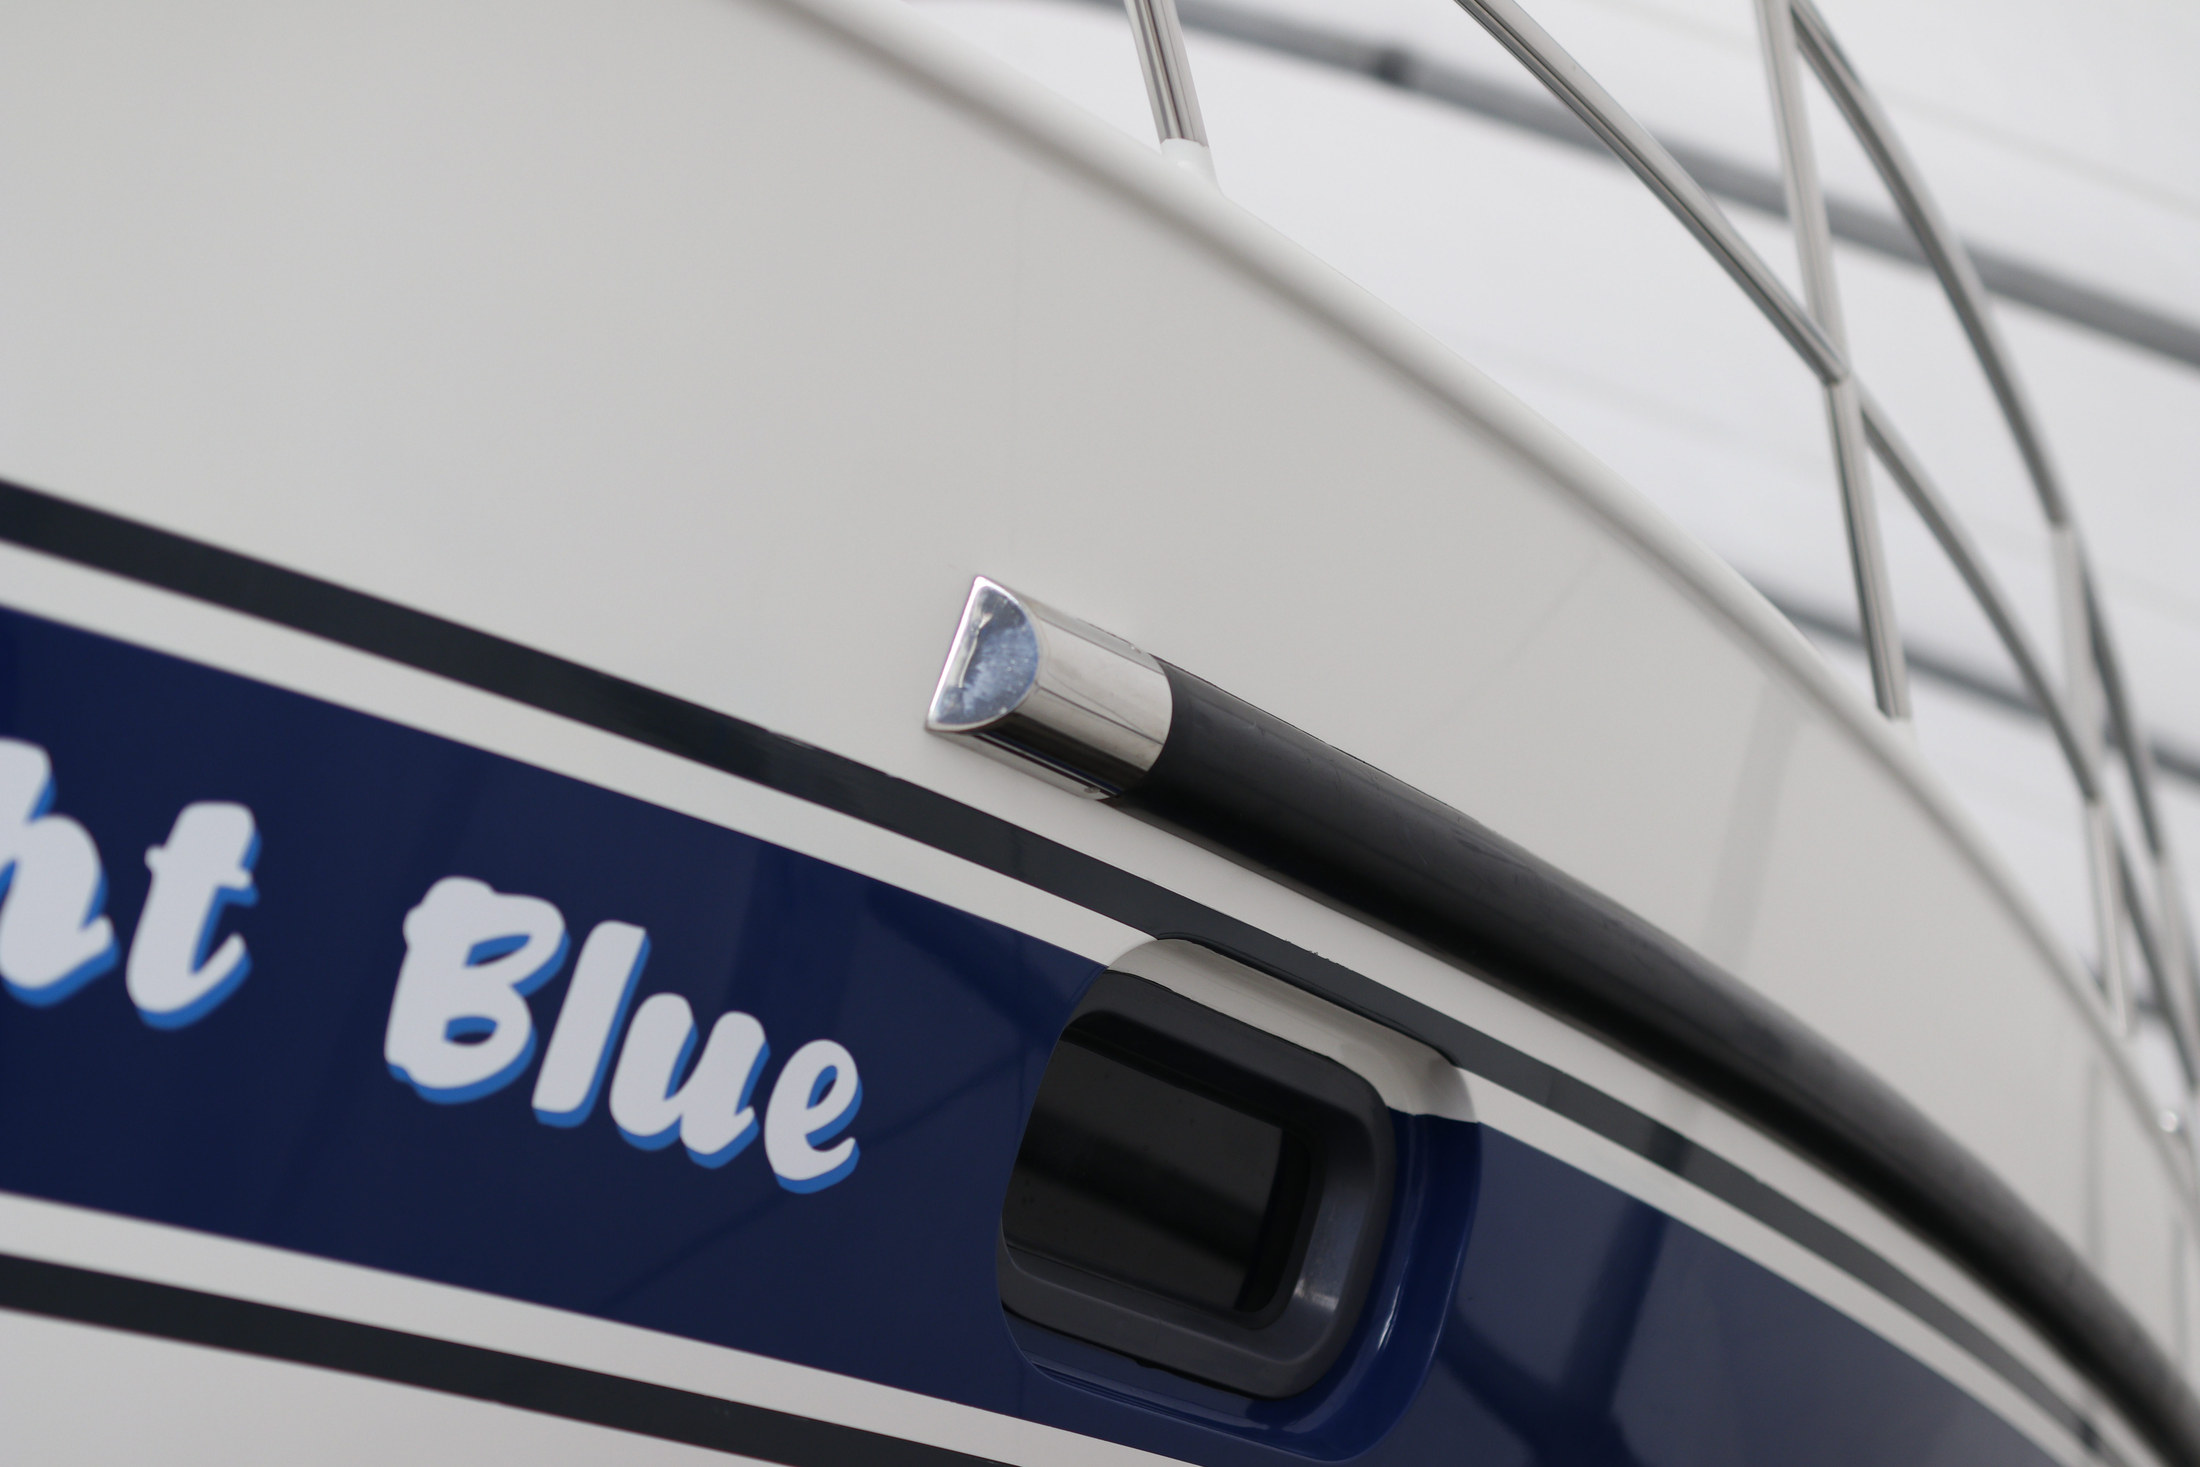
The finished rubbing strake with its metal end cap and surrounding repainted surfaces.
Finished detailThe completed rubbing strakeThe finished rubbing strake with its metal end cap and surrounding repainted surfaces.
Behind the finish

Not simply a cosmetic improvement: the repair dealt with the damaged assembly, corrosion around the fixing points and the water-entry route before the final finish was restored.

Chapter 02  /  Radar arch & upper-deck restoration

The radar arch.
More than meets the eye.

Restoring the arch meant addressing its deteriorated surfaces alongside the surrounding structures that house the hydraulic mechanisms. The non-slip deck and seat-base finishes were renewed as part of the same wider overhaul.

One connected restoration

Coatings had deteriorated around the radar arch, its supports, fittings and hydraulic mechanism housings. With equipment and access panels removed, the full extent of the local surface work became visible.

Selected areas were worked back to clean aluminium where required. Preparation and fairing then brought the arch and its surrounding structures towards a consistent finish.

The photographs also show the non-slip deck renewal and the refinished seat-base fittings, completing the appearance of the upper deck.

01 / Condition & access

What the fittings had concealed.

Deteriorated coatings were visible around mounts, pivots and access openings. Removing equipment exposed the areas that needed attention and allowed the adjoining hydraulic mechanism housings to be included in the restoration.
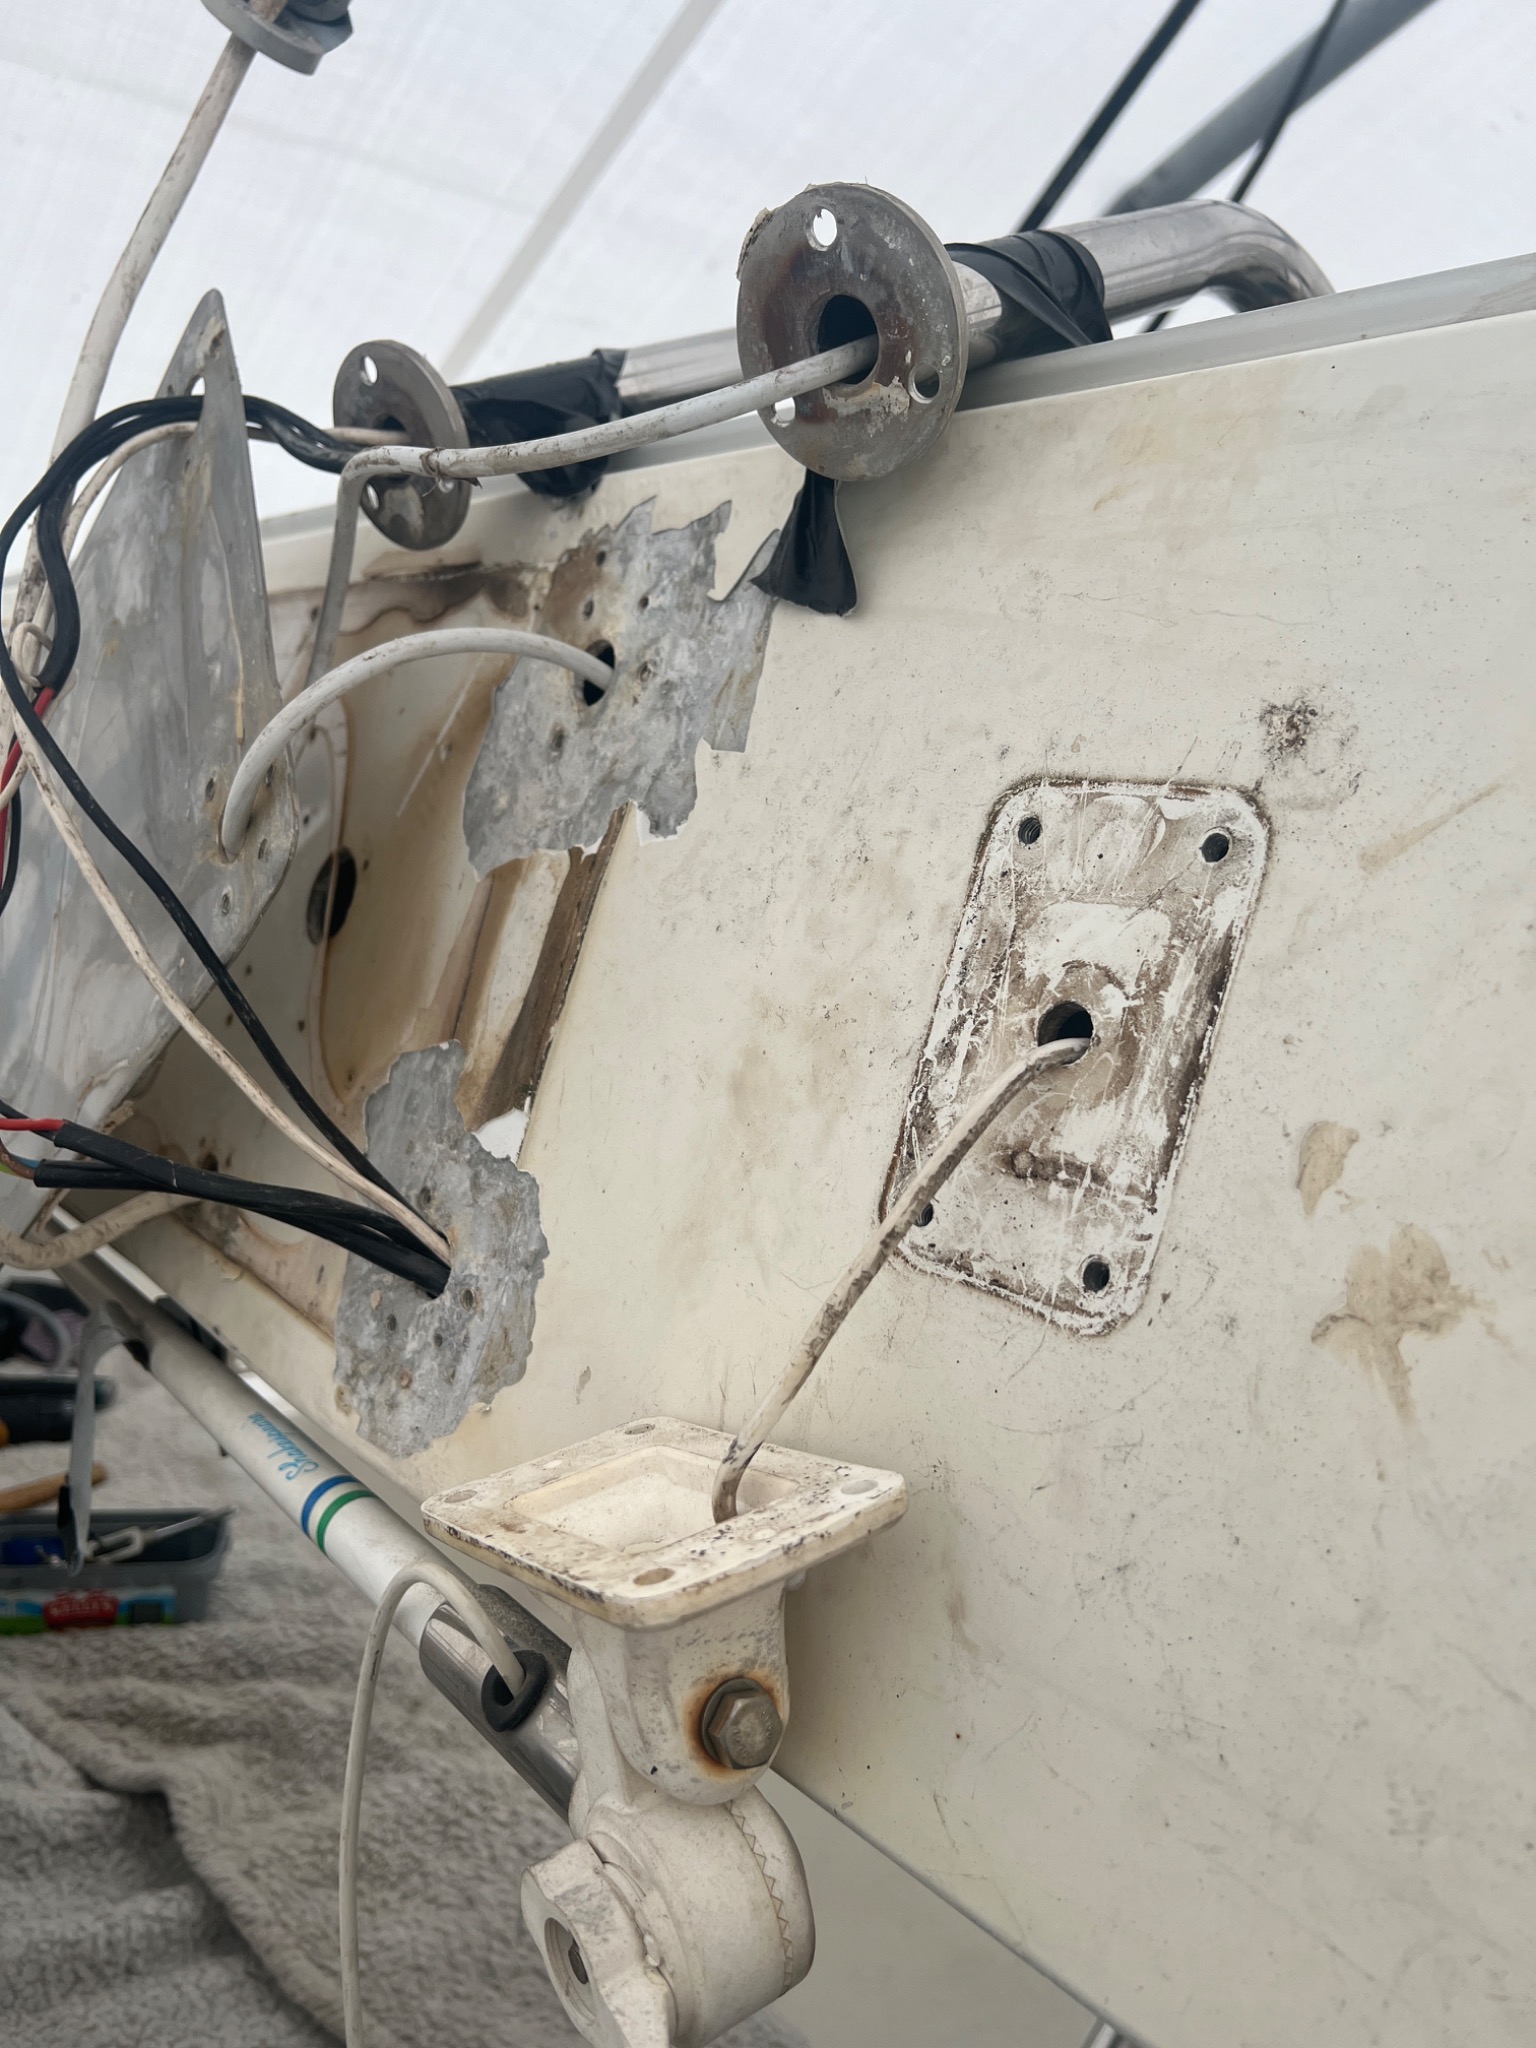
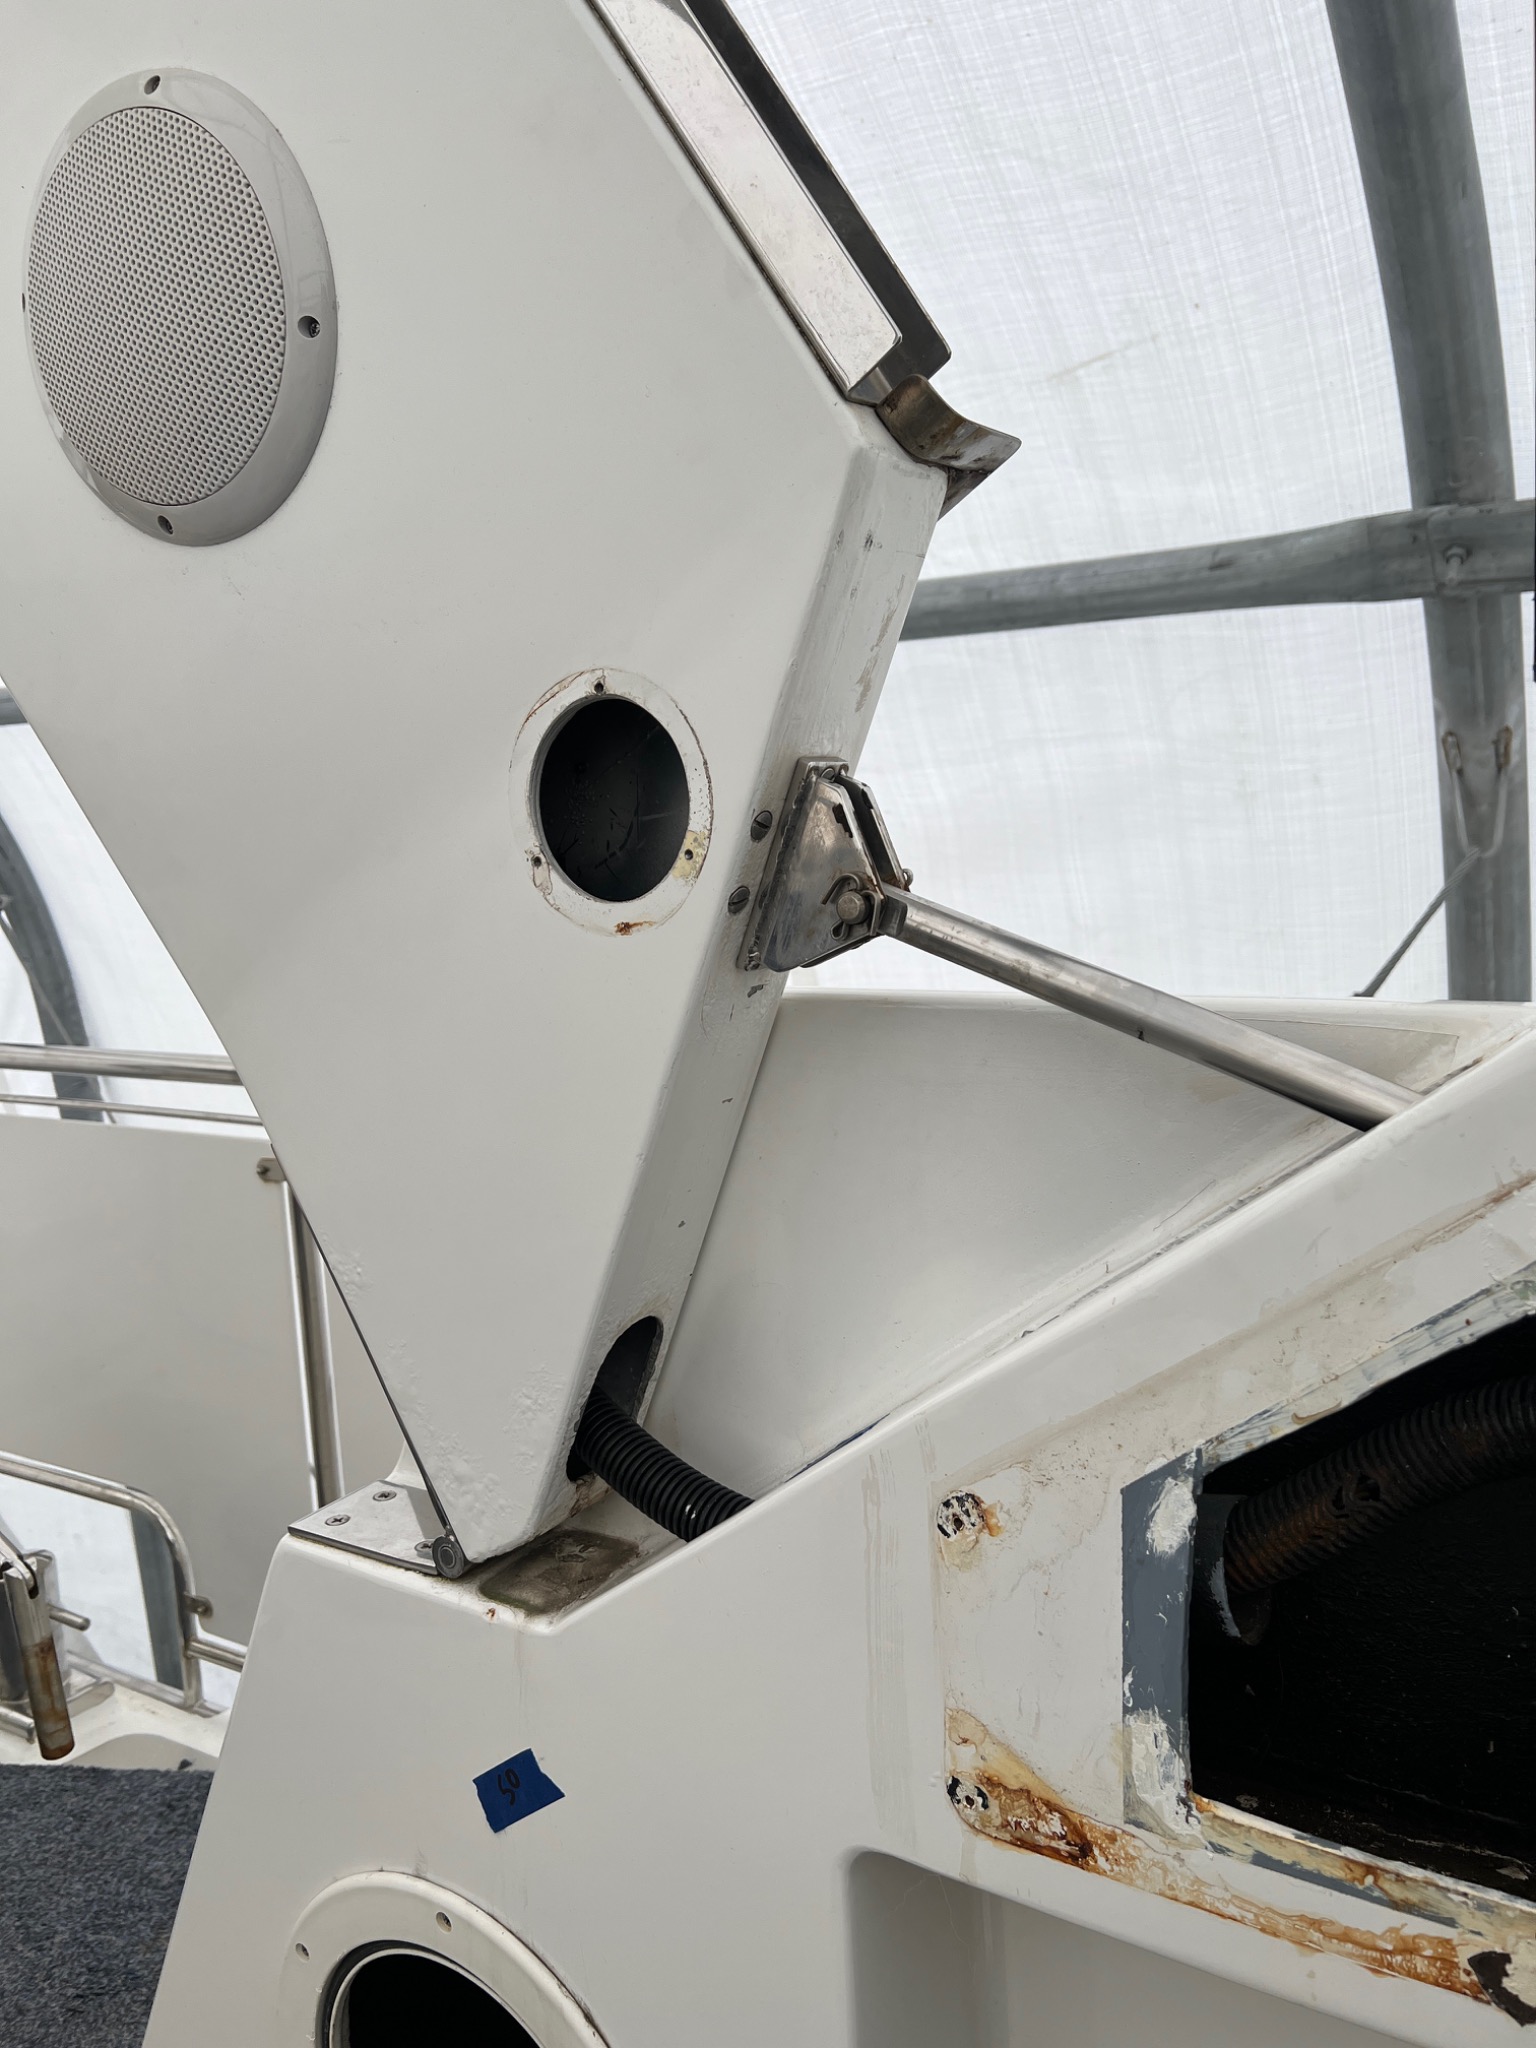
The arch with equipment and mounting plates removed, exposing areas of coating deterioration around cables and fixing points.
Fittings removedThe arch with equipment and mounting plates removed, exposing areas of coating deterioration around cables and fixing points.
The arch support, pivot arrangement and adjacent housing before restoration, with deterioration visible at exposed edges.
Arch support and mechanism housingThe arch support, pivot arrangement and adjacent housing before restoration, with deterioration visible at exposed edges.
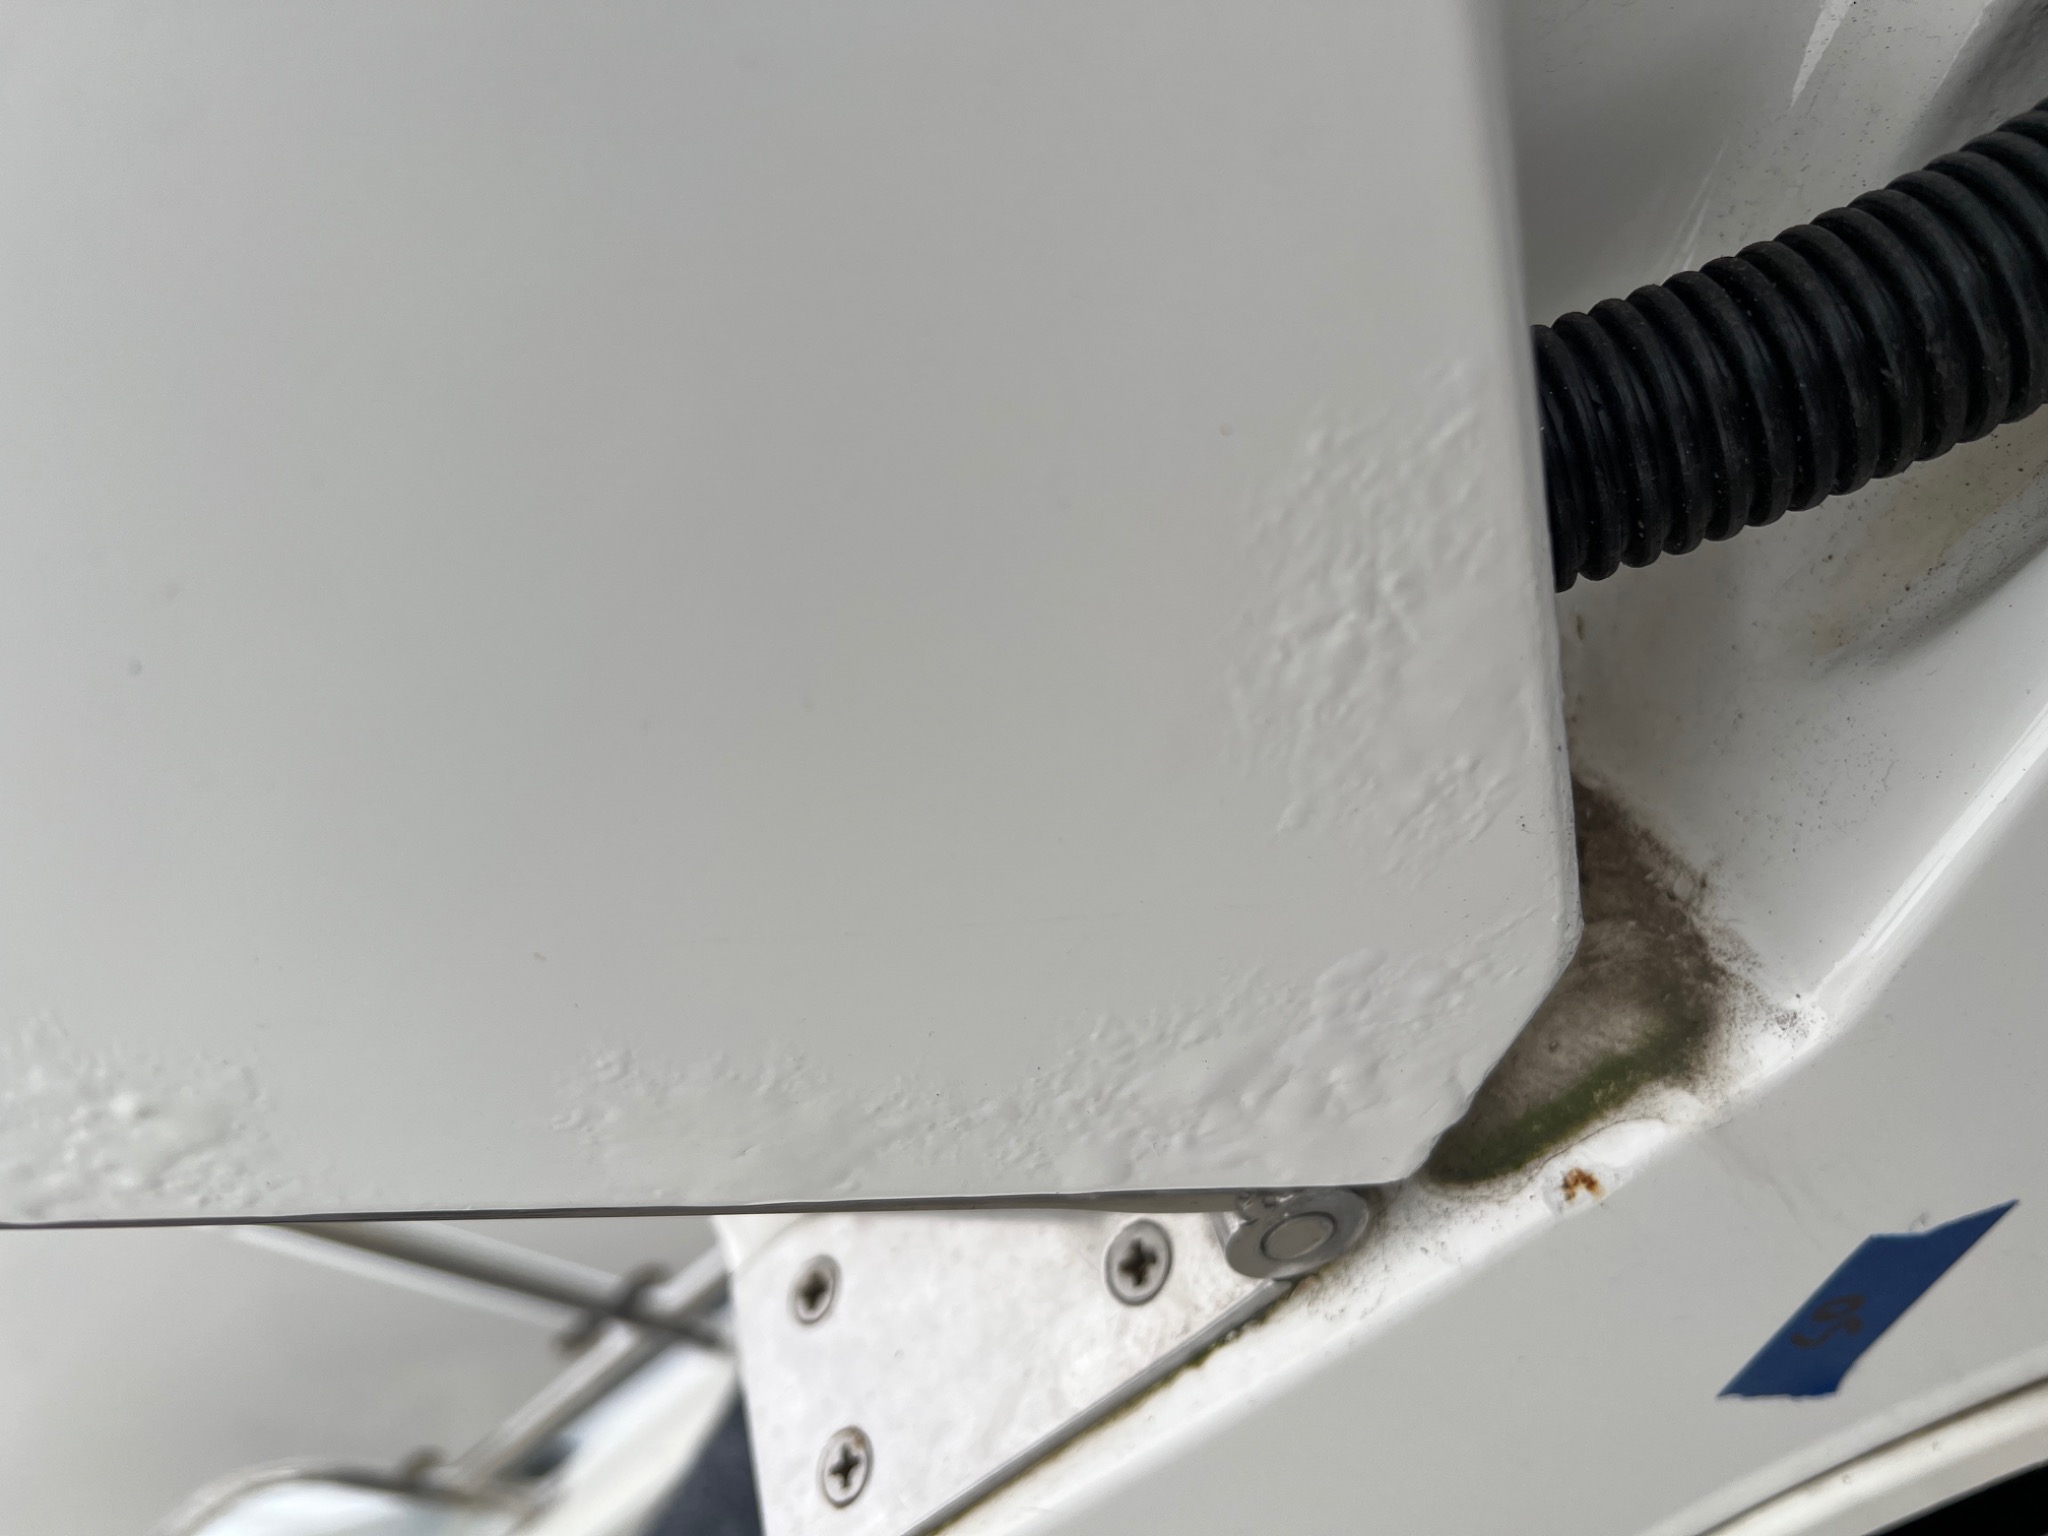
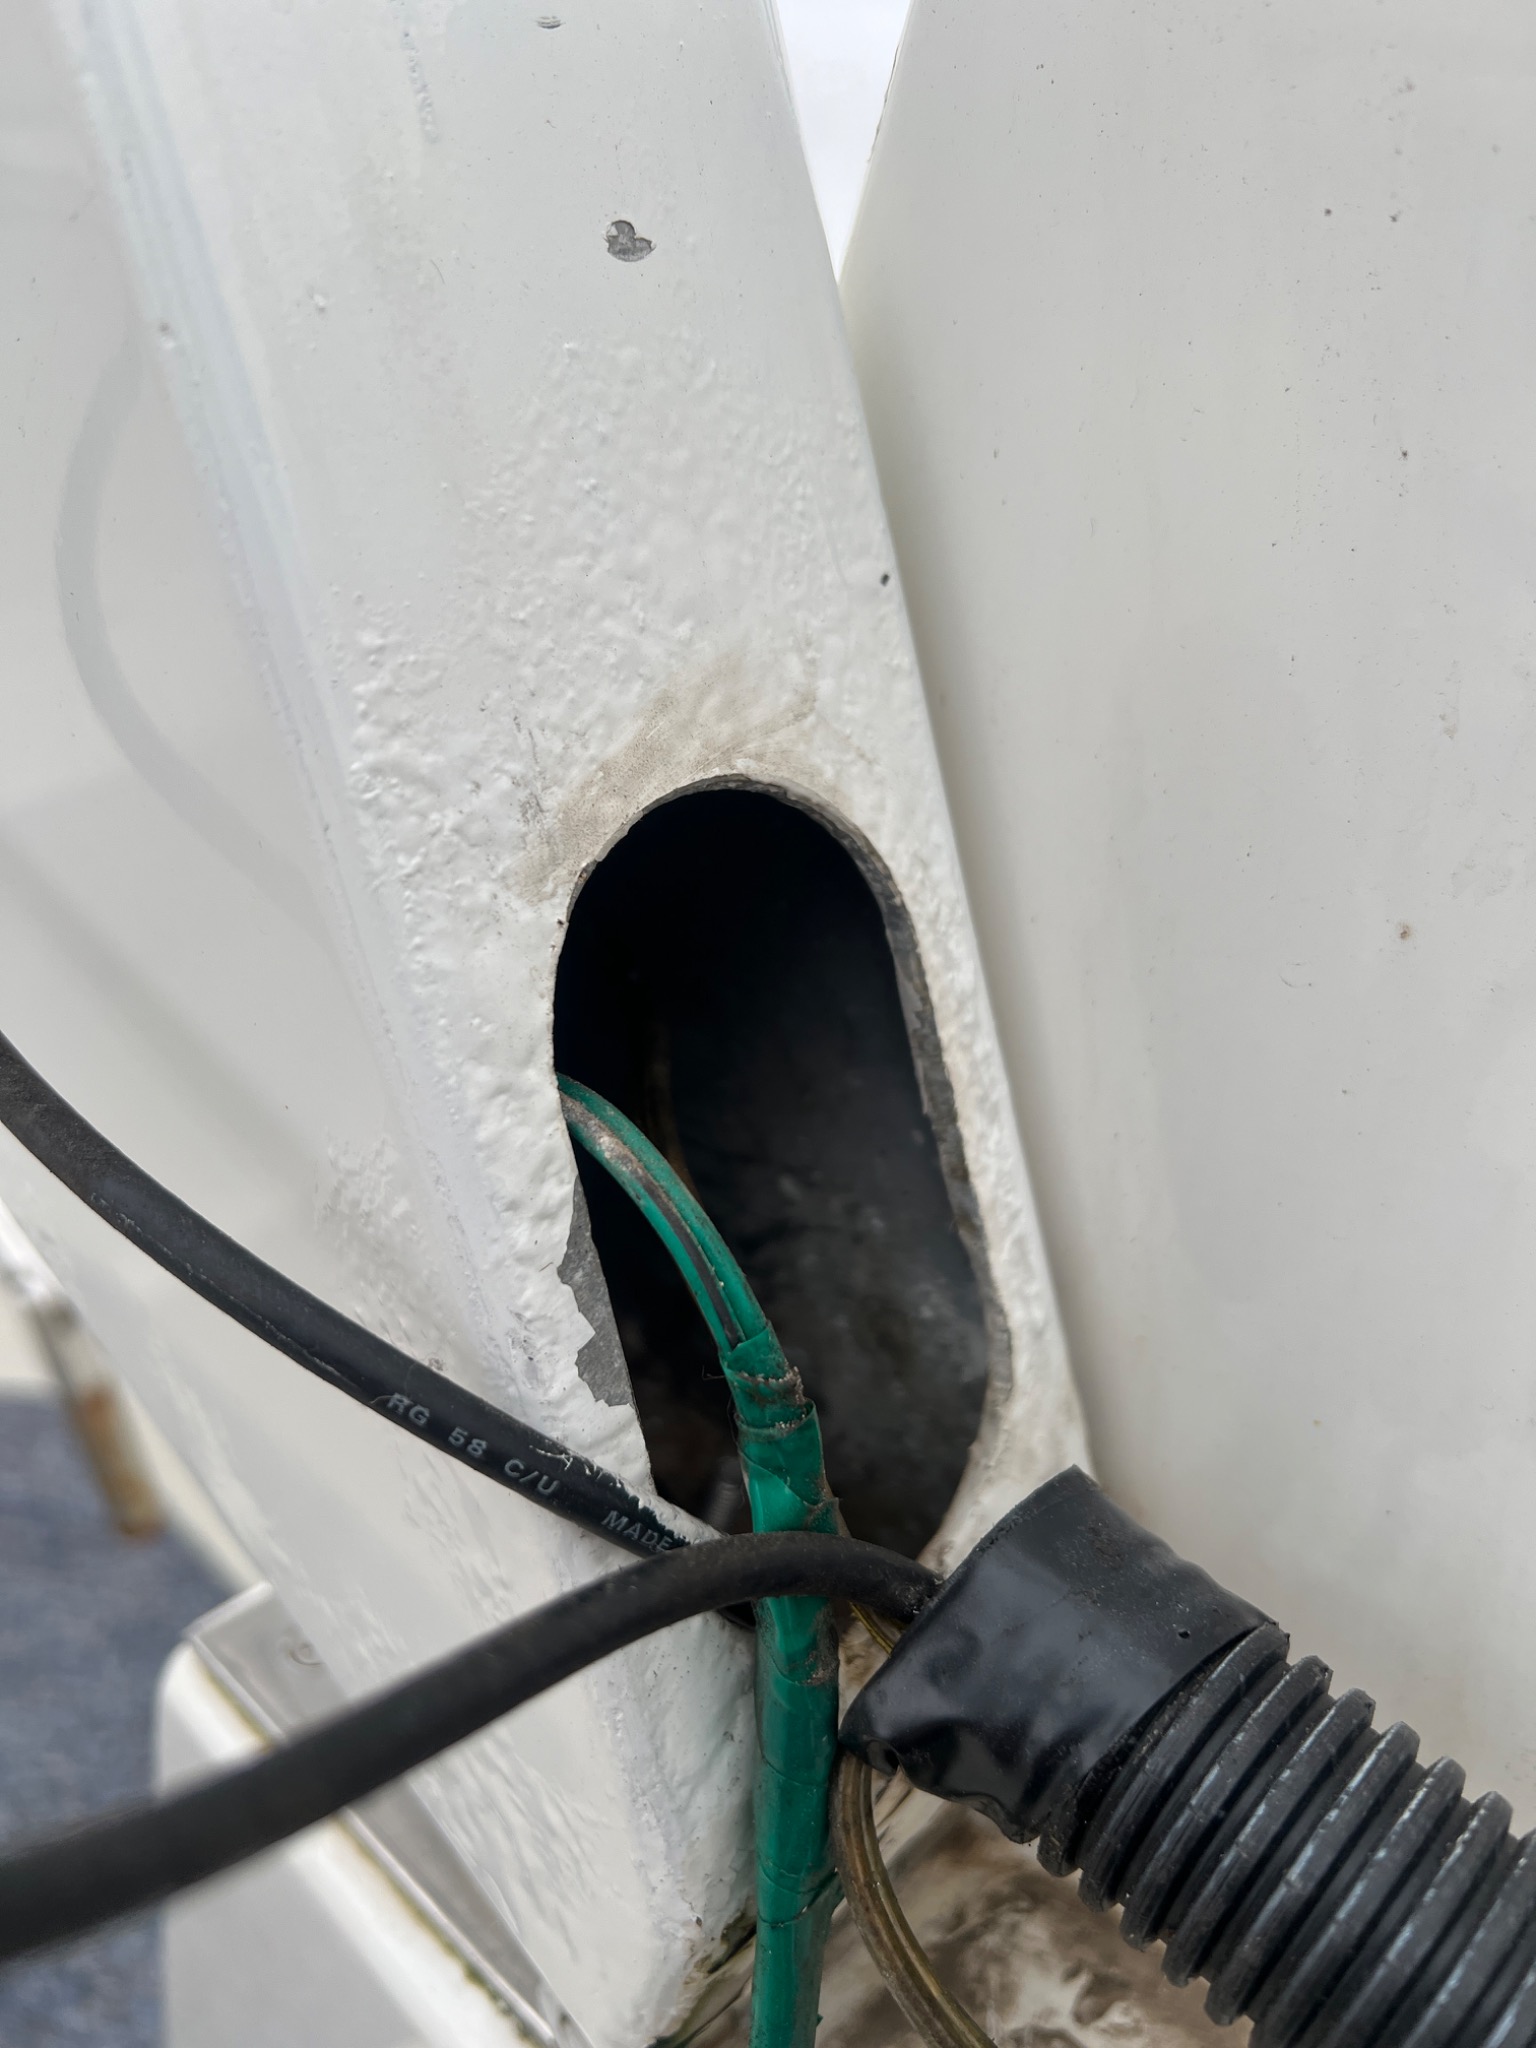
Close-up of bubbling and uneven coating around the lower arch near its pivot and cable route.
Deteriorated paint at the hingeClose-up of bubbling and uneven coating around the lower arch near its pivot and cable route.
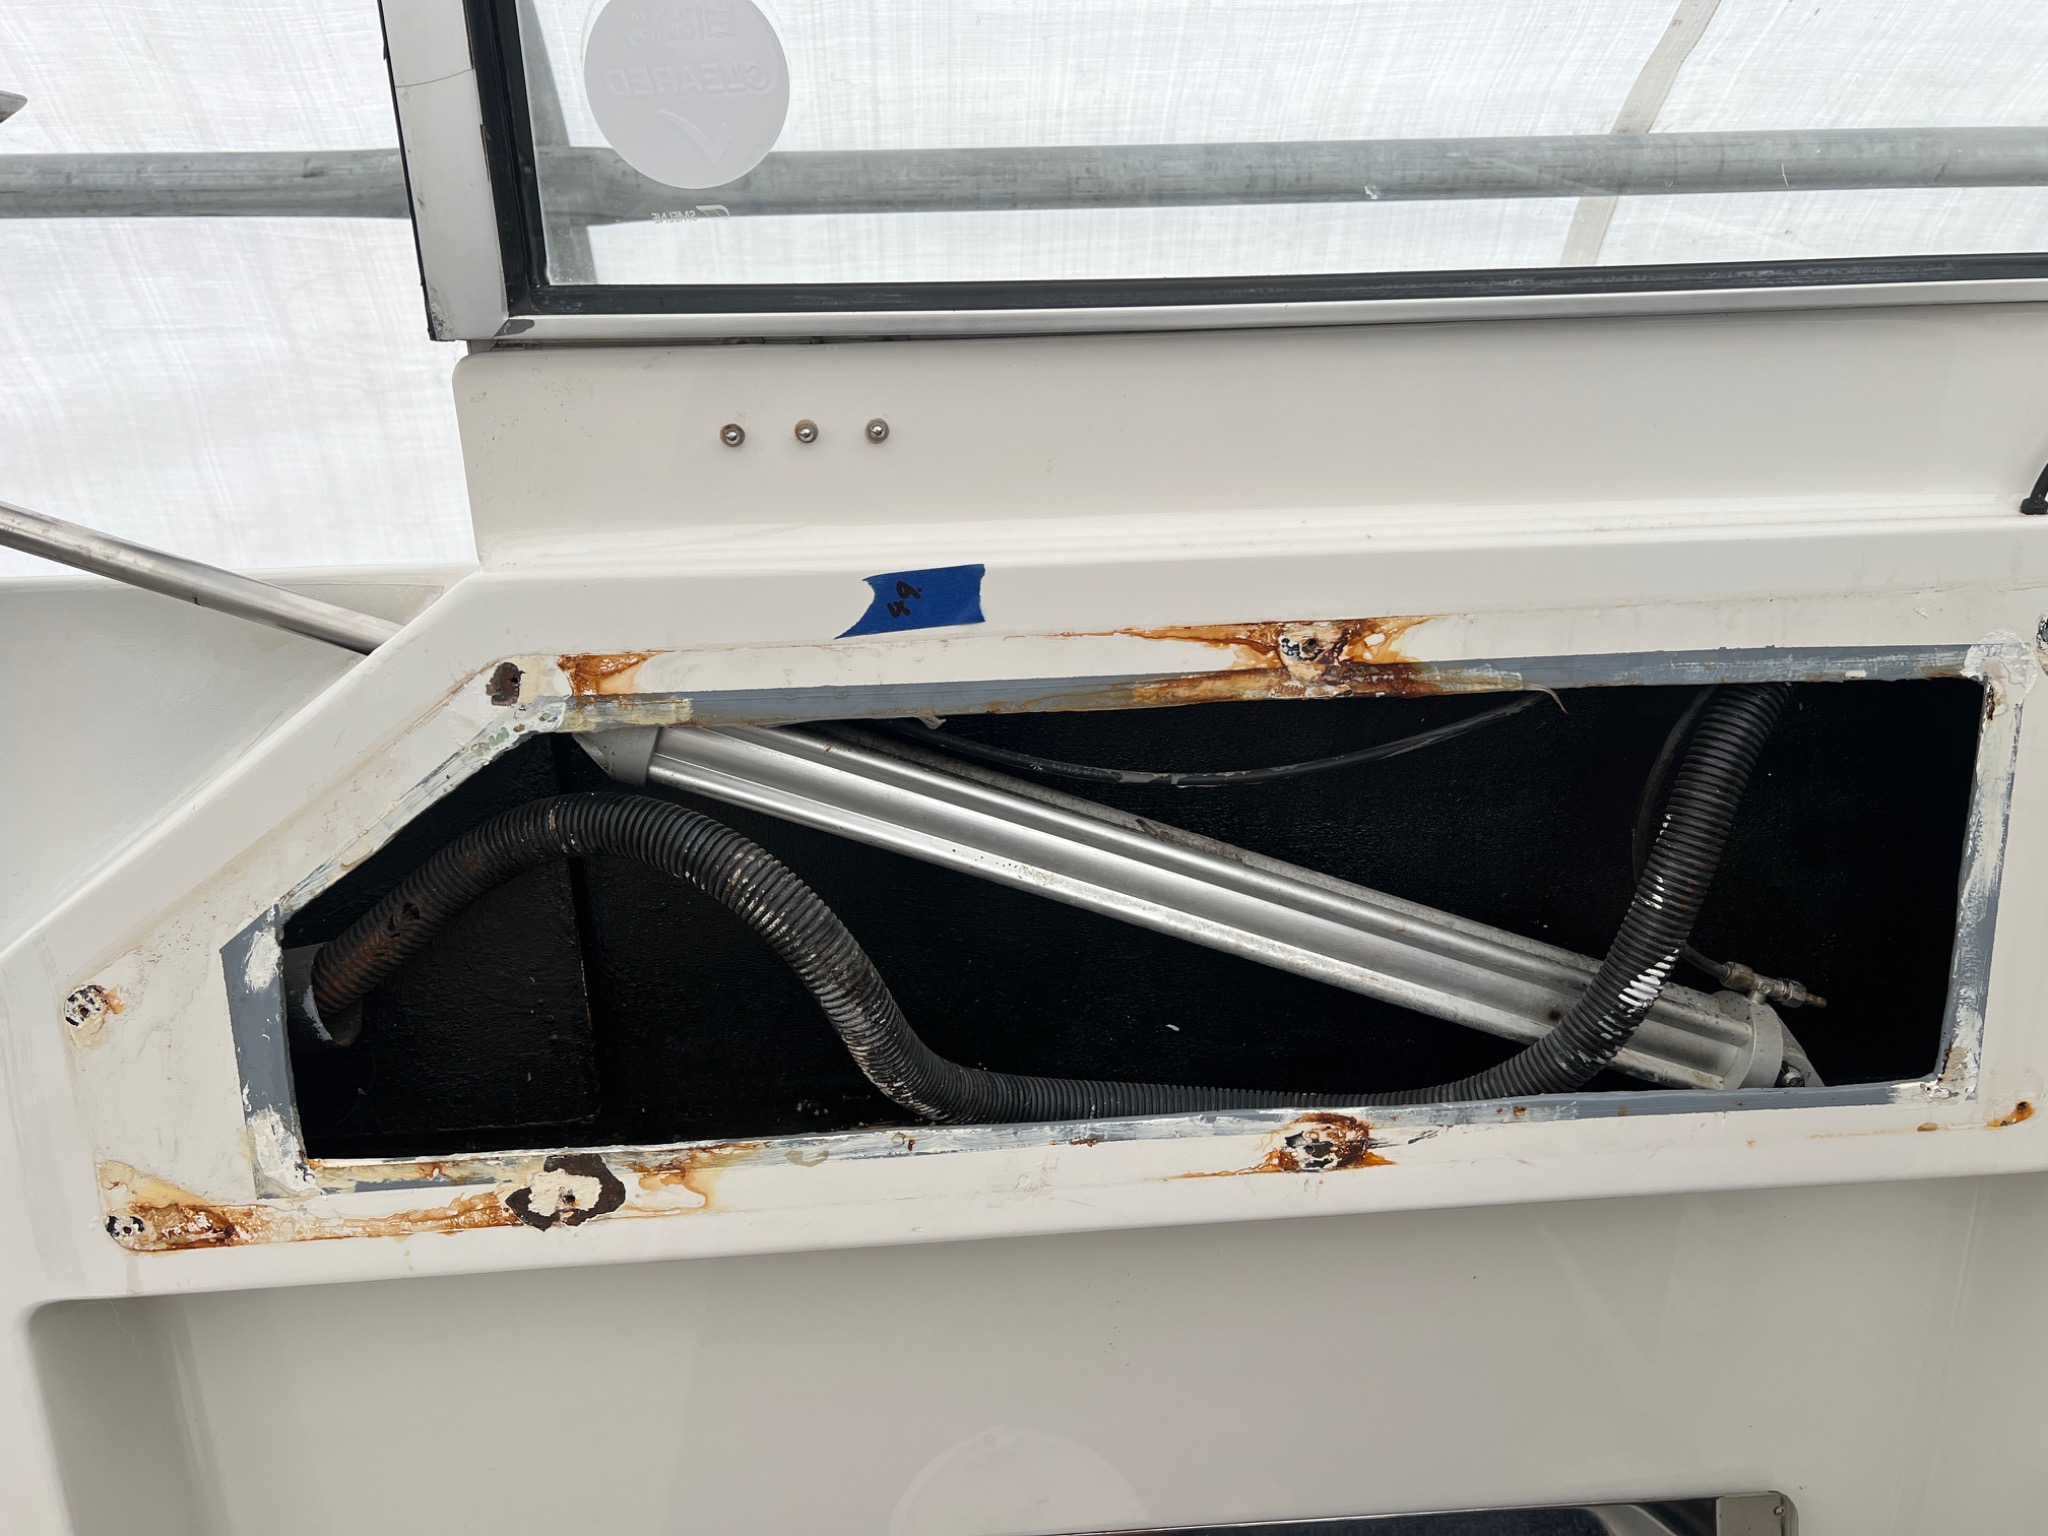
With its access cover removed, corrosion and failing finishes are visible around the opening housing the arch hydraulics.
Hydraulic mechanism housingWith its access cover removed, corrosion and failing finishes are visible around the opening housing the arch hydraulics.
Original coating deterioration and paint bubbling on the lower radar-arch support, visible around the cable opening before restoration.
Bubbling paint on the arch supportOriginal coating deterioration and paint bubbling on the lower radar-arch support, visible around the cable opening before restoration.
02 / Surface preparation

Getting back to a sound surface.

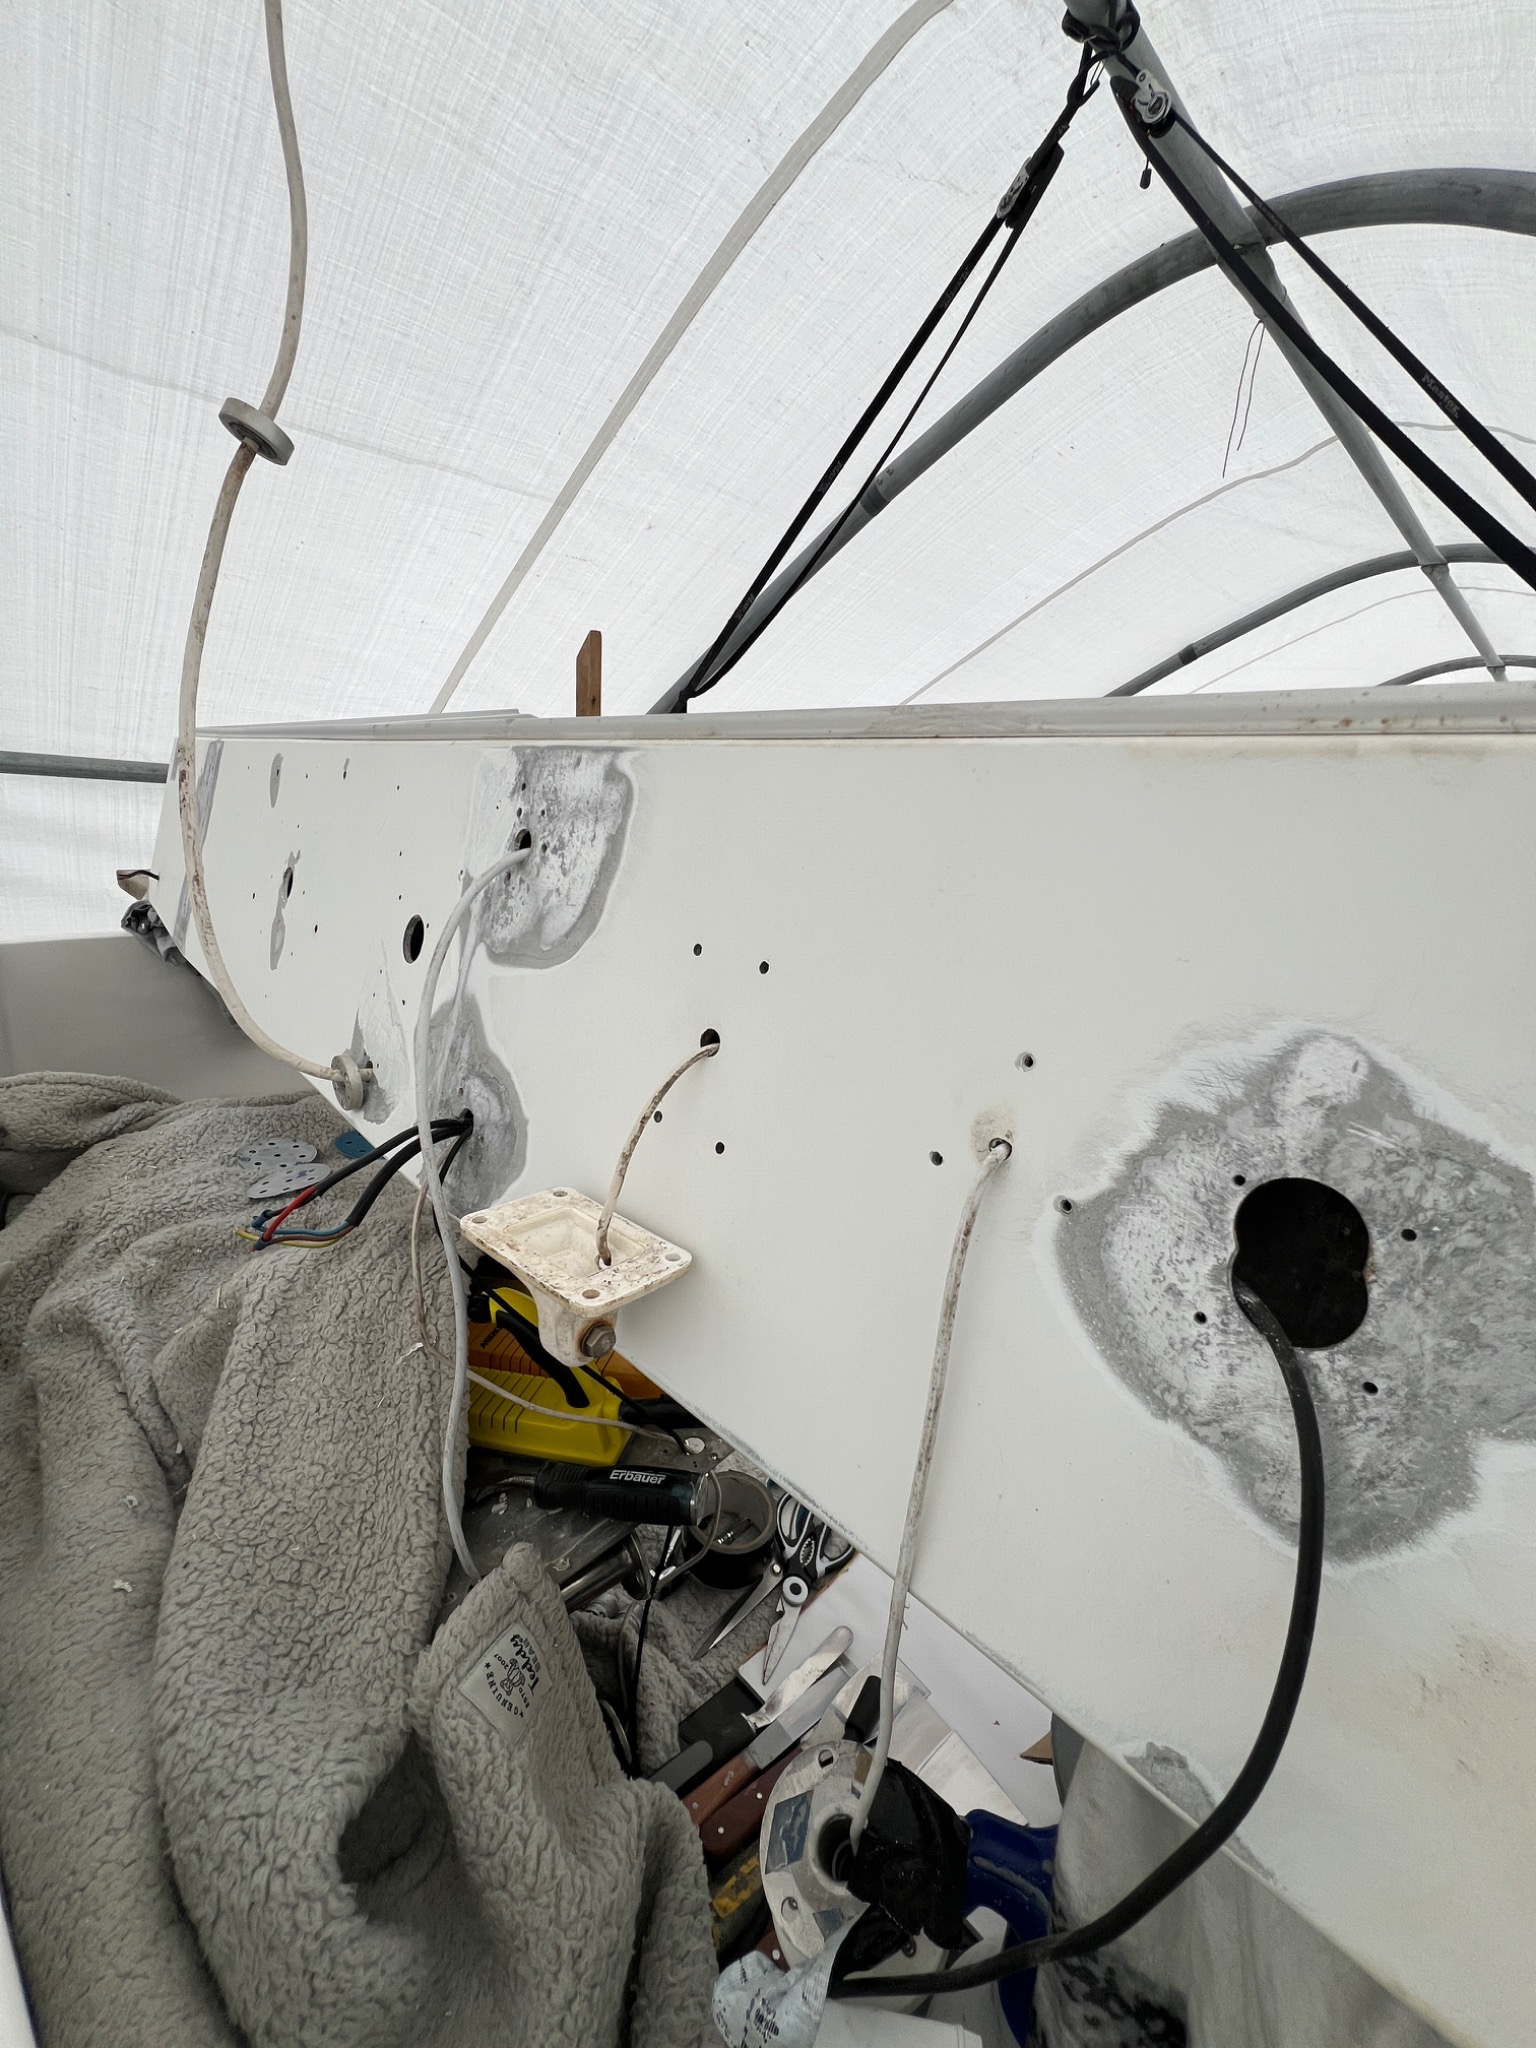
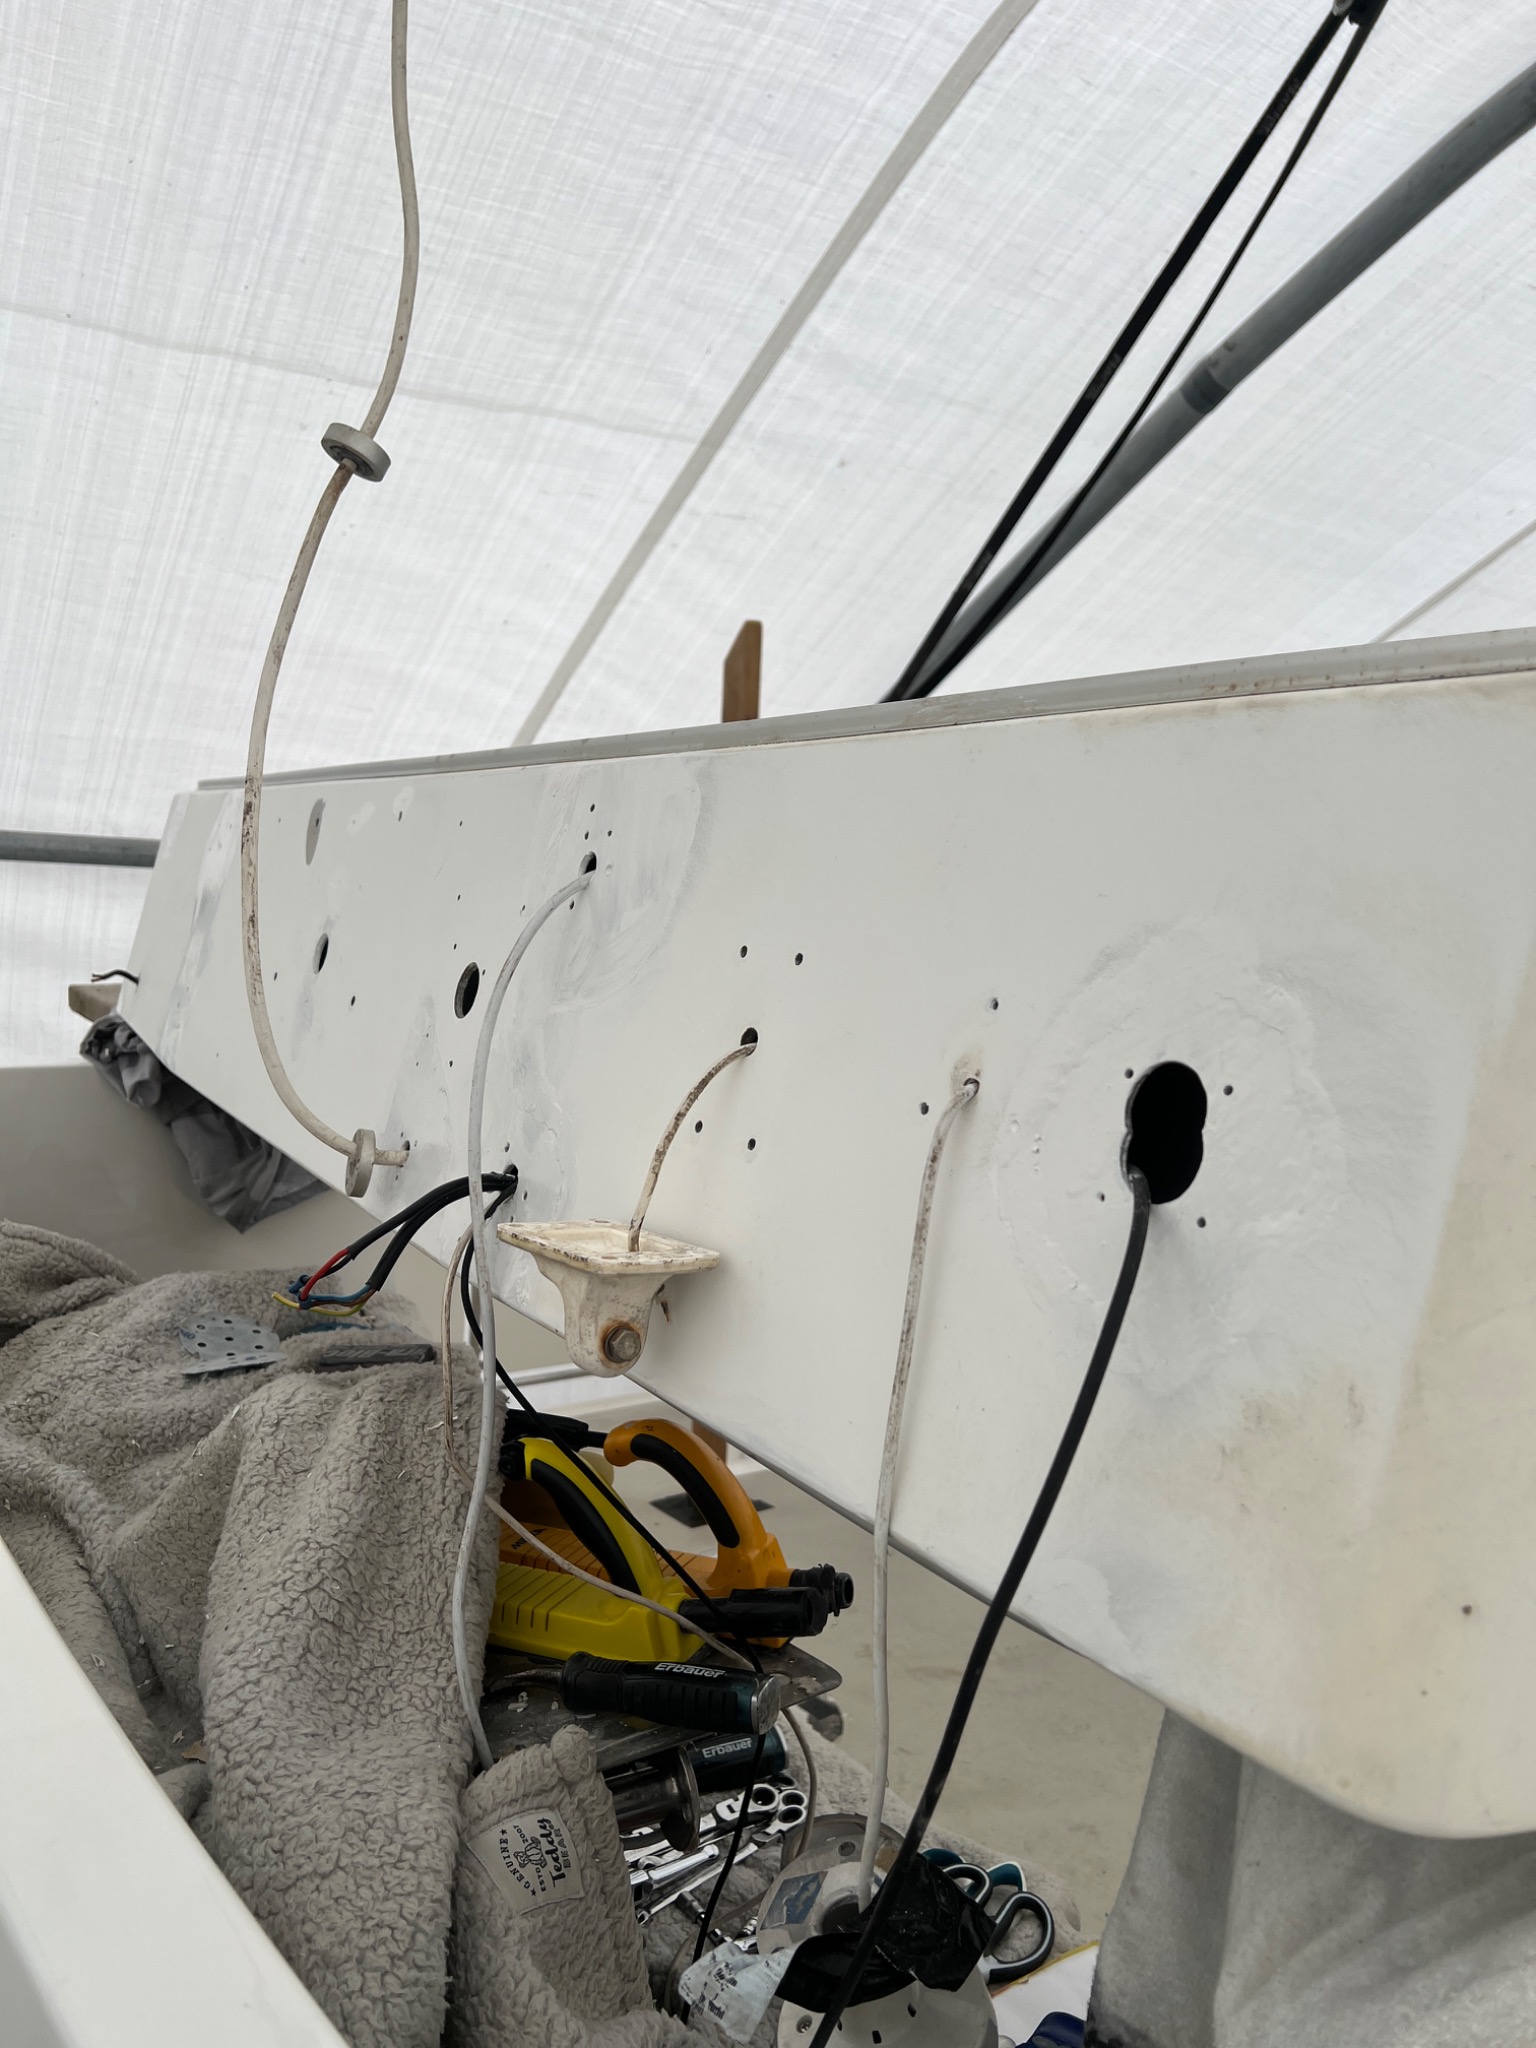
Localised coating removal and careful preparation were undertaken across the arch and around exposed fittings, including areas worked back to aluminium where necessary.
Selected areas of the arch cleaned back to aluminium where required before the refinishing stages.
Preparation back to aluminiumSelected areas of the arch cleaned back to aluminium where required before the refinishing stages.
Wider areas of the arch and fittings prepared, with the original equipment removed to make the surfaces accessible.
Surface preparation and correctionWider areas of the arch and fittings prepared, with the original equipment removed to make the surfaces accessible.
03 / Filling & fairing

Bringing the forms back together.

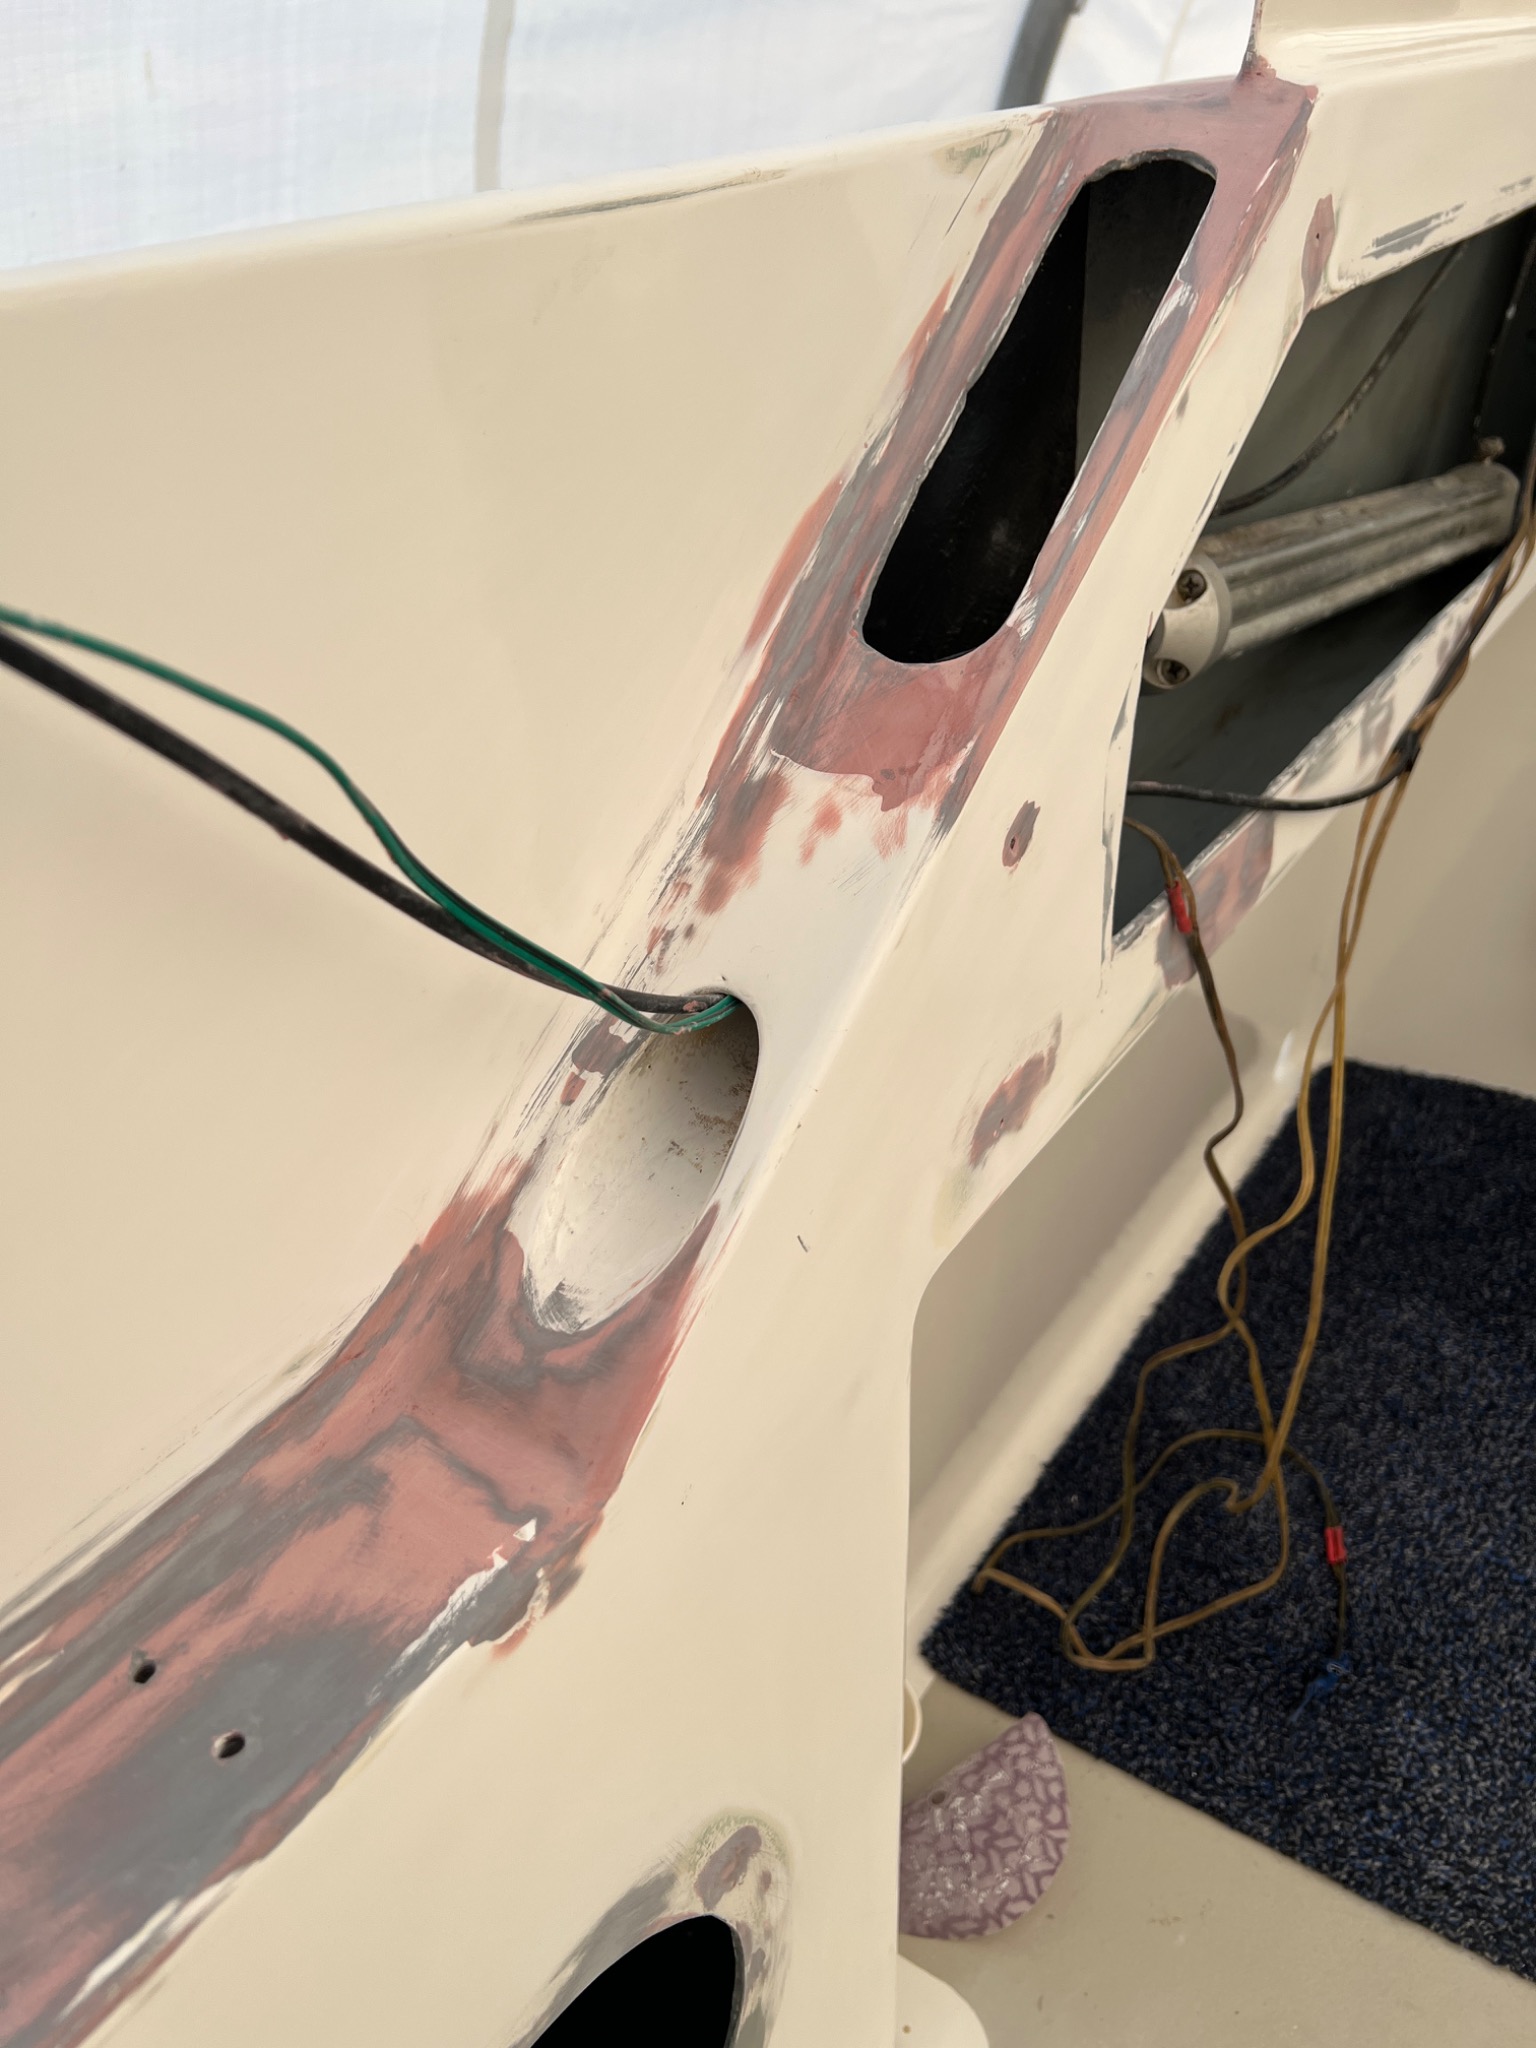
The prepared areas were filled and faired, including the arch faces, mounting points and adjacent mechanism surrounds. These photographs capture stages of the process rather than a finished paint surface.
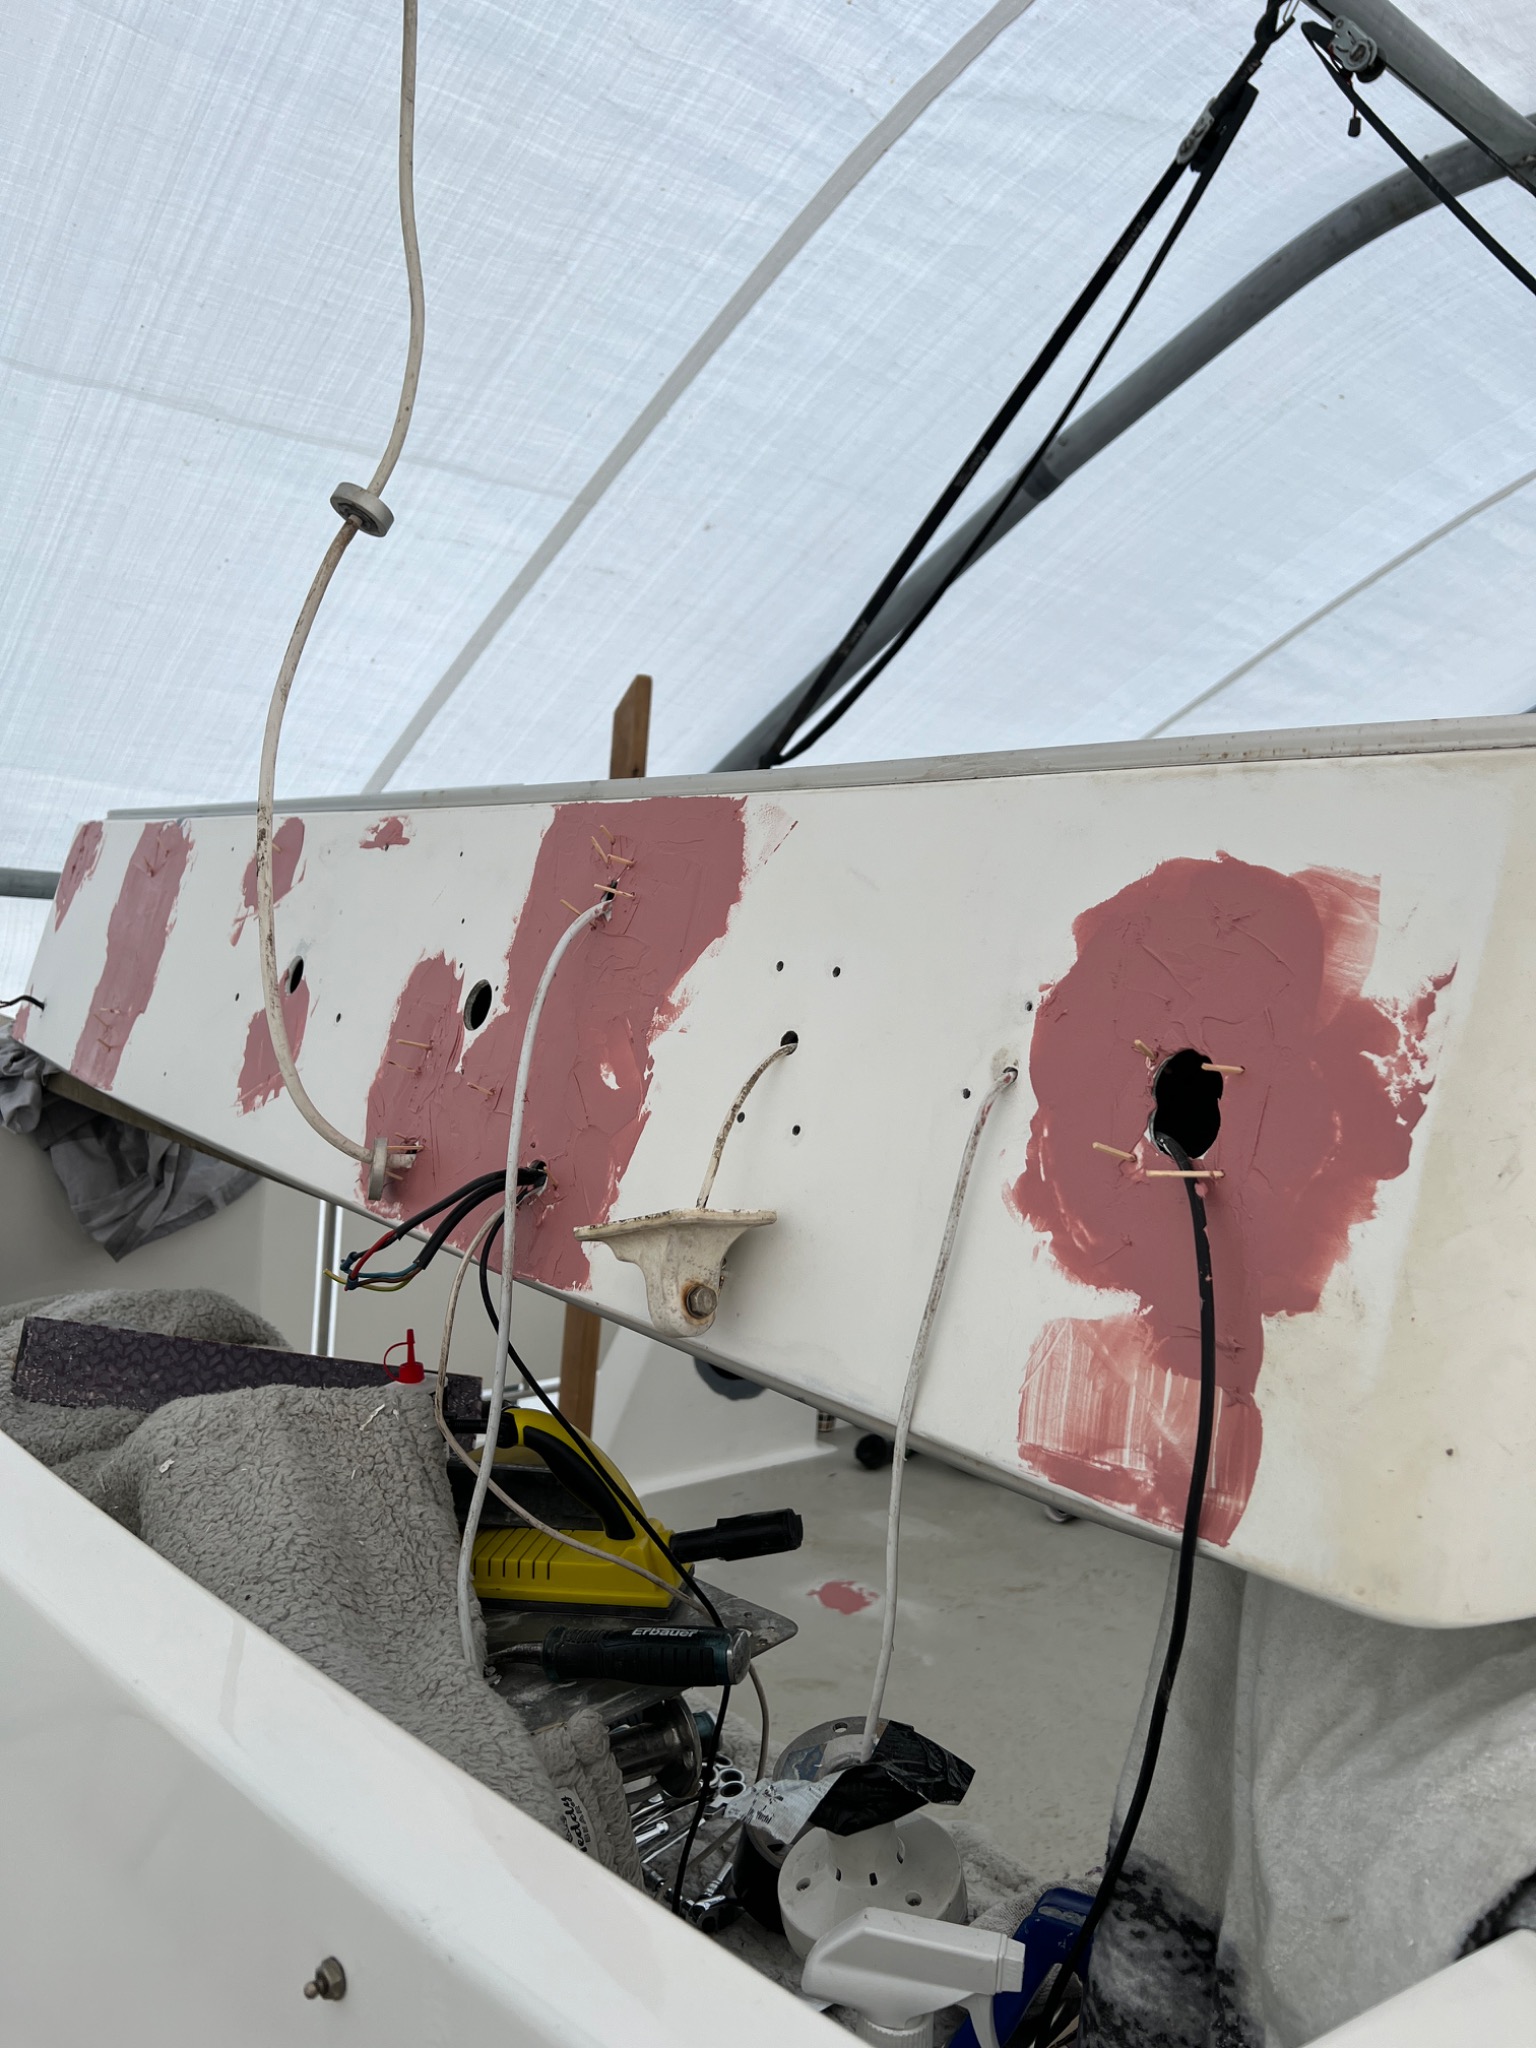
The first filling stage on the arch, before progressive fairing and further surface preparation.
First Awlfair applicationThe first filling stage on the arch, before progressive fairing and further surface preparation.
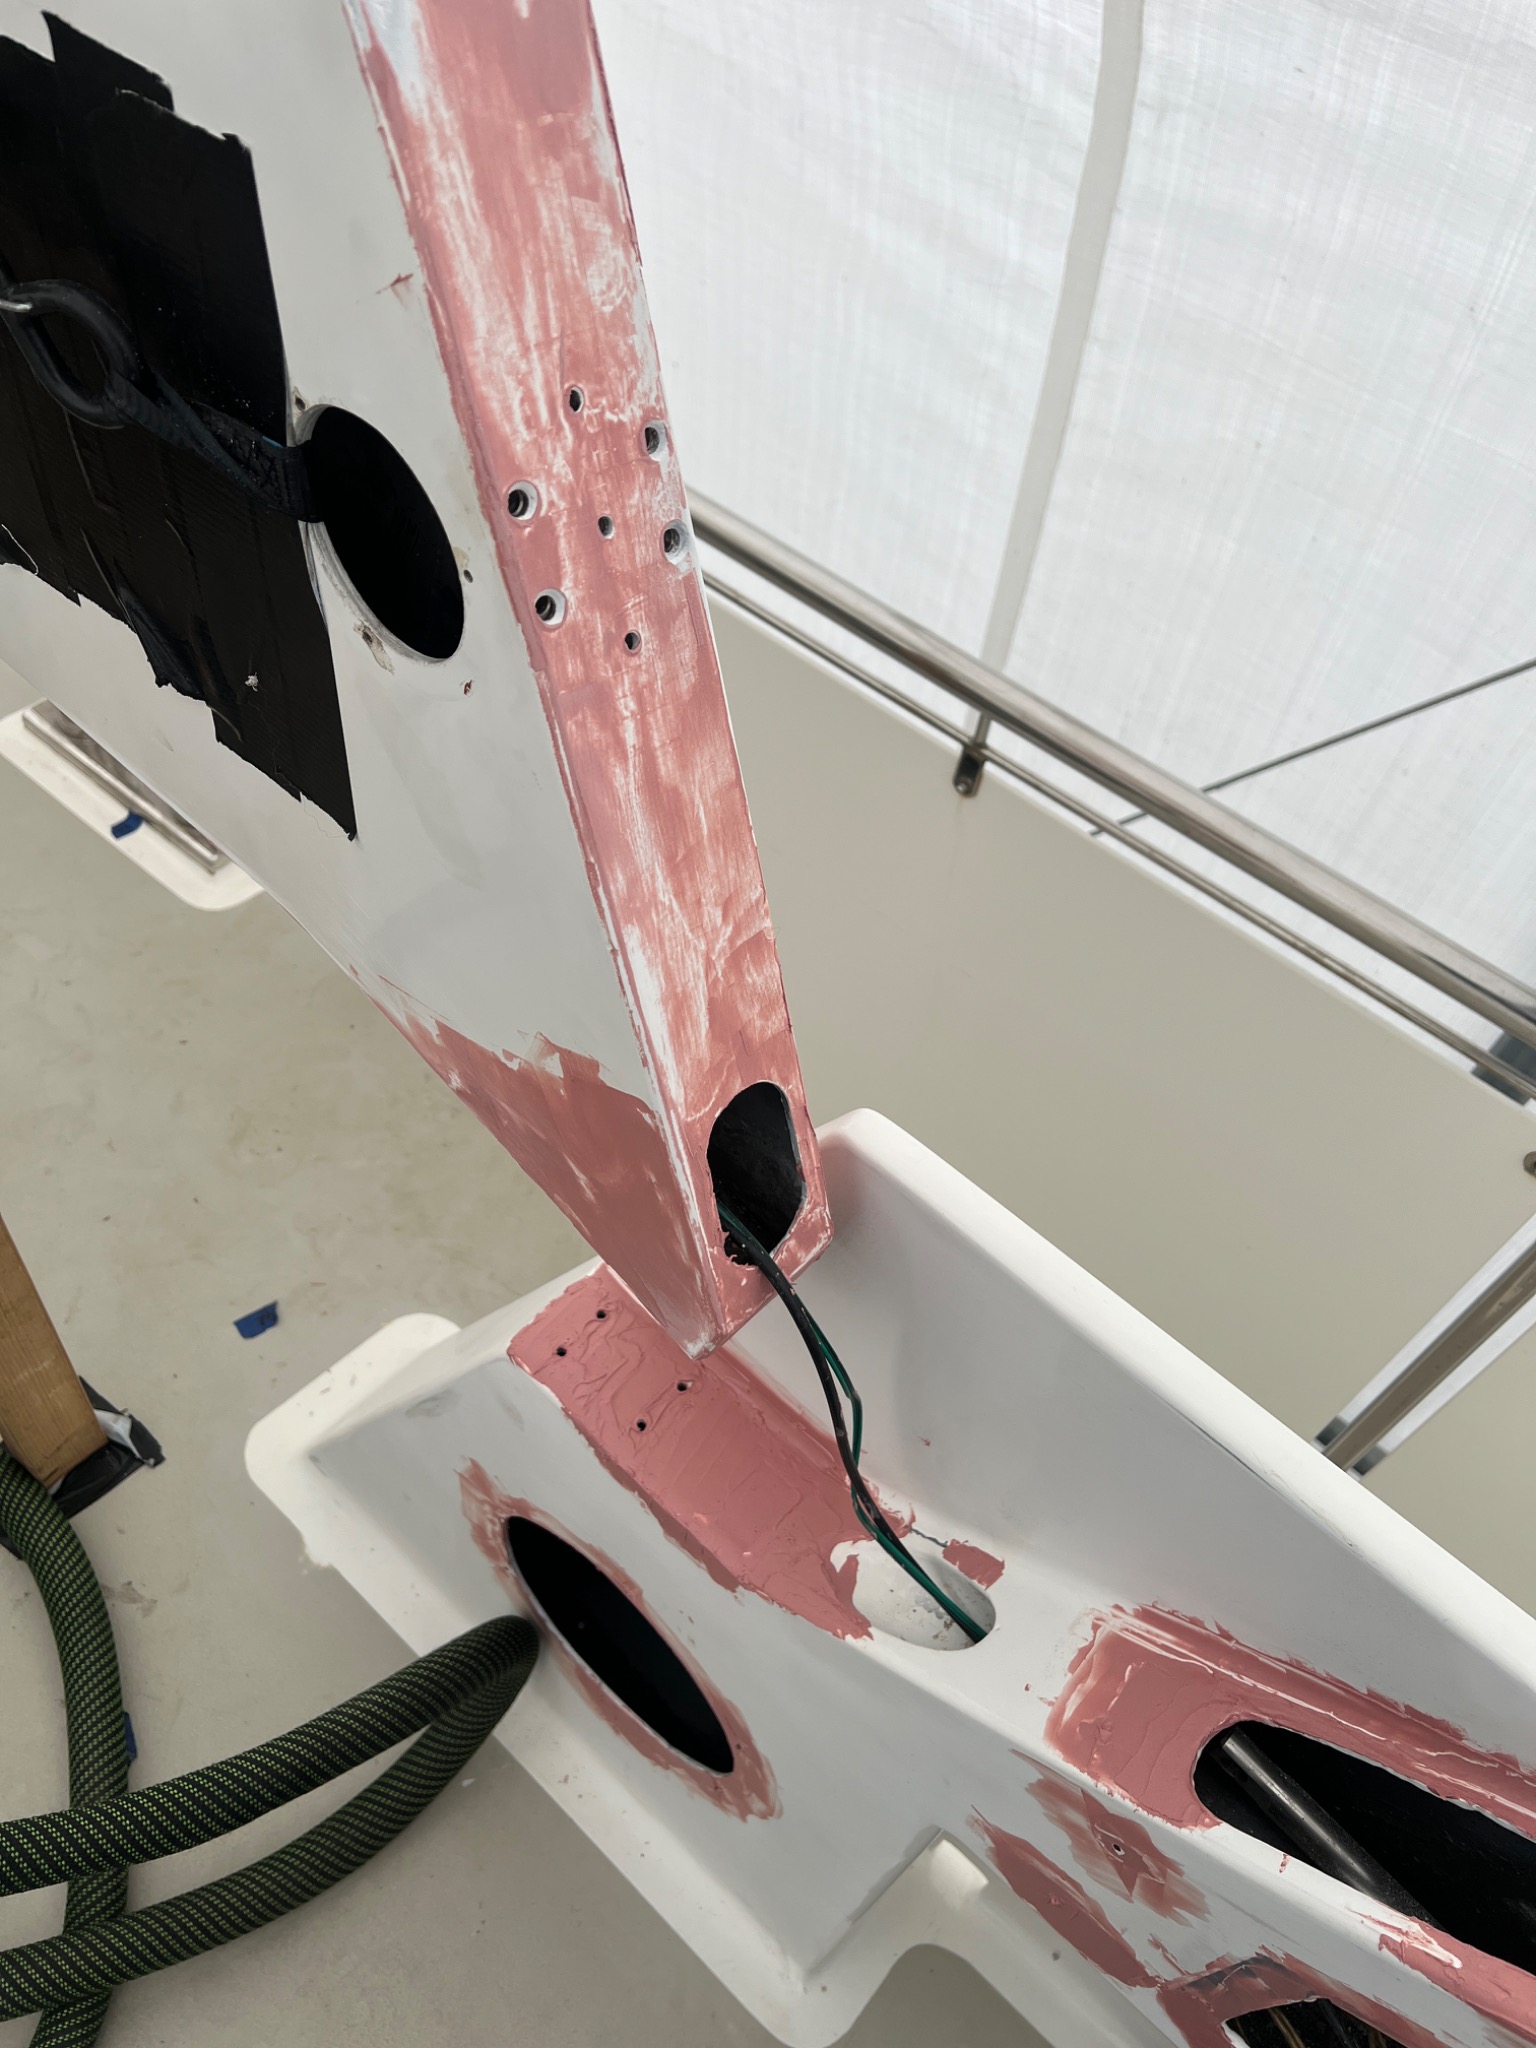
Filler applied around the exposed edges, fittings and hydraulic mechanism housing in preparation for shaping and sanding.
Fairing the arch and surroundsFiller applied around the exposed edges, fittings and hydraulic mechanism housing in preparation for shaping and sanding.
The arch face during the filling and fairing stages, with mounts and wiring carefully left accessible.
Extensive local fairingThe arch face during the filling and fairing stages, with mounts and wiring carefully left accessible.
04 / The finished upper deck

One coherent result.

Once refinished and reassembled, the arch and the surrounding housings present a clean, unified appearance. The renewed non-slip deck and painted seat-base fittings complete the upper-deck transformation.
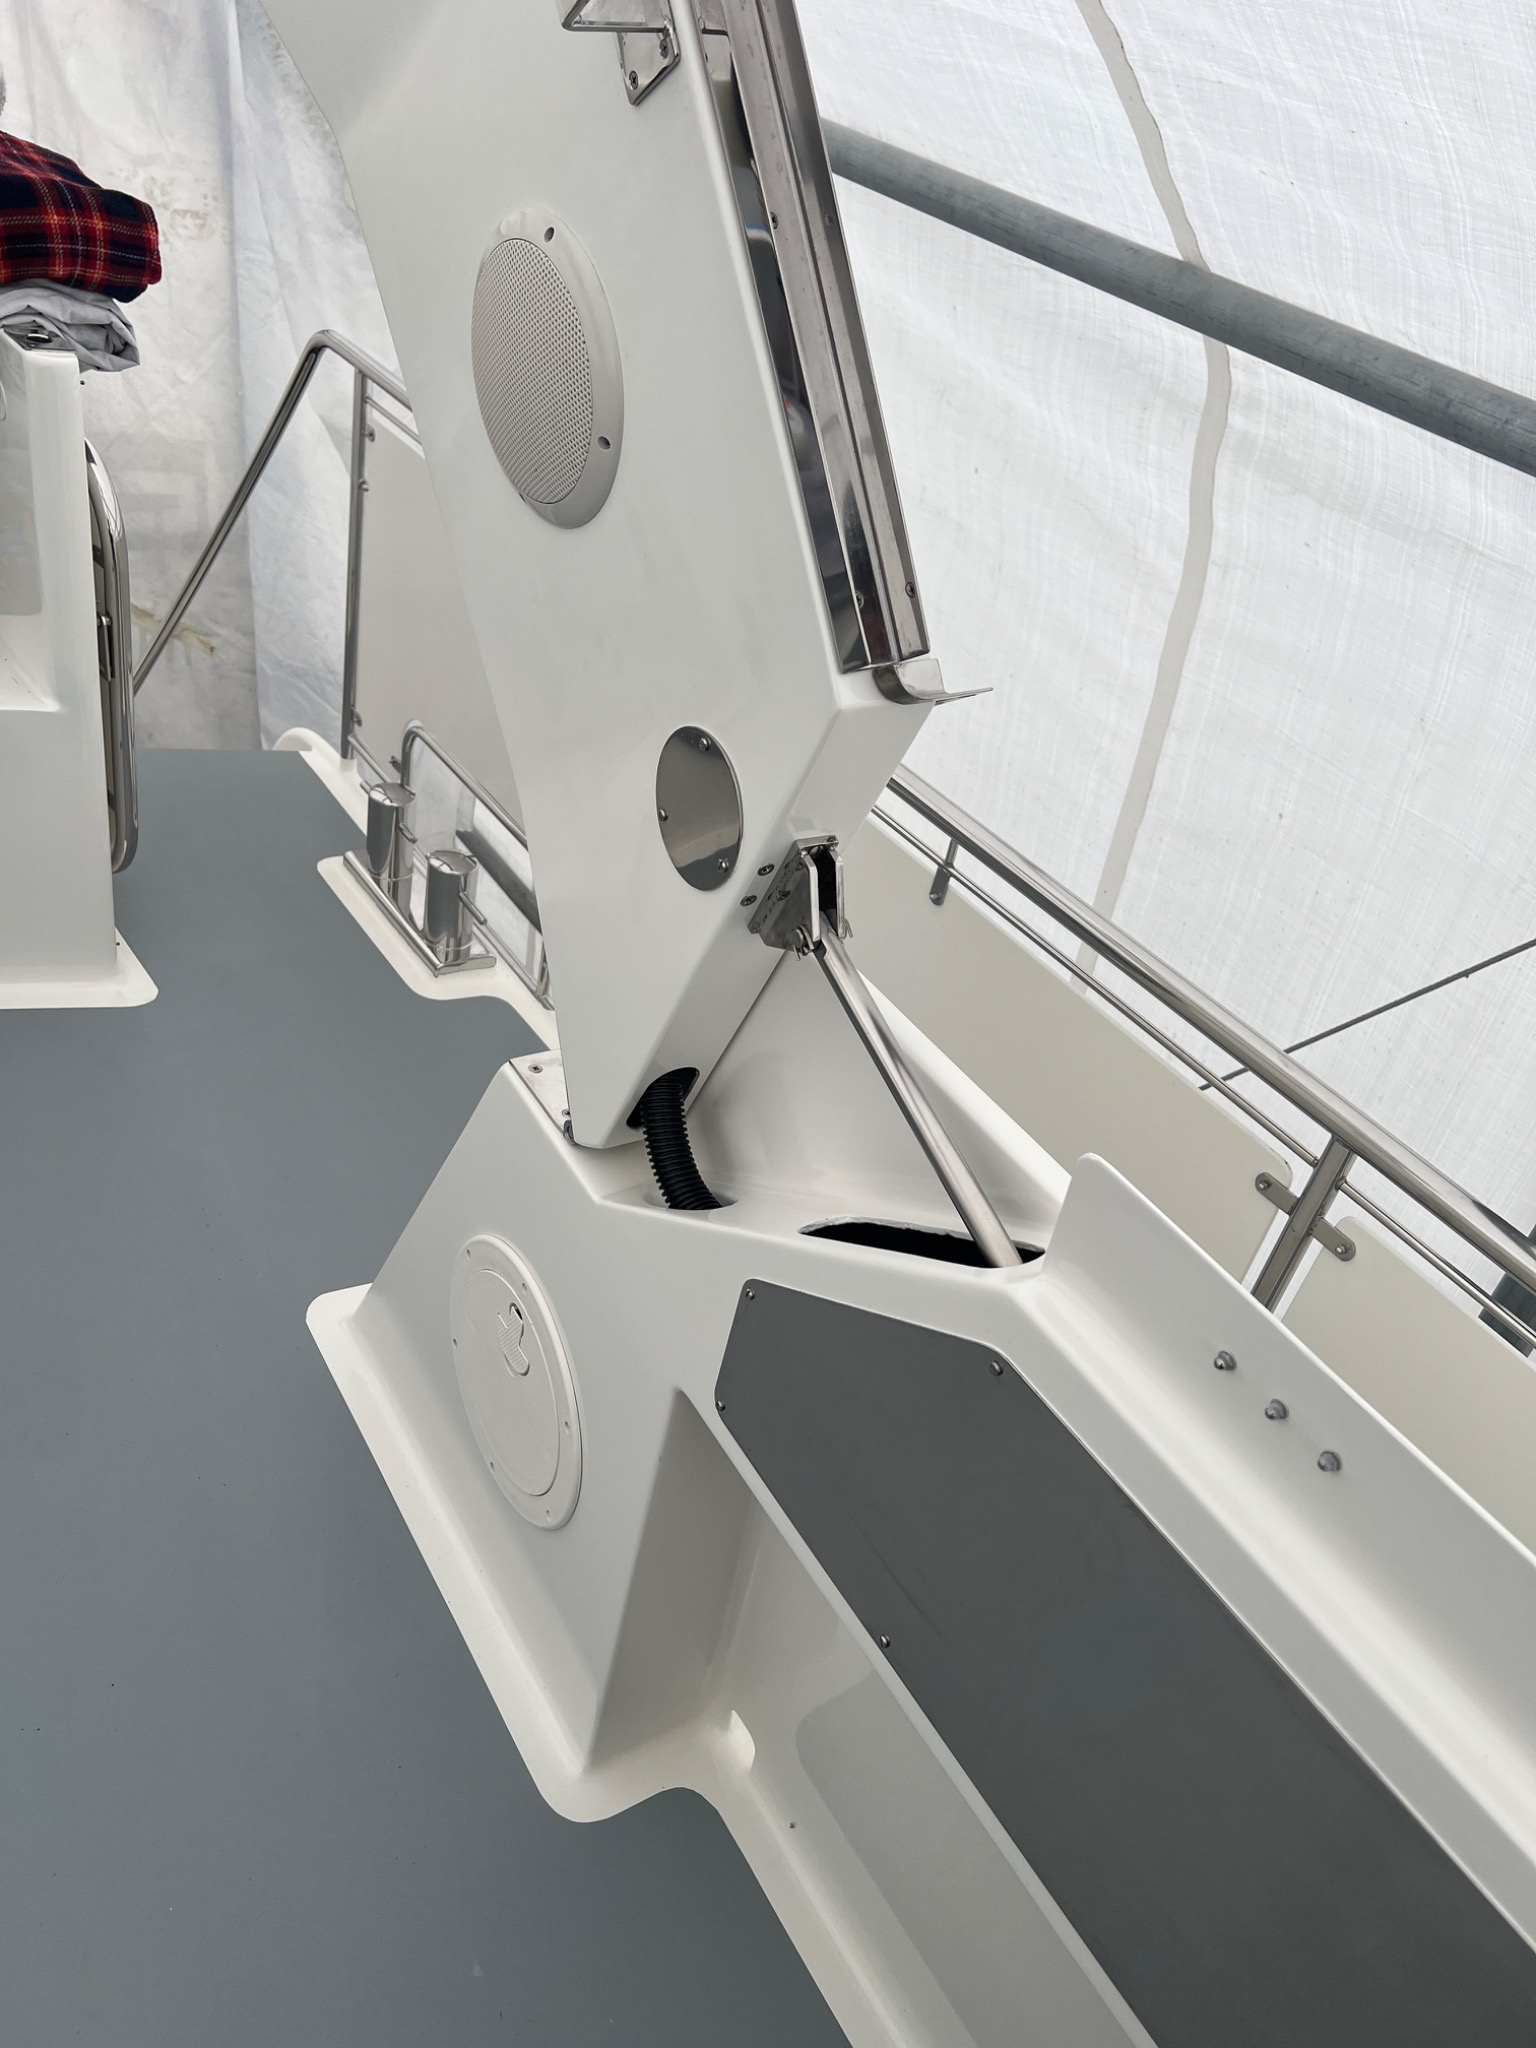
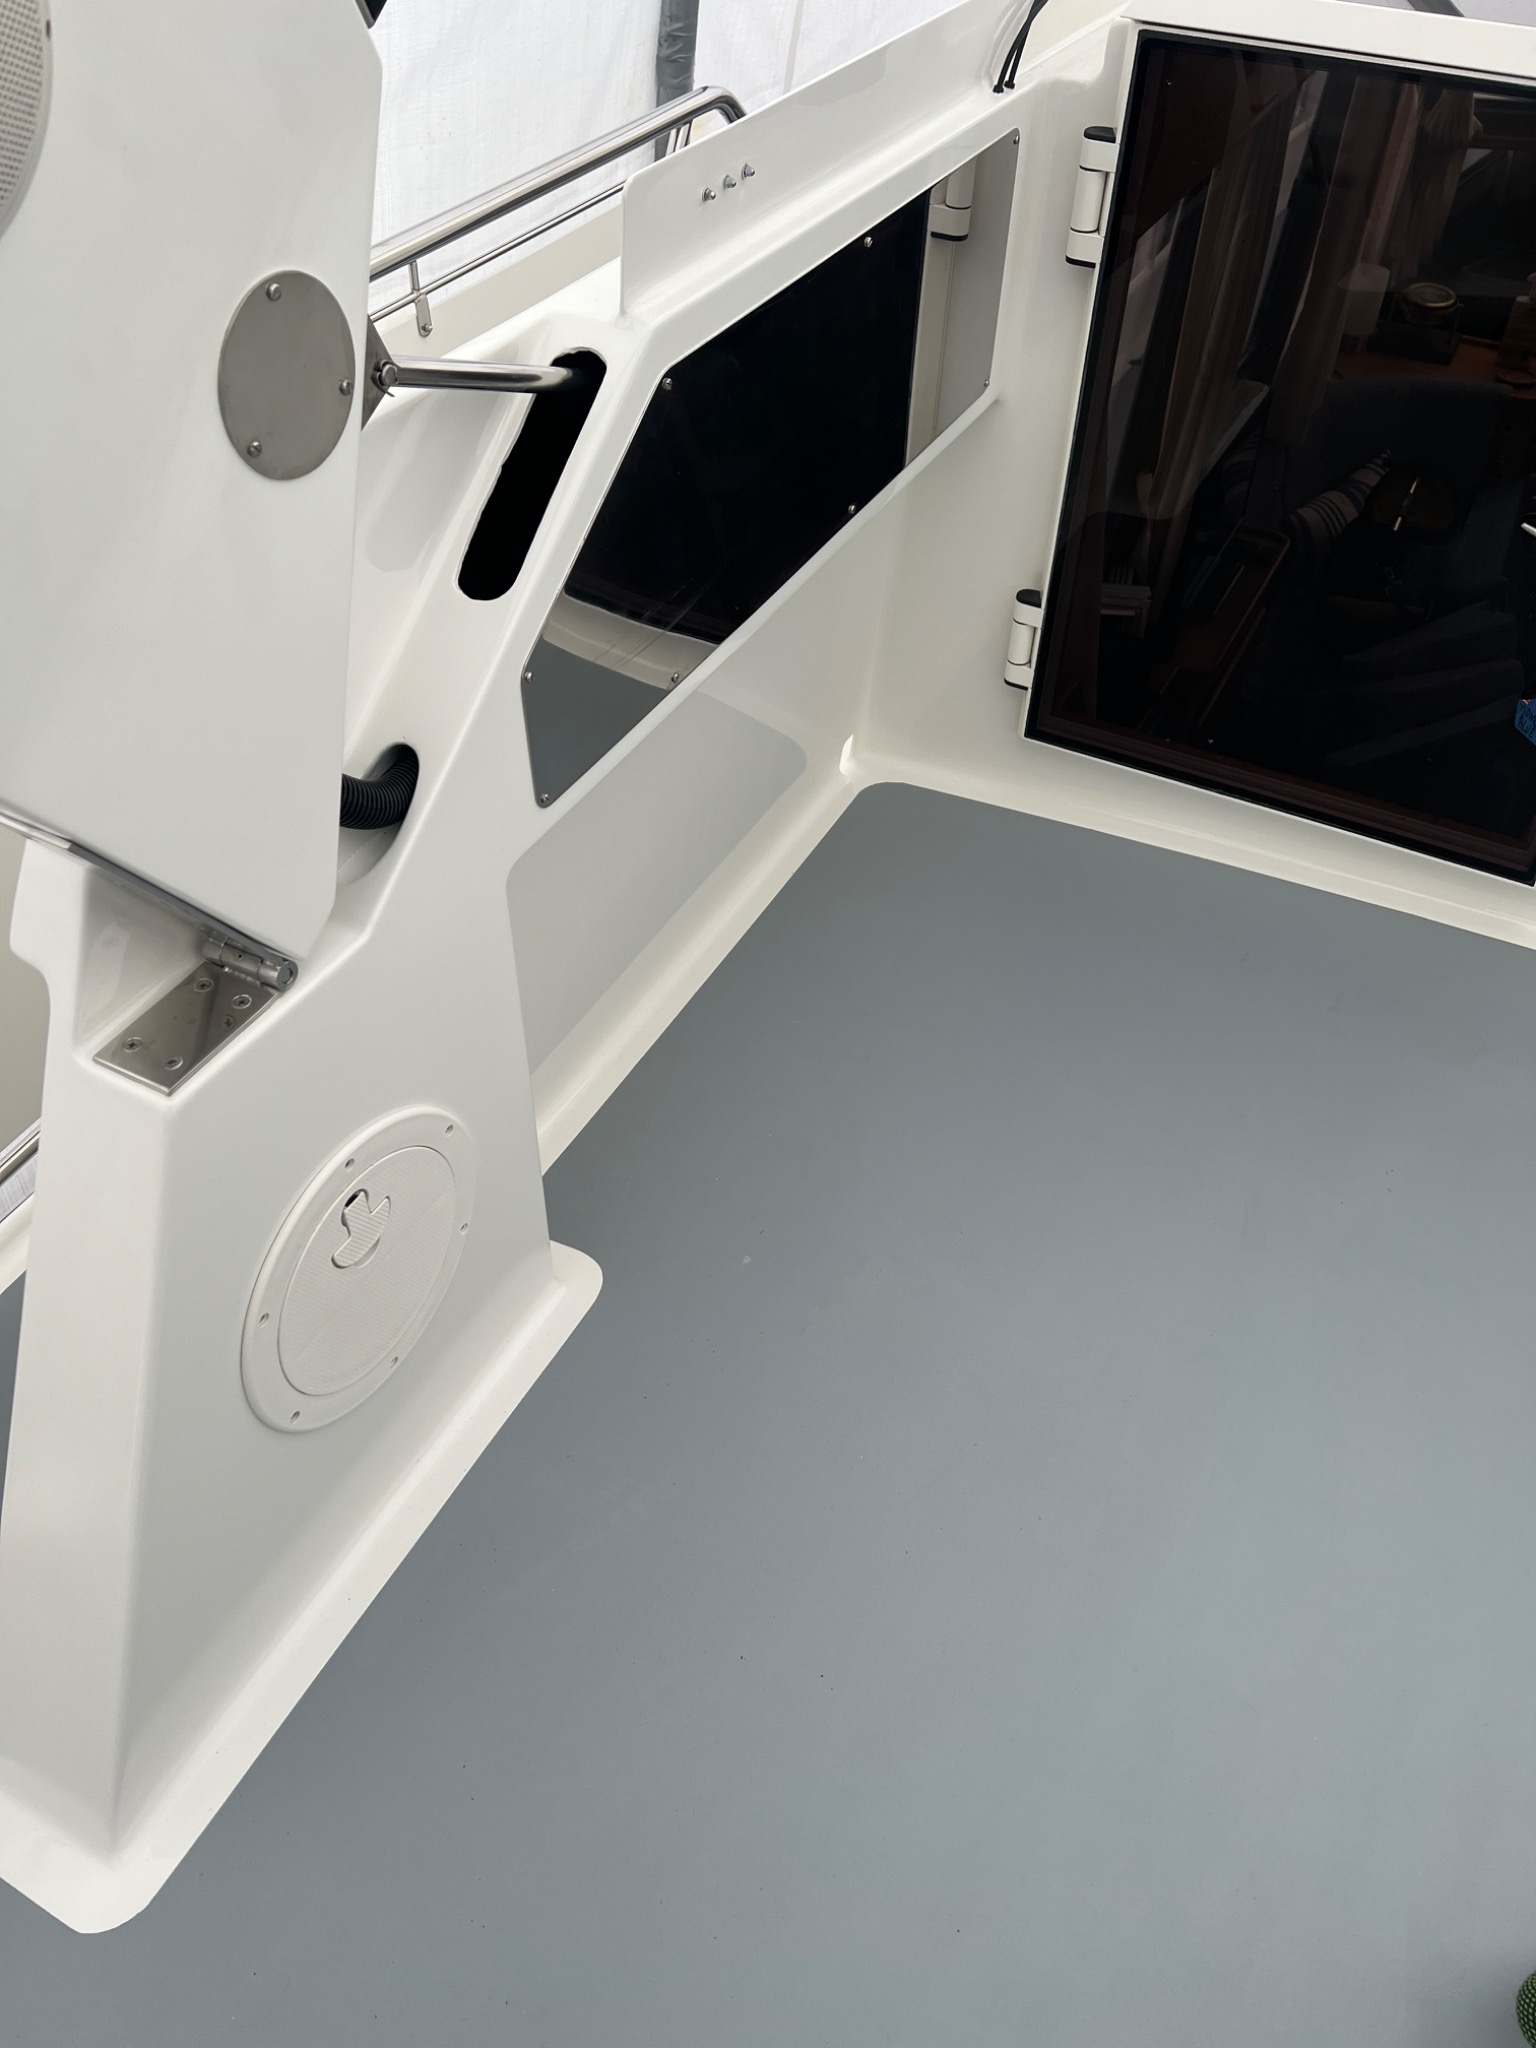
The refinished arch support, clean edges and refitted external hardware beside the renewed grey non-slip deck.
Restored radar arch and pivotThe refinished arch support, clean edges and refitted external hardware beside the renewed grey non-slip deck.
The arch and the adjacent housing presented together, with uniform finishes around the access panels and newly finished deck.
Completed hydraulic housing surroundsThe arch and the adjacent housing presented together, with uniform finishes around the access panels and newly finished deck.
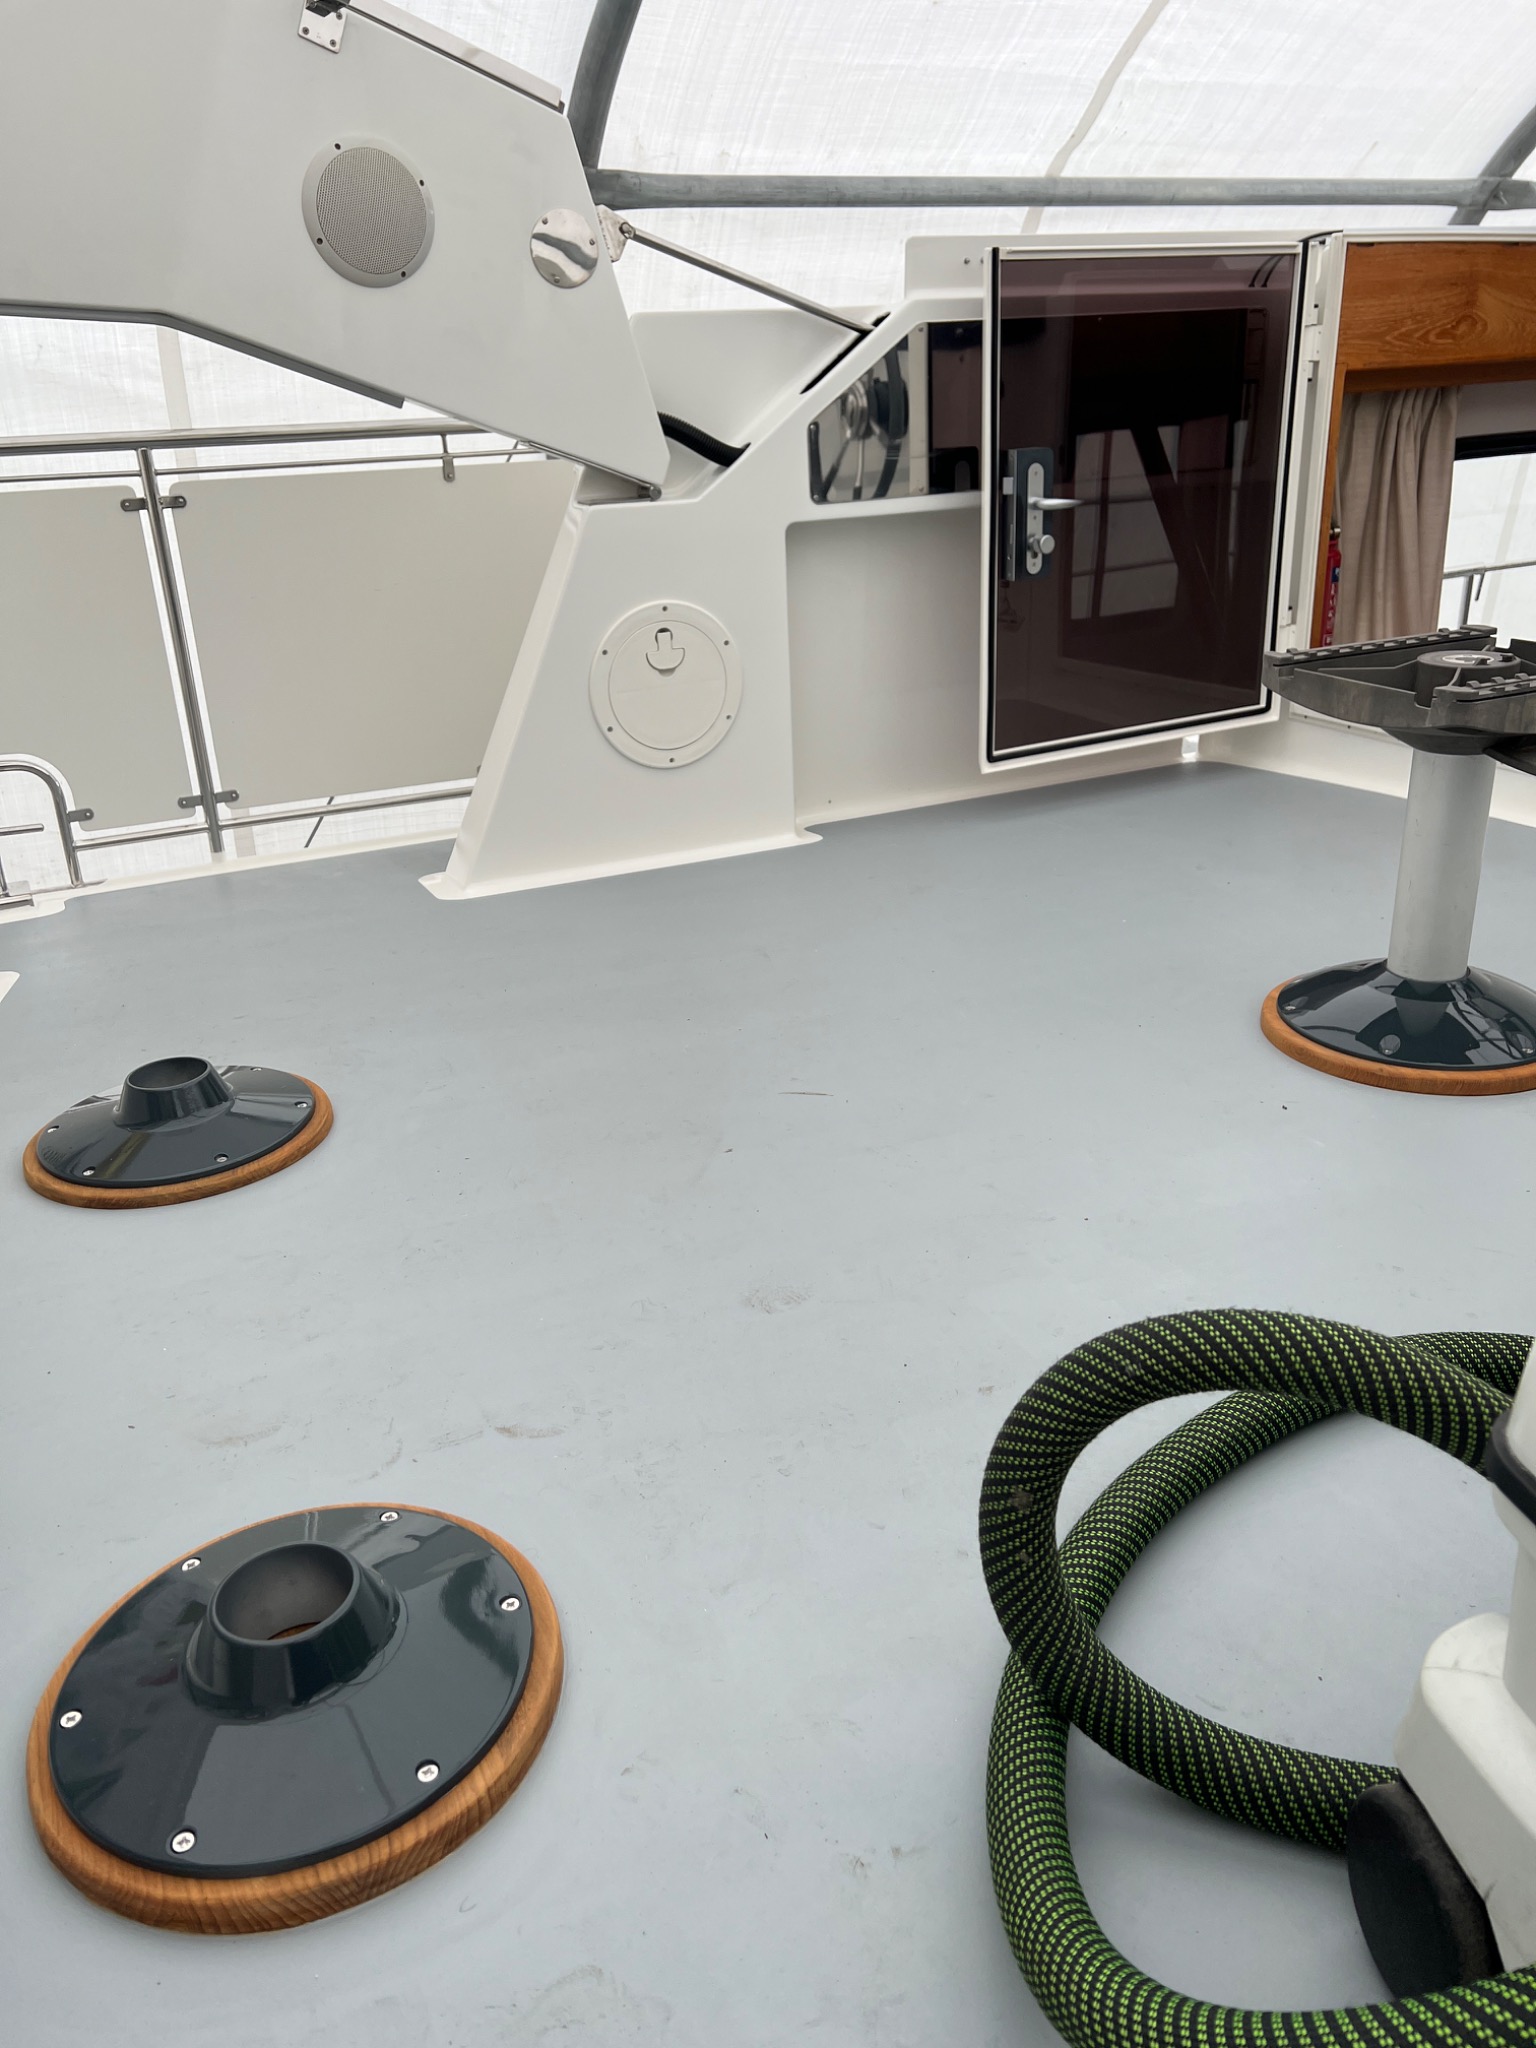
The completed arch and surrounding upper deck, including the new non-slip finish and refinished seat-base fittings.
The restored upper-deck settingThe completed arch and surrounding upper deck, including the new non-slip finish and refinished seat-base fittings.
Behind the finish

The quality is in the detail: access openings, supports and hydraulic mechanism surrounds needed the same care as the prominent arch surfaces. The finished result is more than a fresh coat of paint.

Chapter 03  /  Documented restoration

Exterior paintwork.
Restoring the whole picture.

Midnight Blue's exterior rejuvenation was not one large repaint. It was a considered programme of decontamination, local repairs, preparation, surface correction and refinishing, with the treatment chosen to suit each area.

A surface-by-surface approach

Damaged paintwork and tired areas of coating were assessed and prepared back to a sound surface where required. Other areas received careful surface correction as part of the wider refurbishment.

From isolated paint failures to larger painted panels, deck areas and small fittings, the aim was to bring the exterior back to a consistent standard rather than treating each visible defect in isolation.

These photographs document individual stages of the work; they do not imply that every exterior surface required stripping to bare metal or a complete repaint.

01 / The starting point

Different defects. Different treatments.

Paint damage, thin coating coverage and other local defects were examined to determine what needed repair and what could be improved through surface preparation or correction.
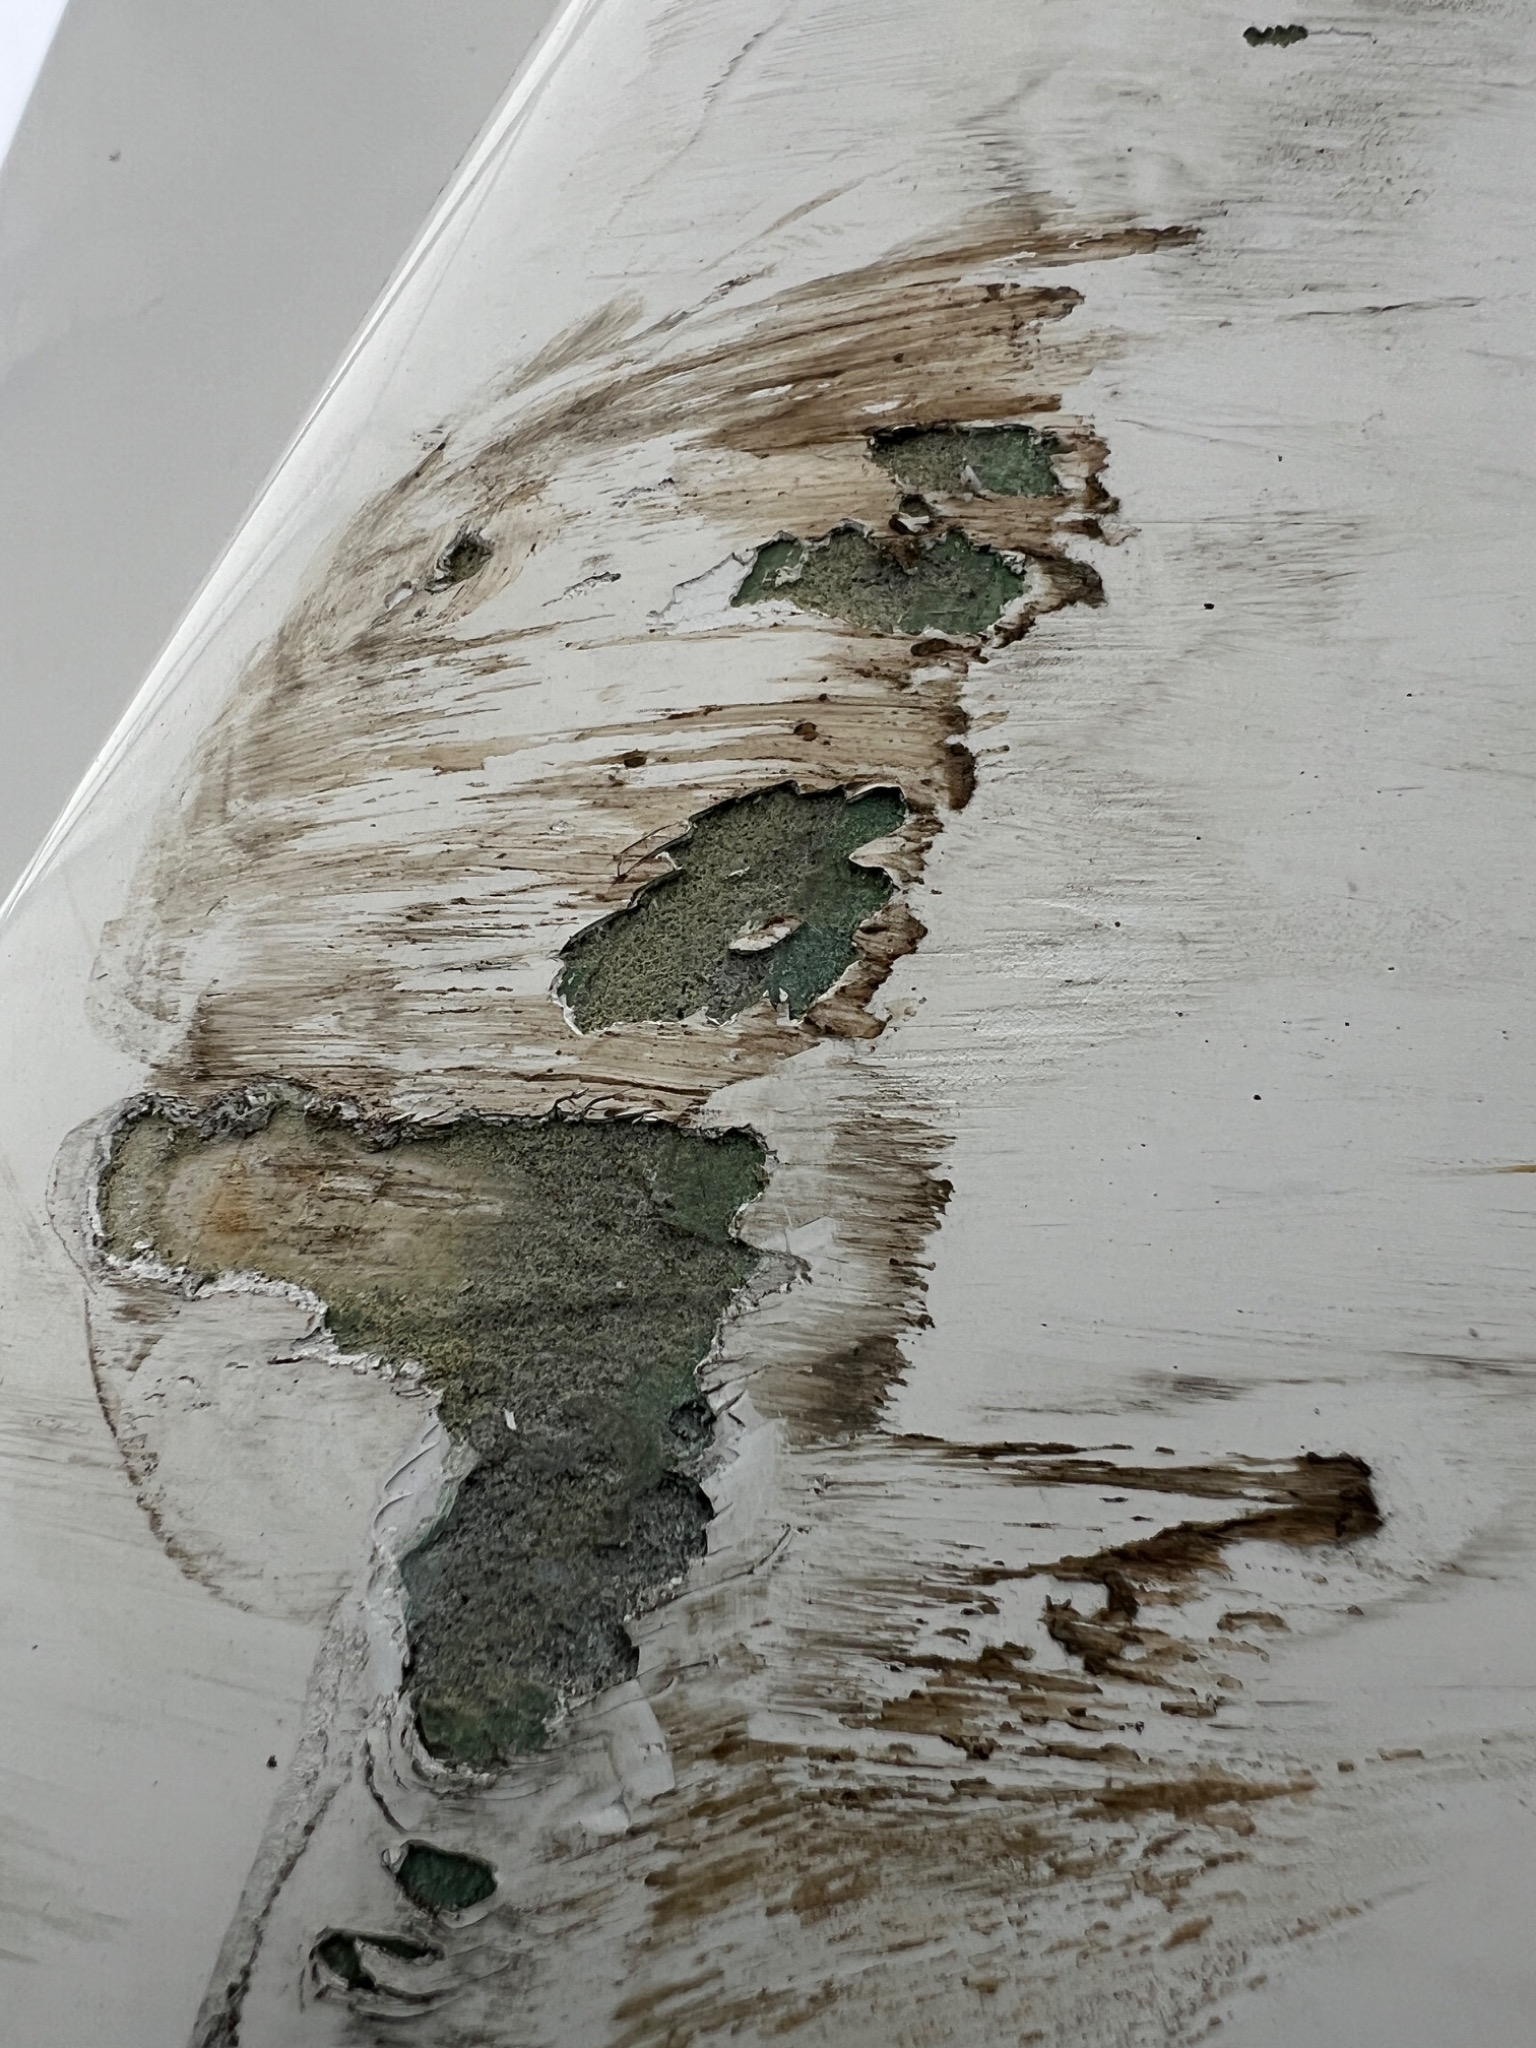
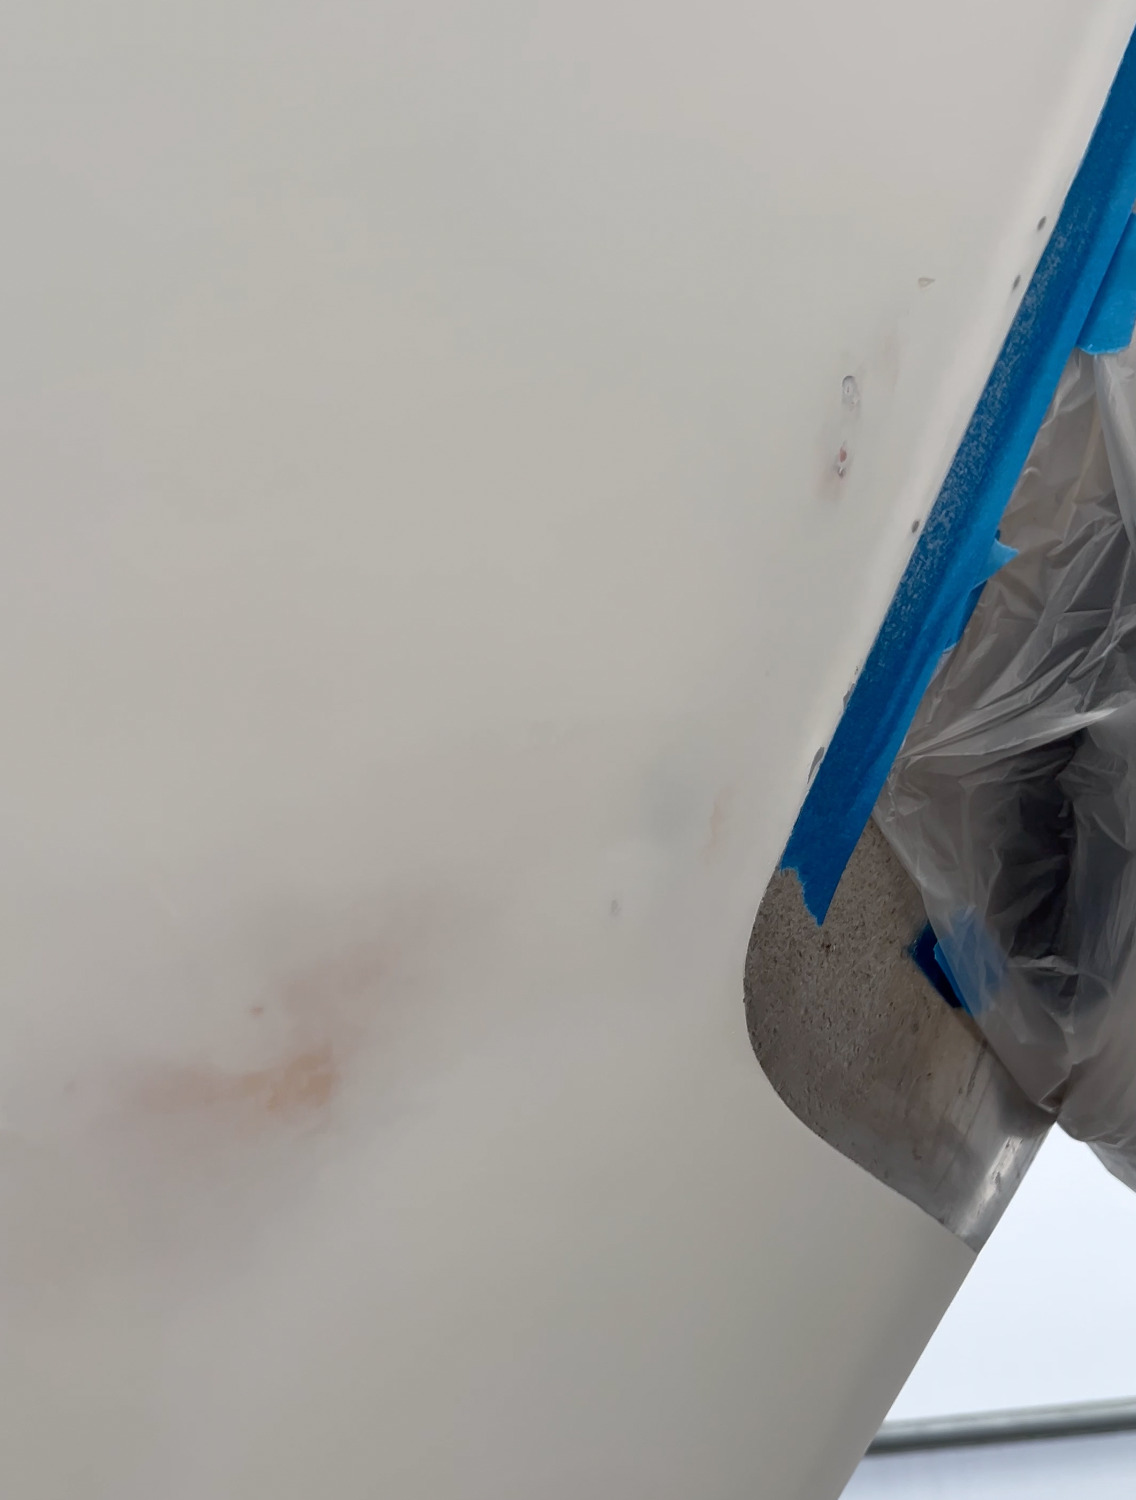
The paintwork had been ripped back through the finish to expose the underlying filler. This required a properly prepared paint repair rather than polishing.
Photo 01Paint damage exposing the fillerThe paintwork had been ripped back through the finish to expose the underlying filler. This required a properly prepared paint repair rather than polishing.
Marks on this exterior surface reveal areas where the paint coverage was thin, requiring attention as part of the refinishing work.
Photo 02Thin paint coverageMarks on this exterior surface reveal areas where the paint coverage was thin, requiring attention as part of the refinishing work.
02 / Bringing the surfaces back

Preparation that reaches beyond the visible repair.

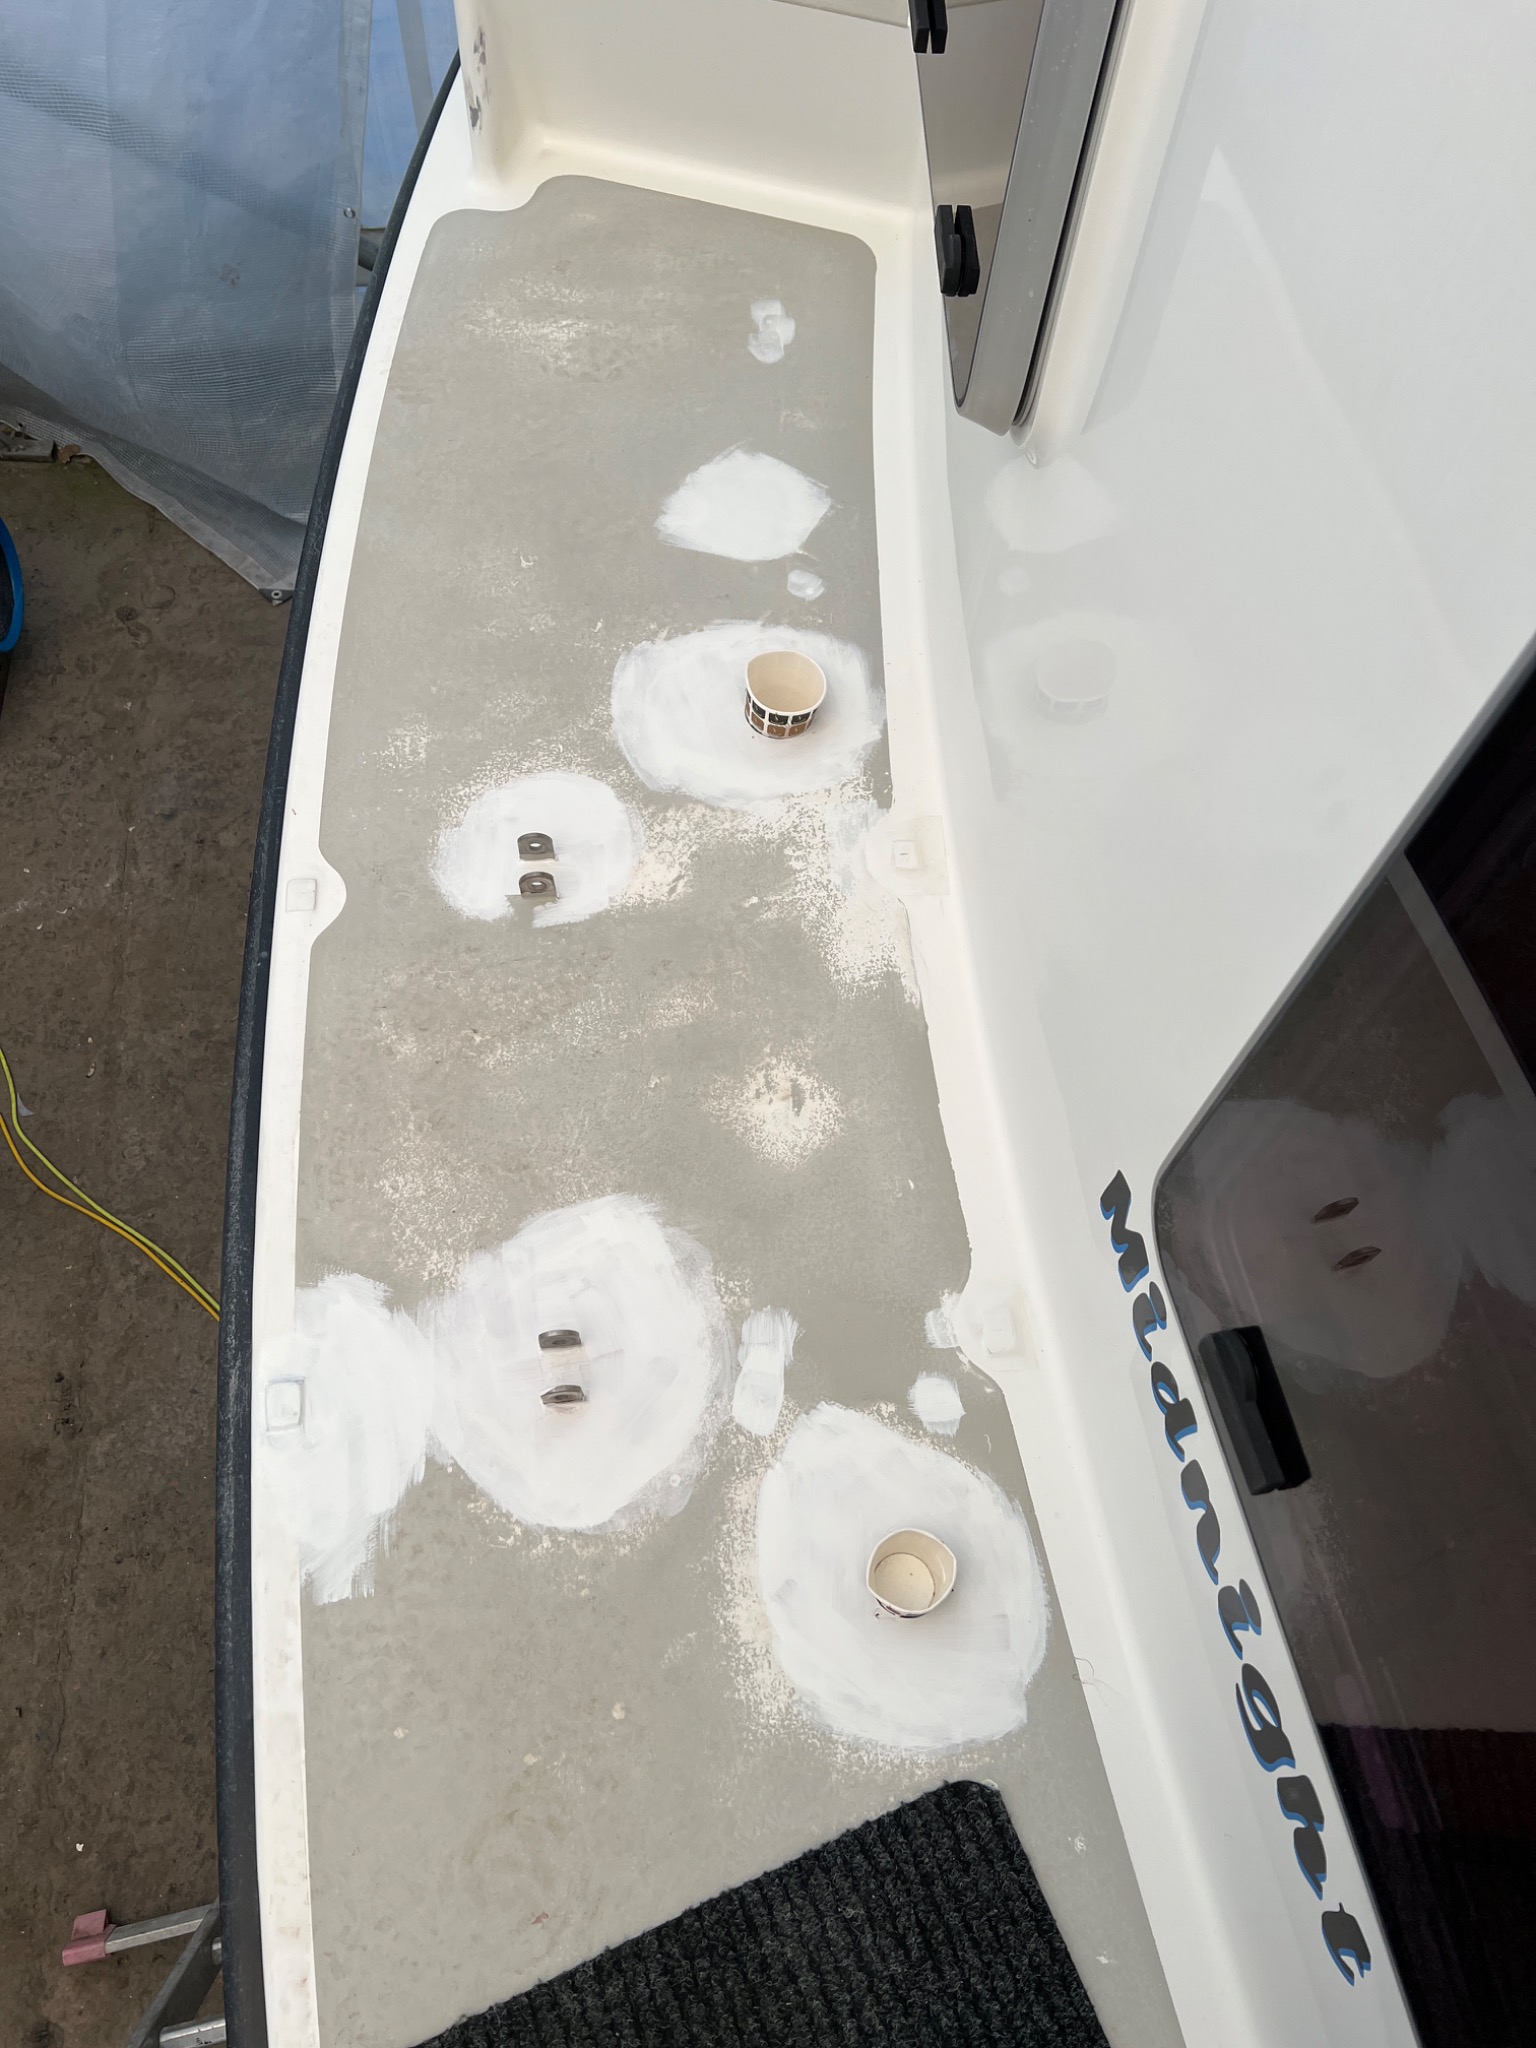
The cockpit floor and boarding platform were sanded and prepared for further coatings, with selected repairs receiving substrate primer. Corroded davit supports were also brought into the wider programme of exterior repairs.
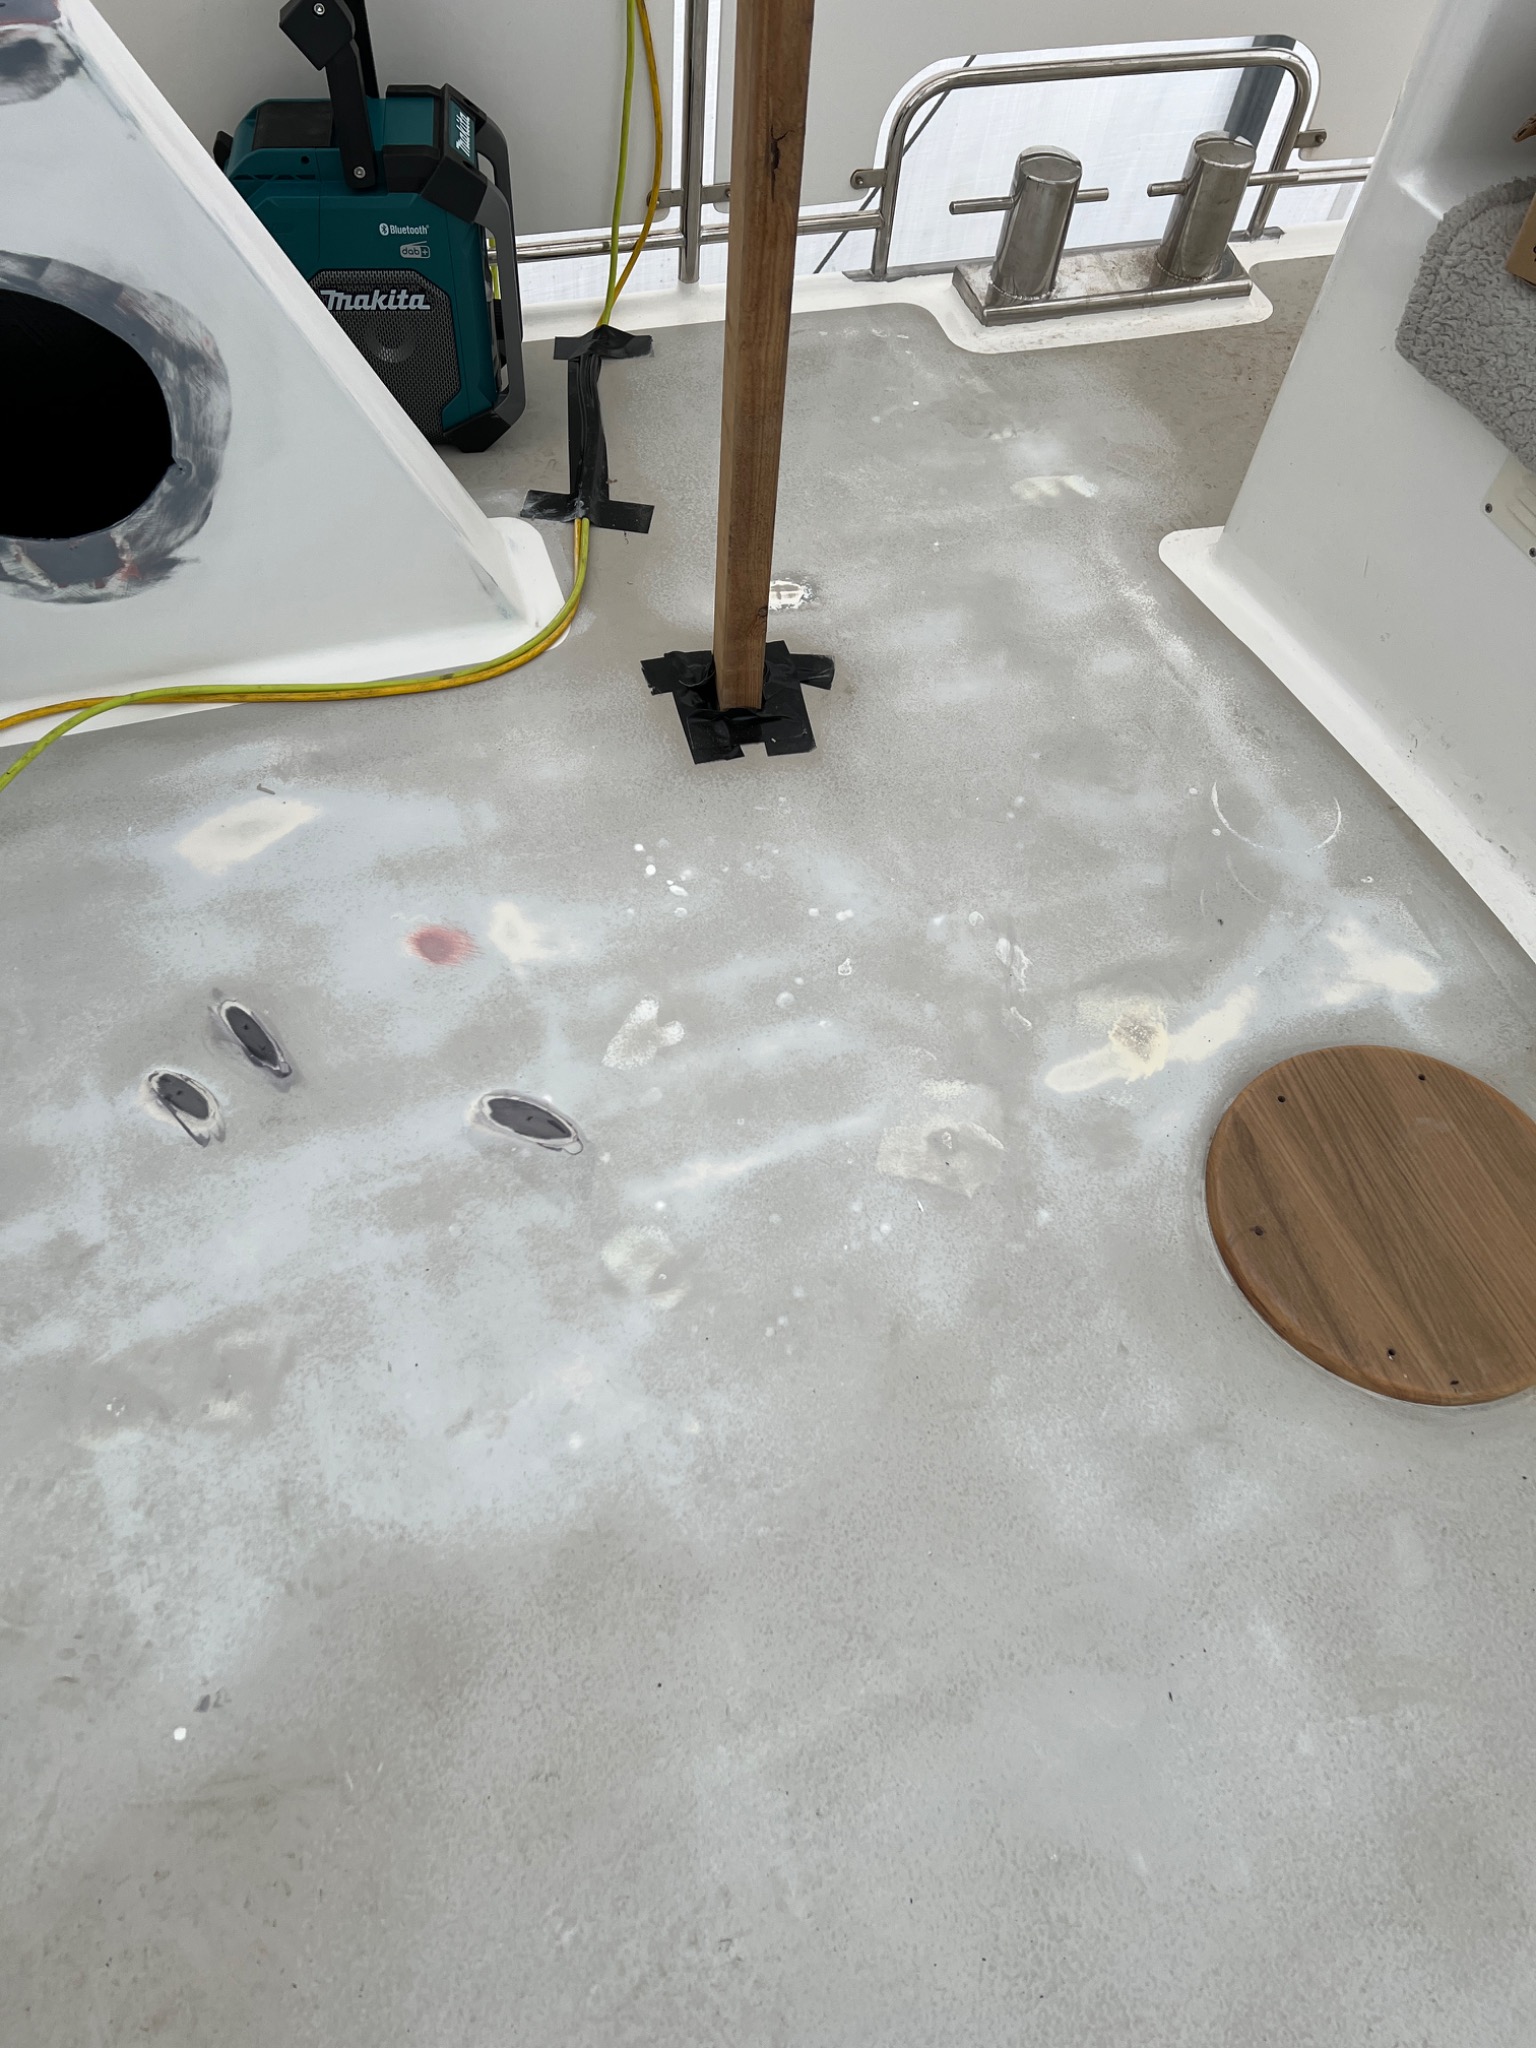
The cockpit floor sanded in preparation for the new non-slip coating, with localised repairs requiring substrate primer.
Photo 03Cockpit floor preparationThe cockpit floor sanded in preparation for the new non-slip coating, with localised repairs requiring substrate primer.
The boarding platform sanded and prepared, with substrate primer applied to repaired areas. This phase also included replacing the holding-tank inlet and outlet fittings.
Photo 04Boarding platform and fittingsThe boarding platform sanded and prepared, with substrate primer applied to repaired areas. This phase also included replacing the holding-tank inlet and outlet fittings.
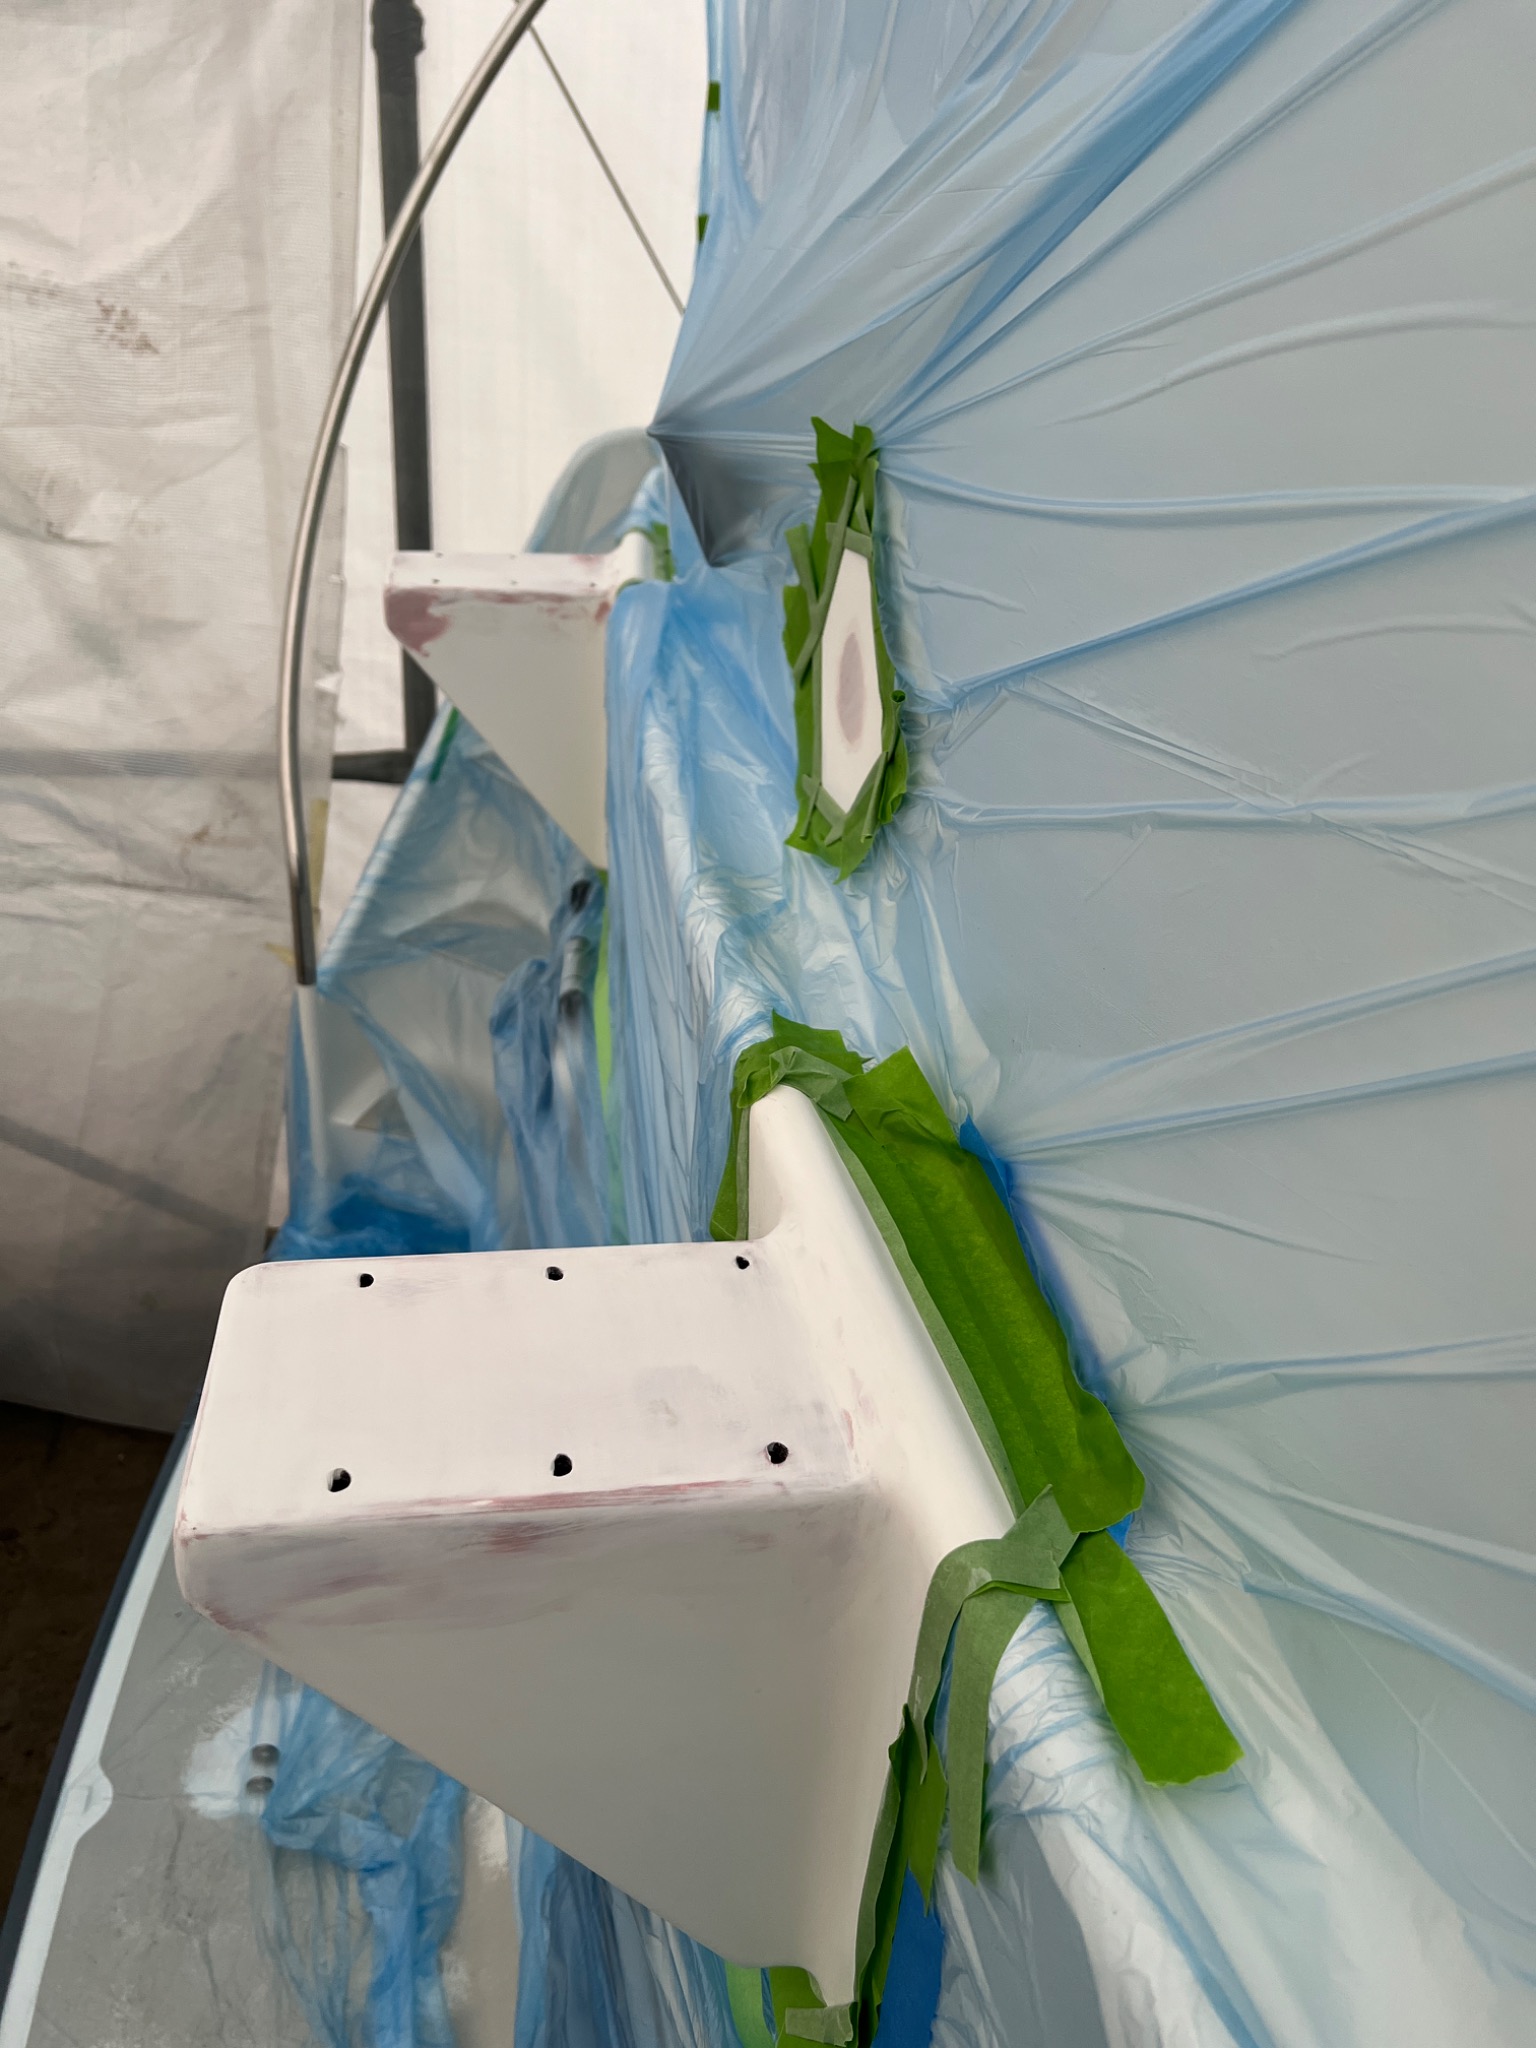
The davit supports during corrosion repair and preparation for repainting, with surrounding surfaces masked and protected.
Photo 05Corroded davit supportsThe davit supports during corrosion repair and preparation for repainting, with surrounding surfaces masked and protected.
03 / Preparing and refinishing

Protecting the surrounding finish.

The bow and bow-locker floor were prepared for repairs, while carefully controlled masking isolated other paintwork areas.
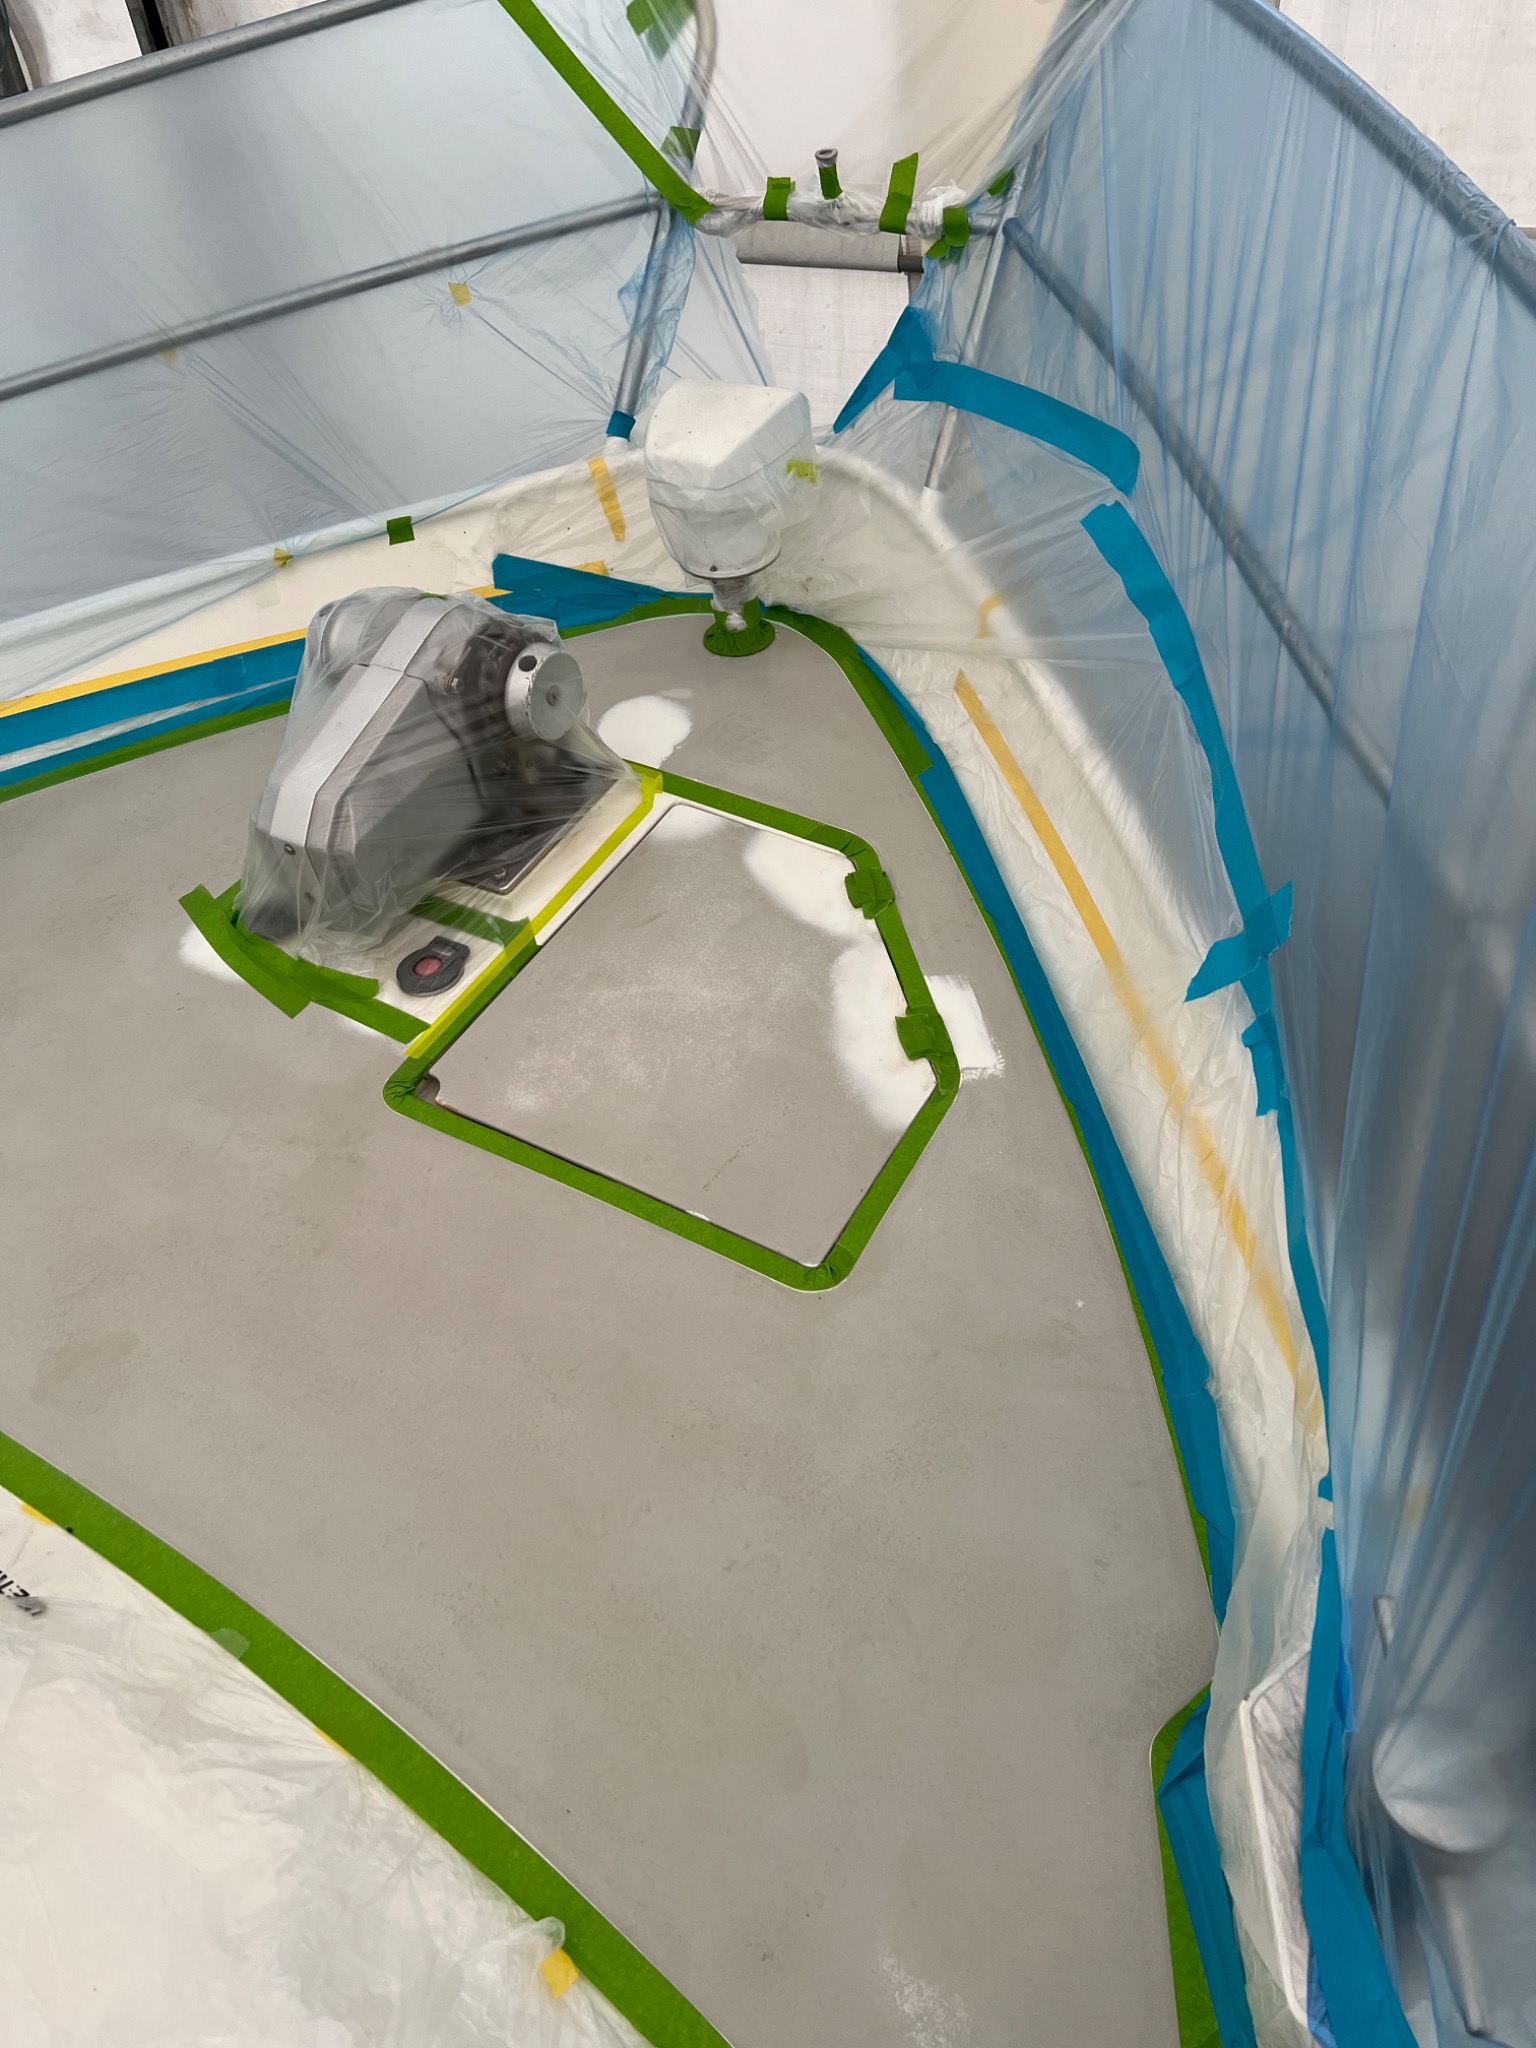
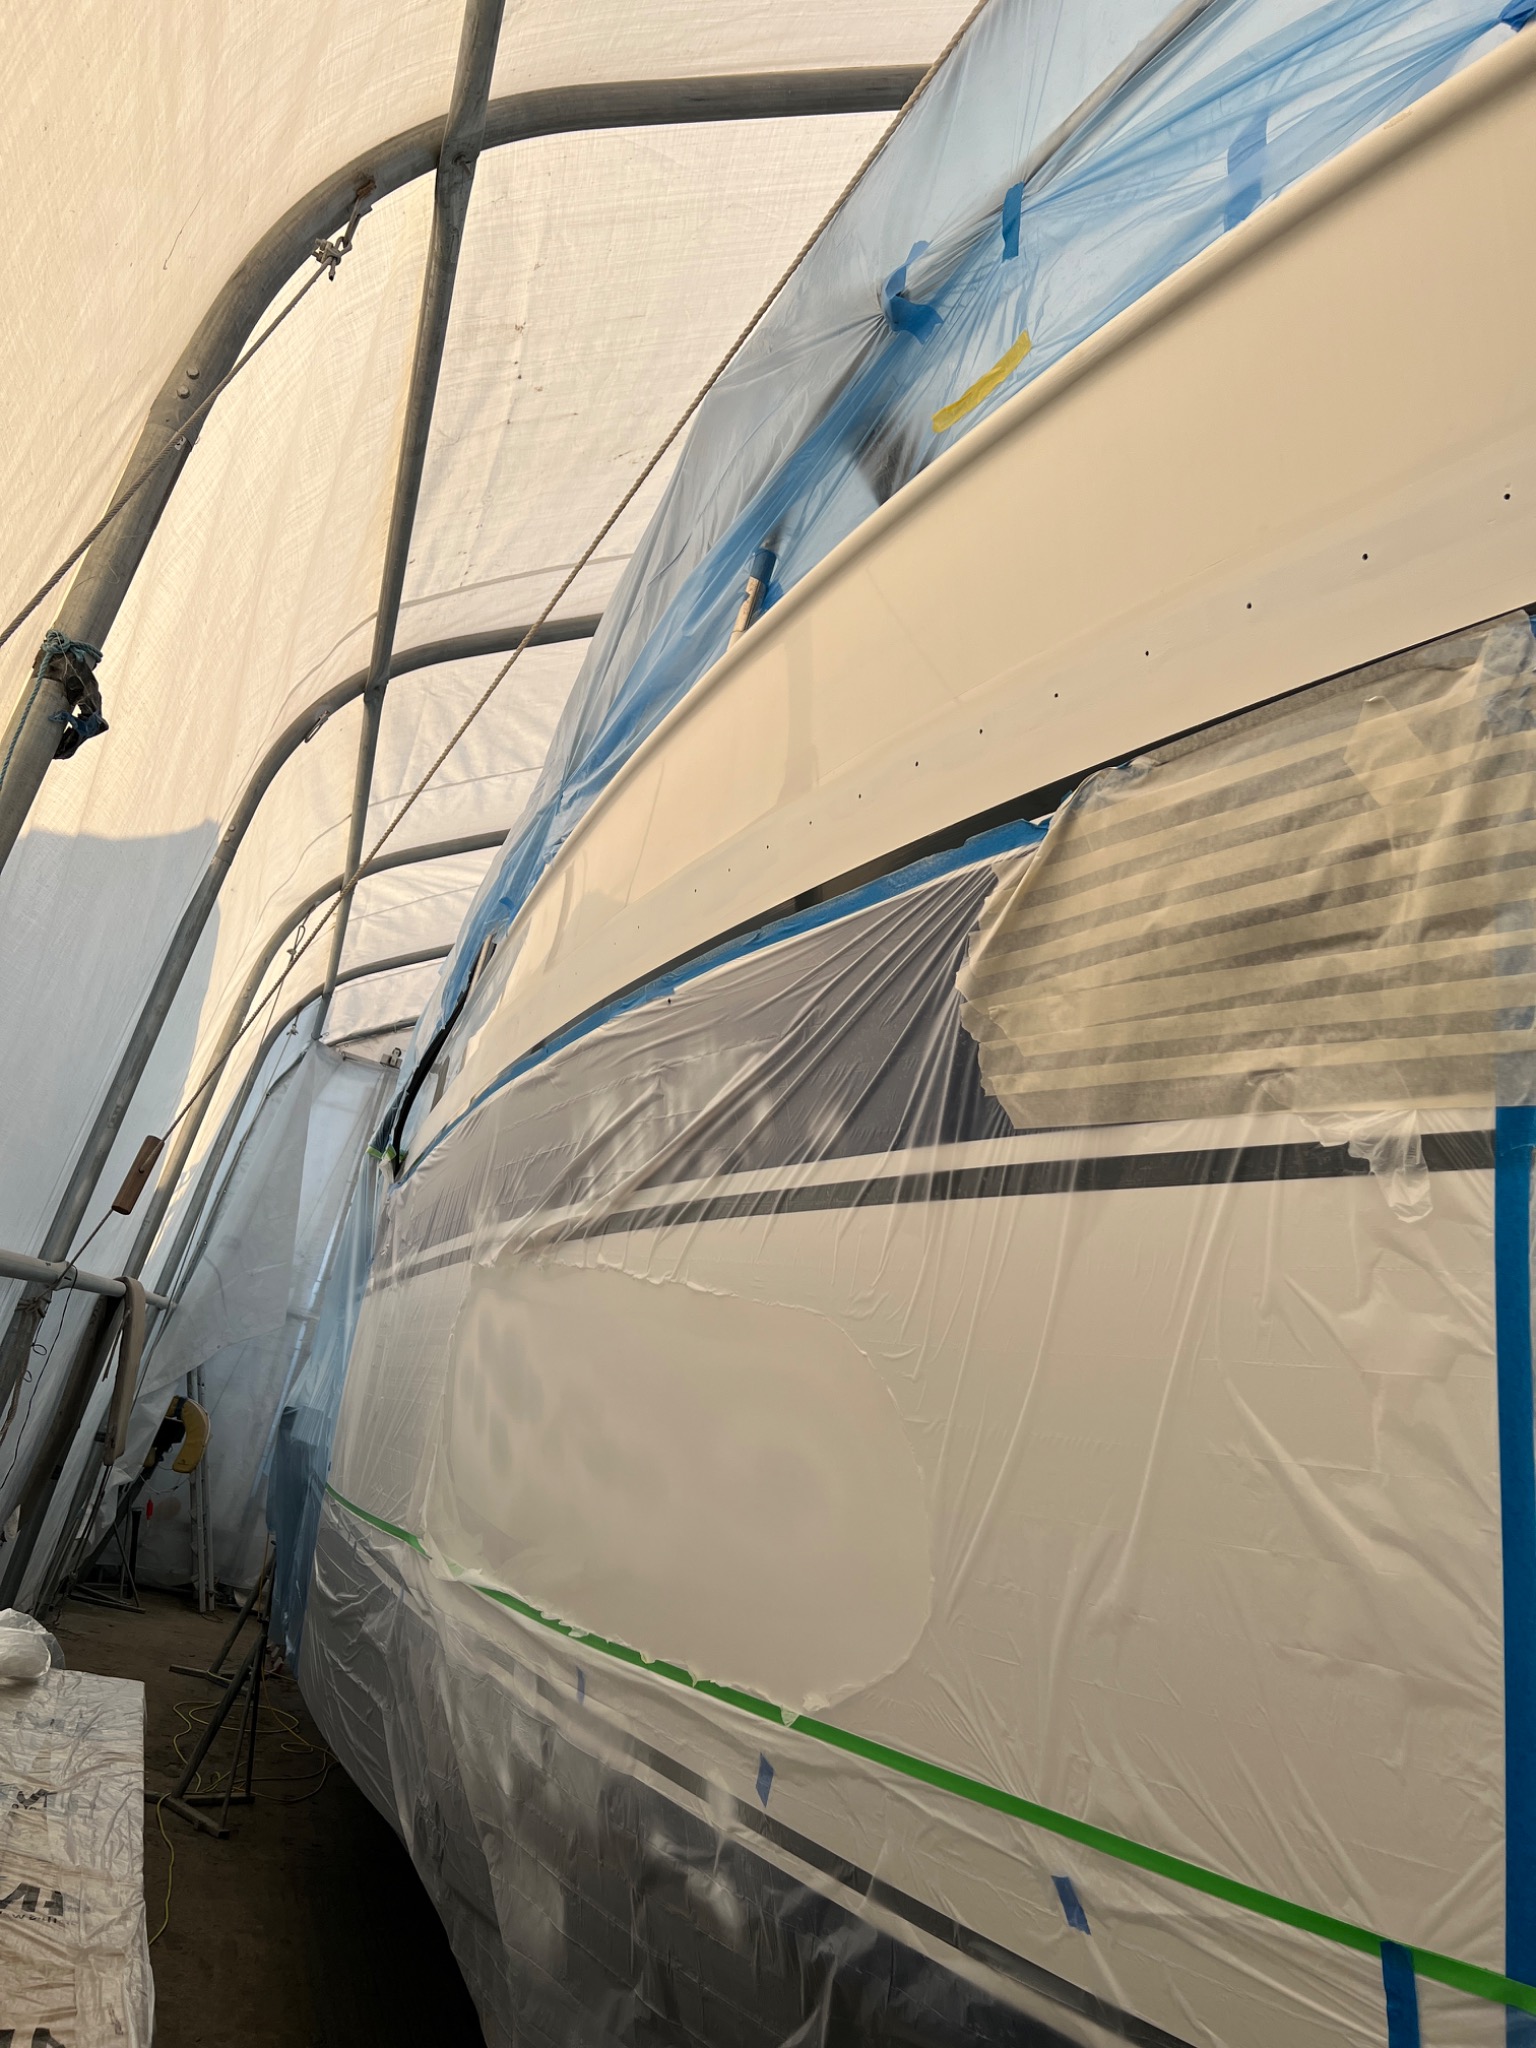
The bow area and bow-locker floor undergoing preparation for local repairs, with adjacent equipment and surfaces masked for protection.
Photo 06Bow and bow-locker preparationThe bow area and bow-locker floor undergoing preparation for local repairs, with adjacent equipment and surfaces masked for protection.
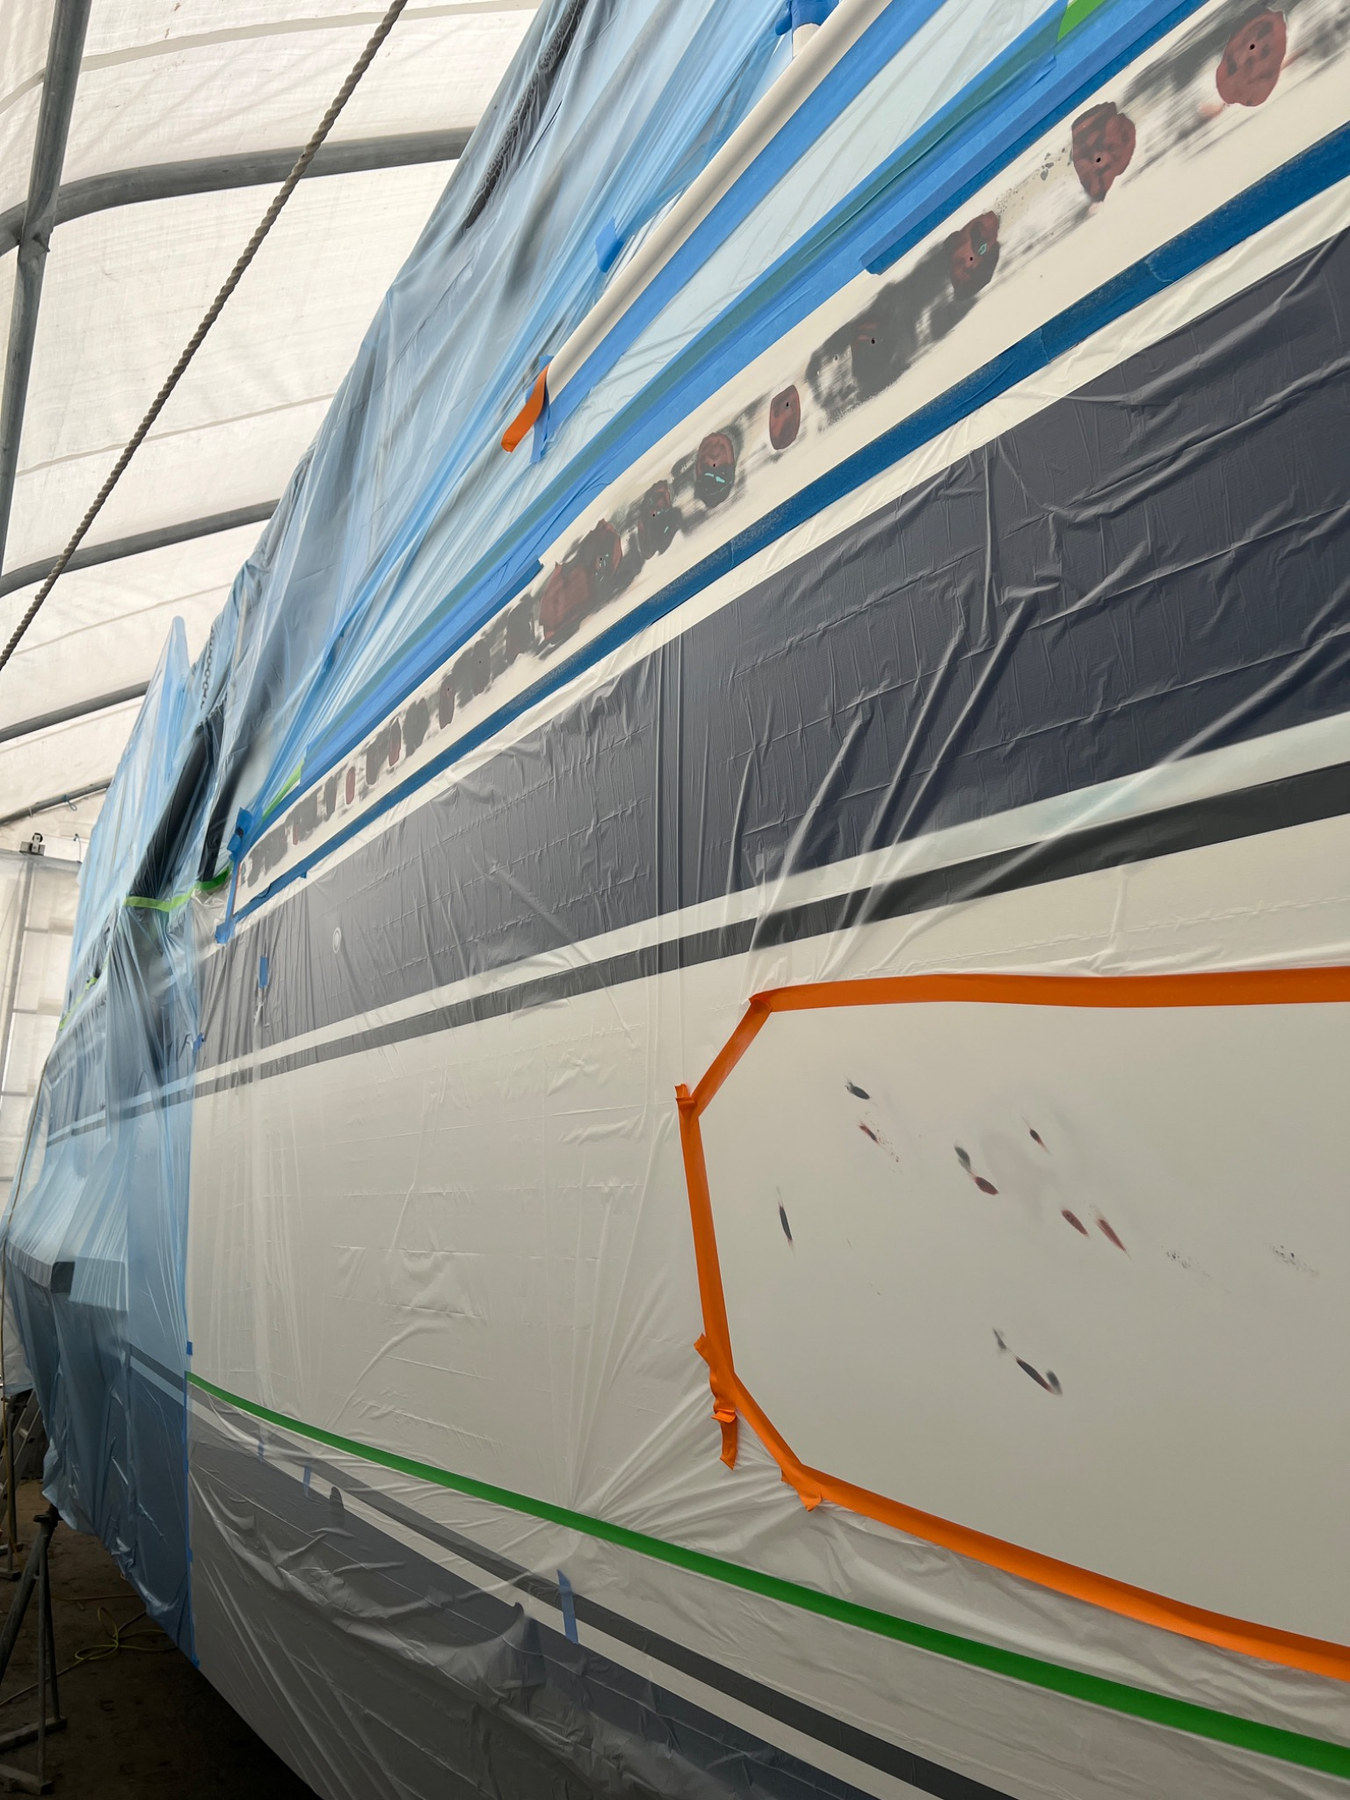
A masked exterior section during the paint repair process, with adjacent hull and cabin surfaces protected while work progressed.
Photo 07Exterior paint repairs in progressA masked exterior section during the paint repair process, with adjacent hull and cabin surfaces protected while work progressed.
04 / Completed exterior finishes

Non-slip decking and restored fittings.

The new non-slip finish on the boarding platform and adjoining steps, together with repainted davit supports and seat bases, brought these areas back into line with the wider exterior restoration.
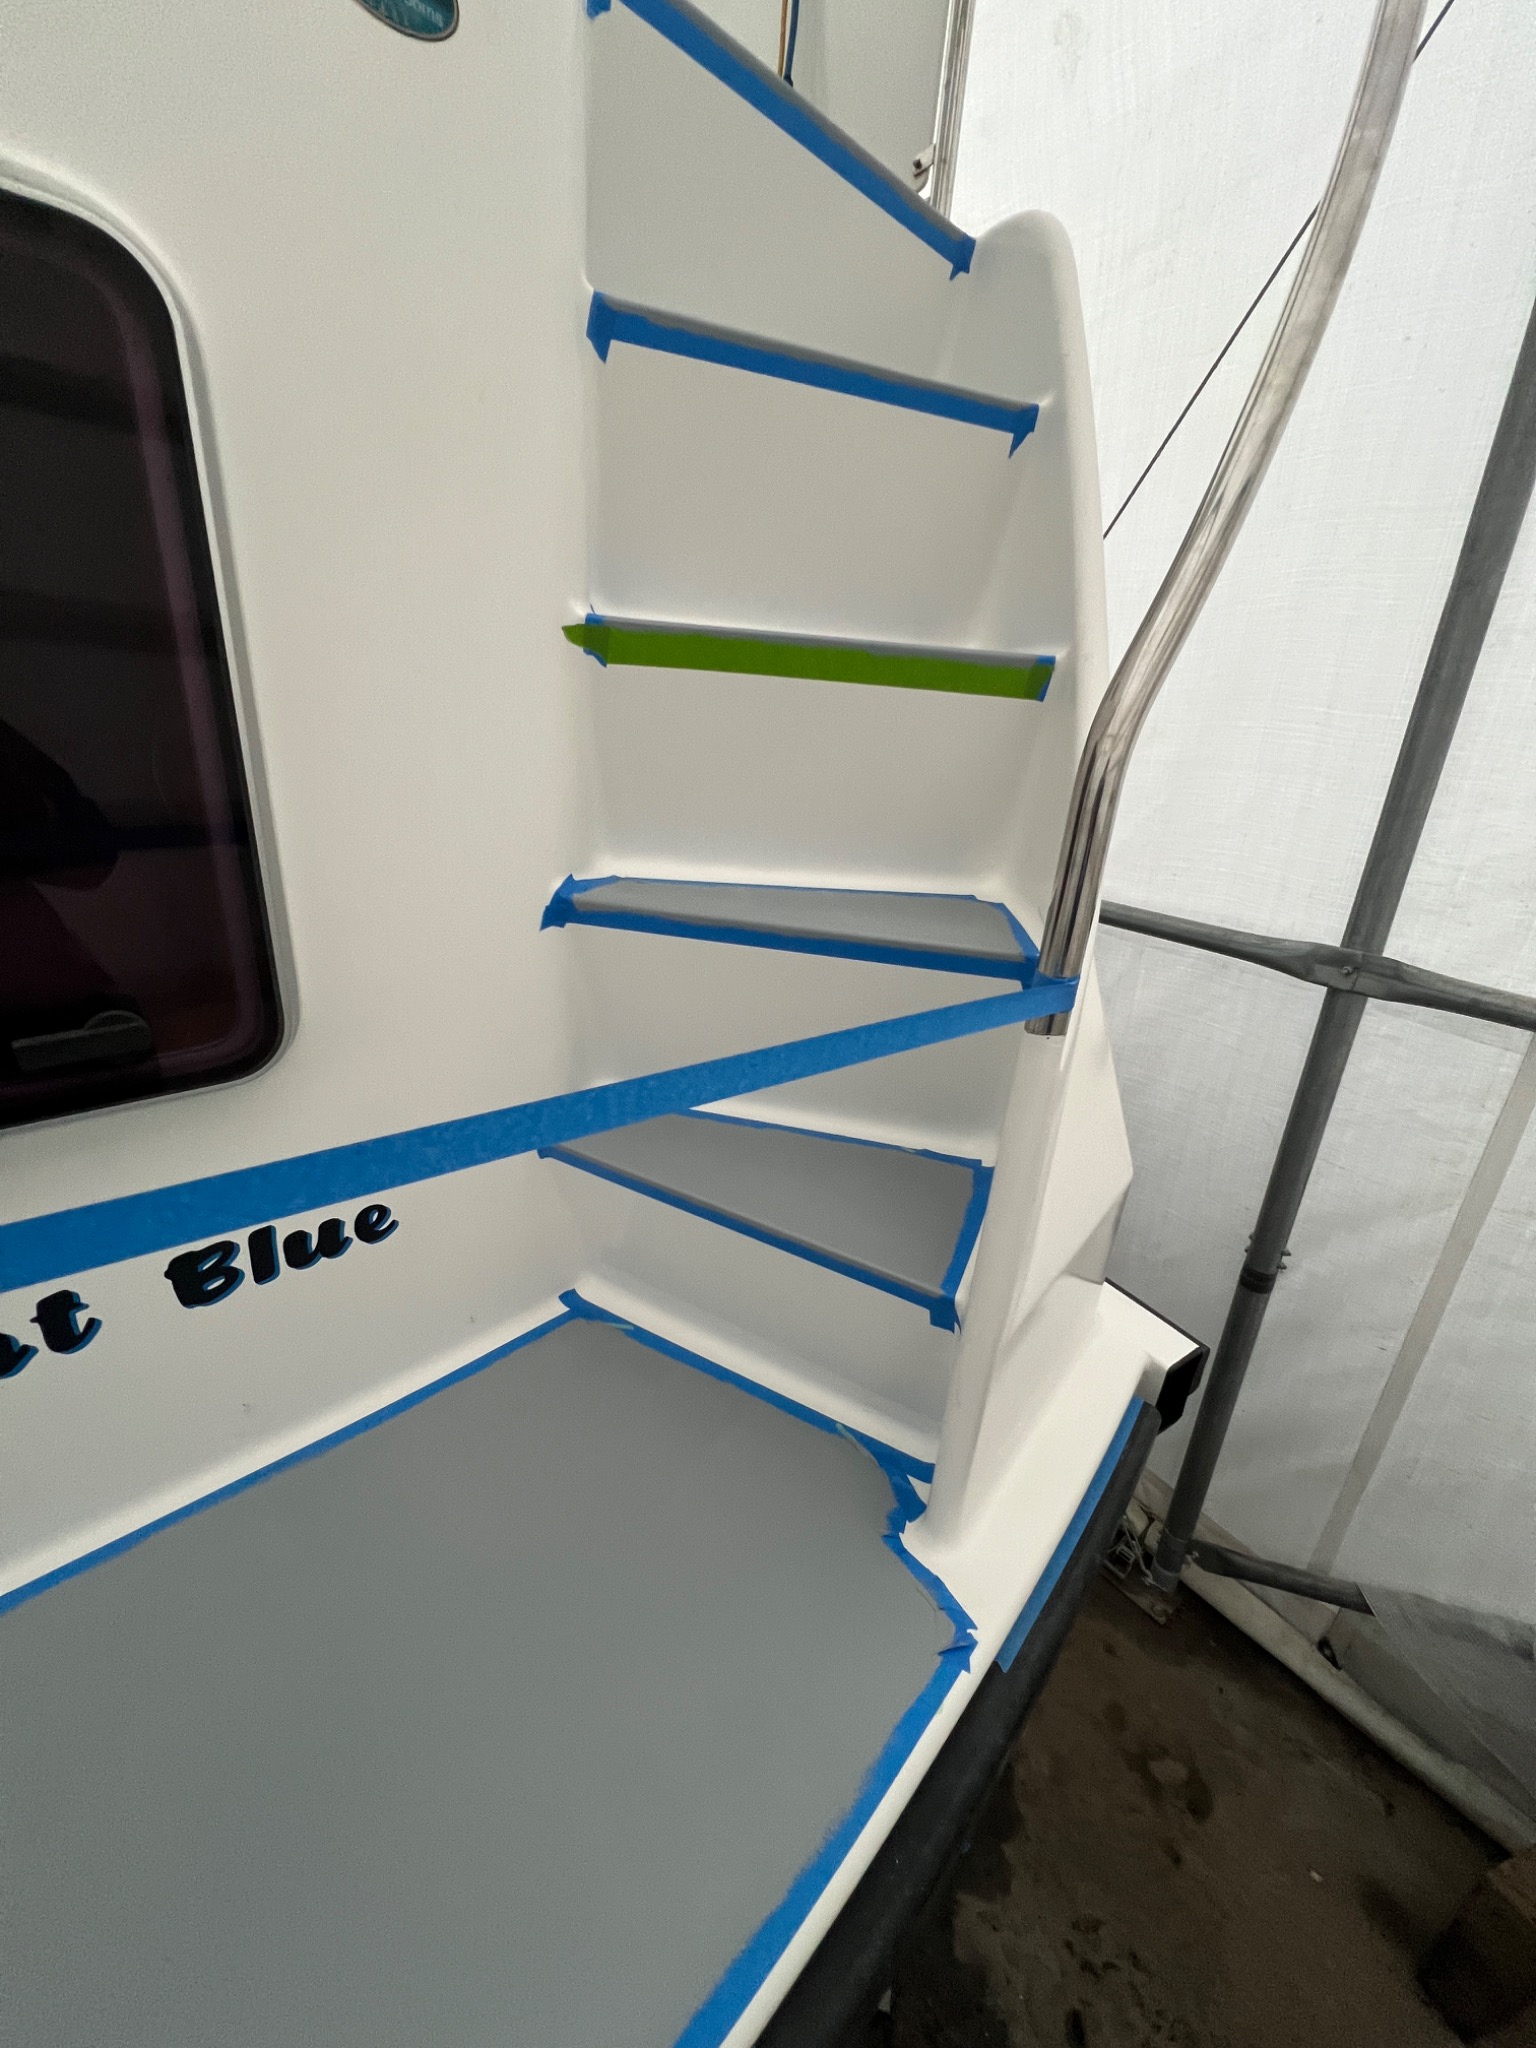
The boarding platform deck and adjoining steps showing the completed application of the new non-slip finish.
Photo 08Completed boarding-platform non-slip finishThe boarding platform deck and adjoining steps showing the completed application of the new non-slip finish.
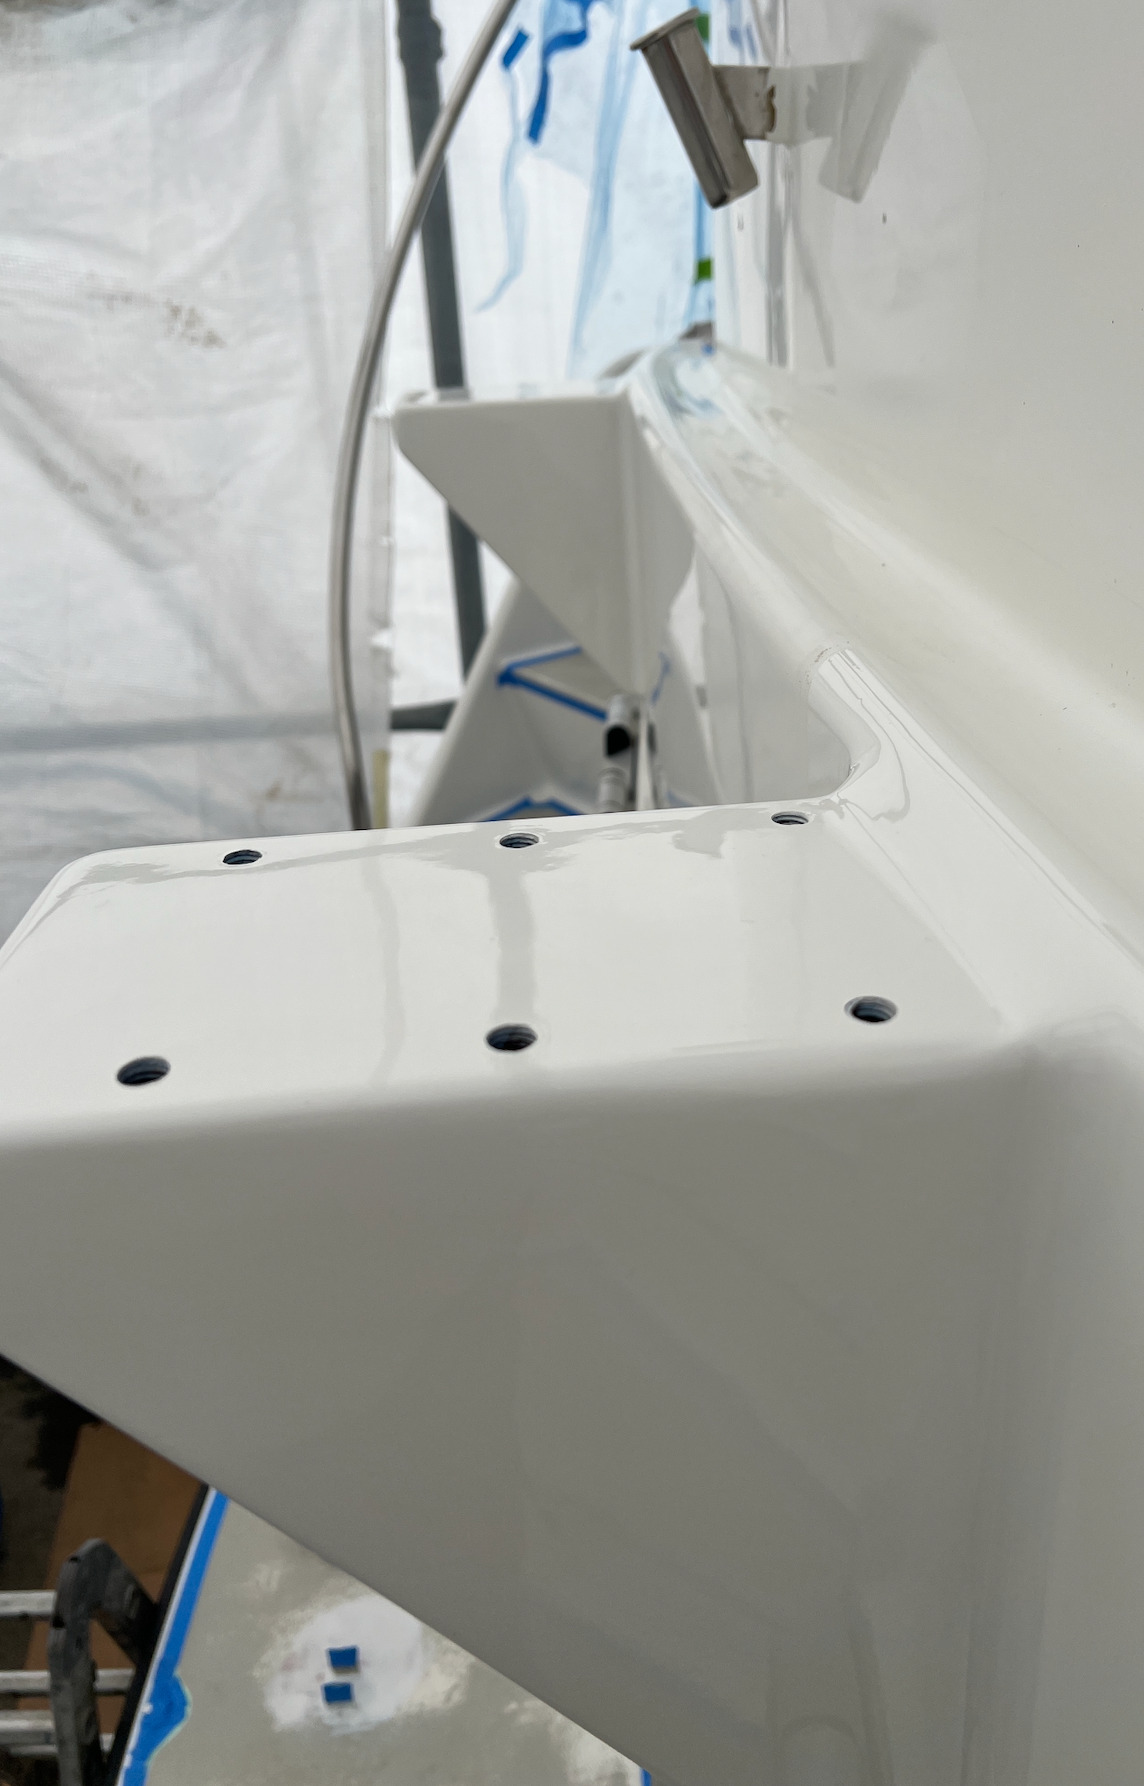
The restored davit supports following repainting, with a clean gloss finish and their fixing positions retained for reassembly.
Photo 09Repainted davit supportsThe restored davit supports following repainting, with a clean gloss finish and their fixing positions retained for reassembly.
The previously heavily corroded seat-base components after refinishing, showing their restored painted finish against the renewed deck.
Photo 10Repainted seat basesThe previously heavily corroded seat-base components after refinishing, showing their restored painted finish against the renewed deck.
05 / The restored setting

A more consistent exterior.

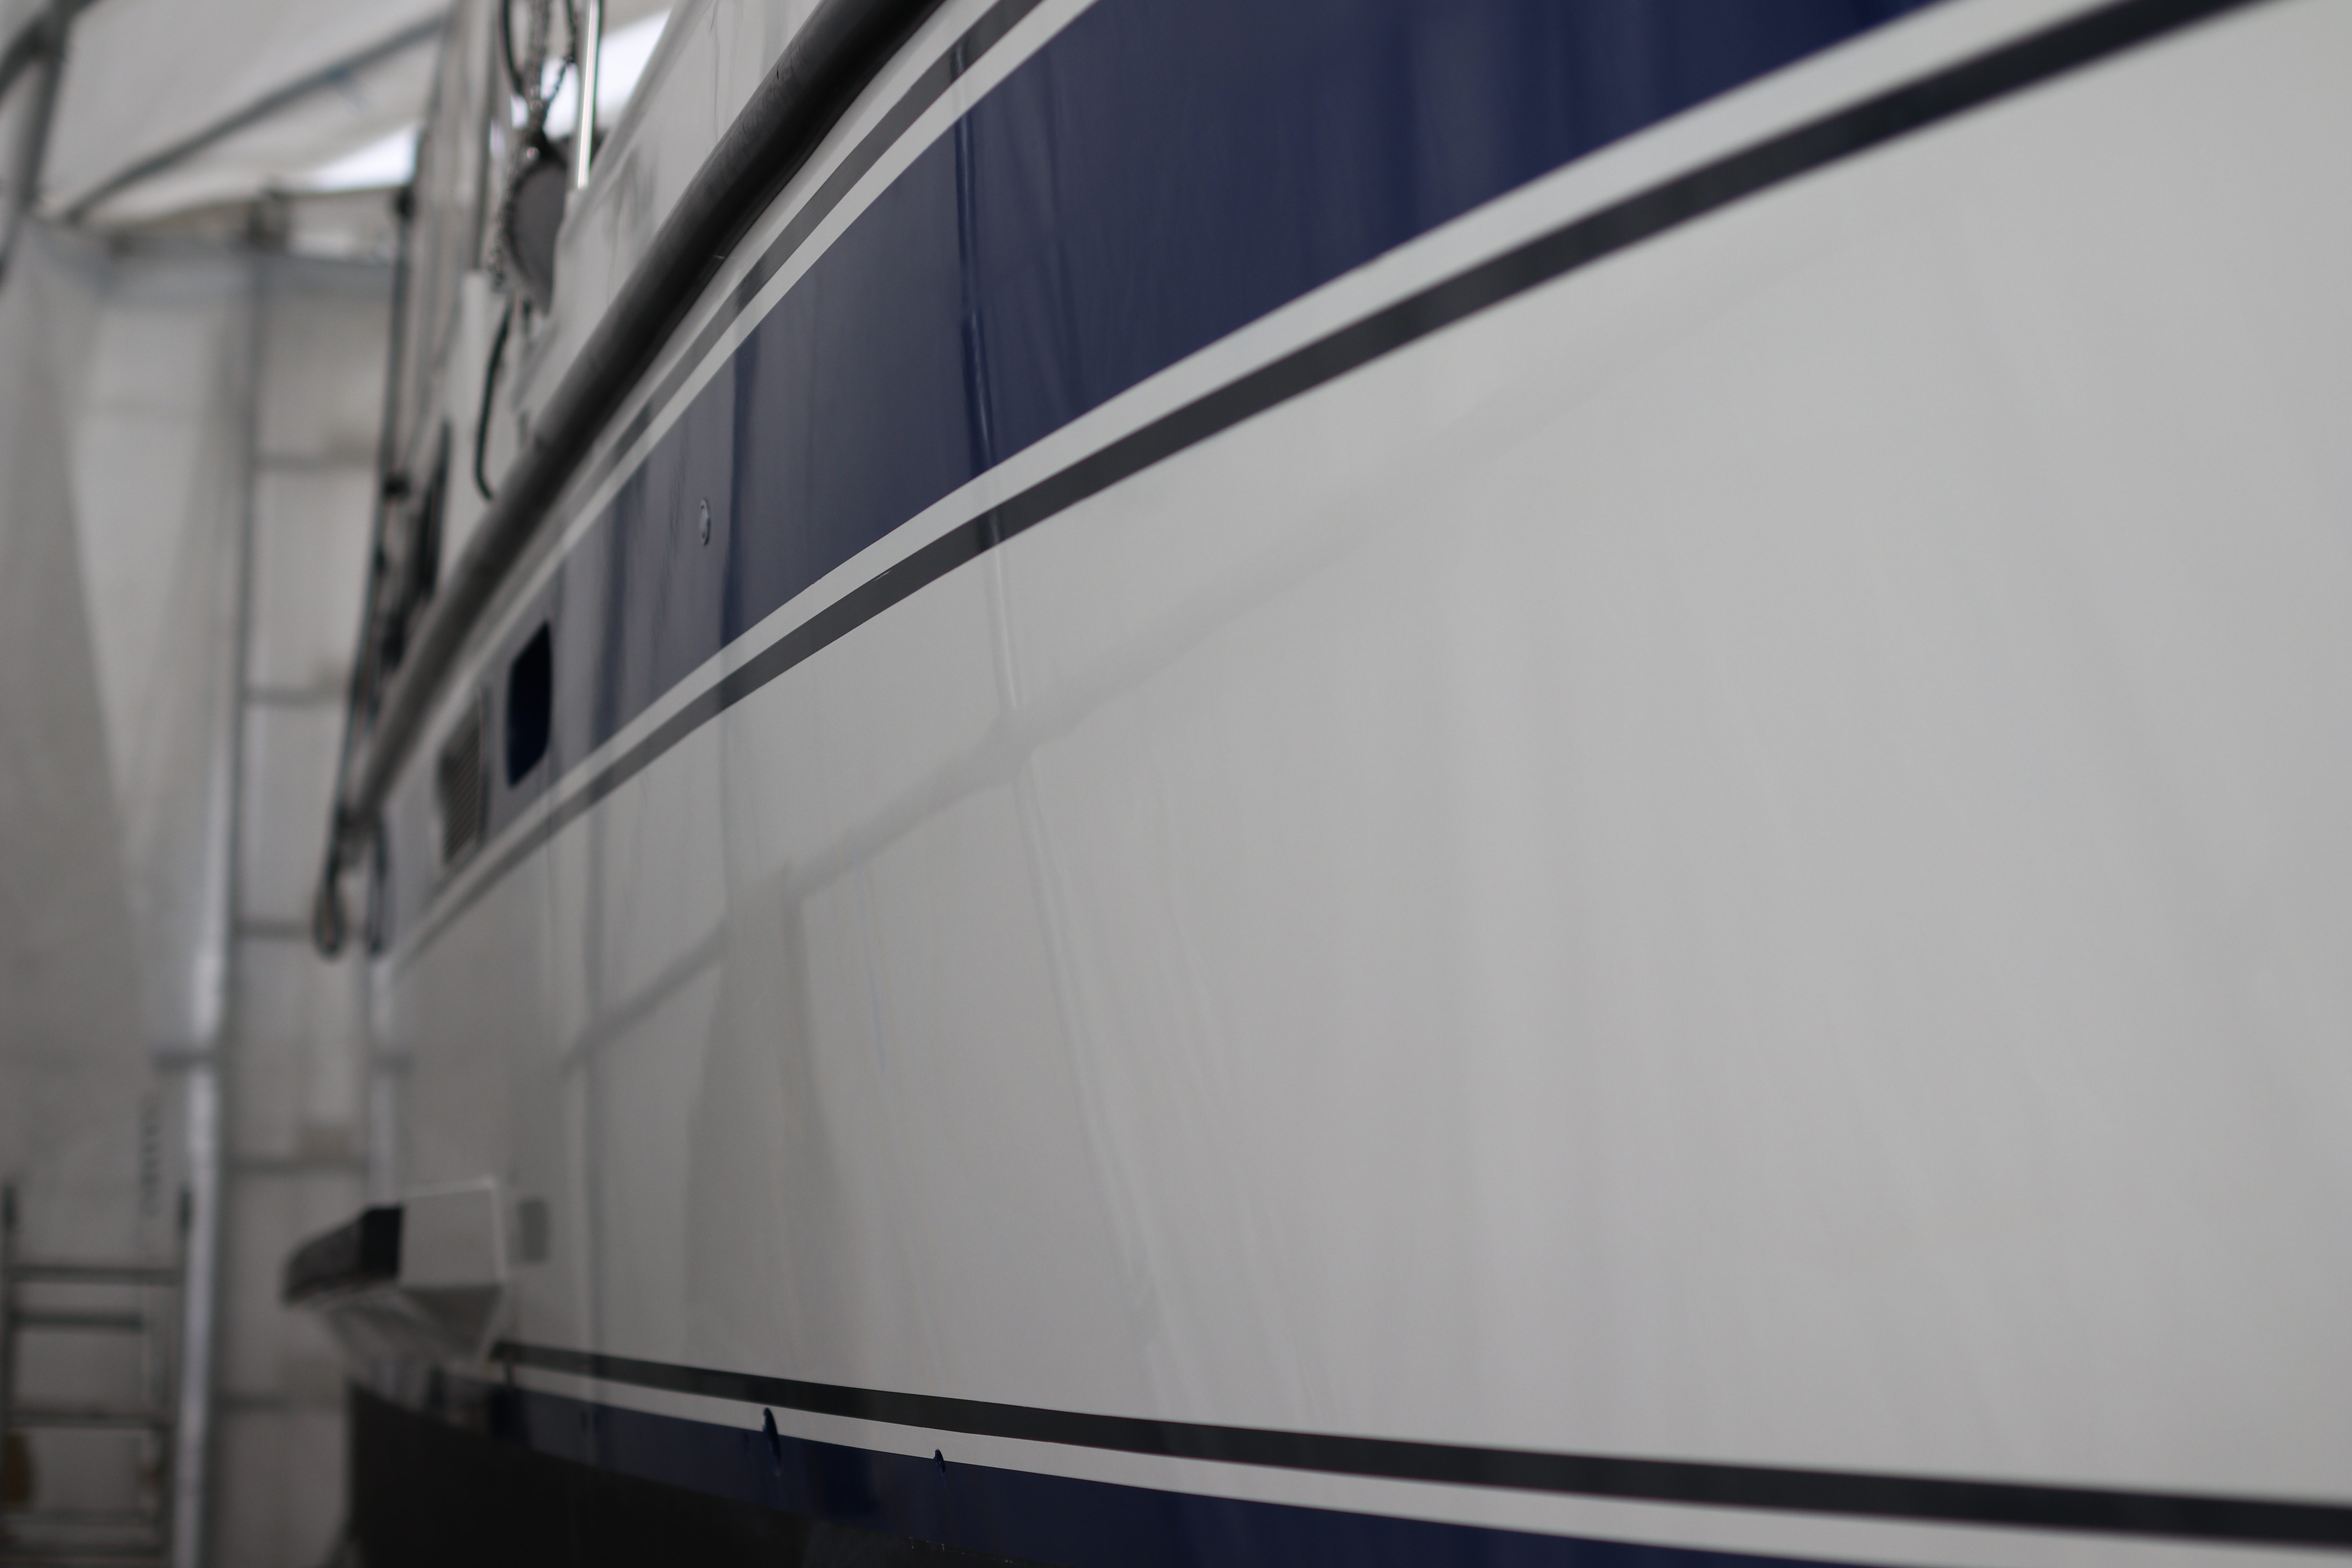
These wider views show the results of the repairs, surface correction and polishing in context: the renewed relationship between painted structures, navy and white hull-side finishes, and the grey deck. The next stage was to build the vessel back up and prepare for relaunch.
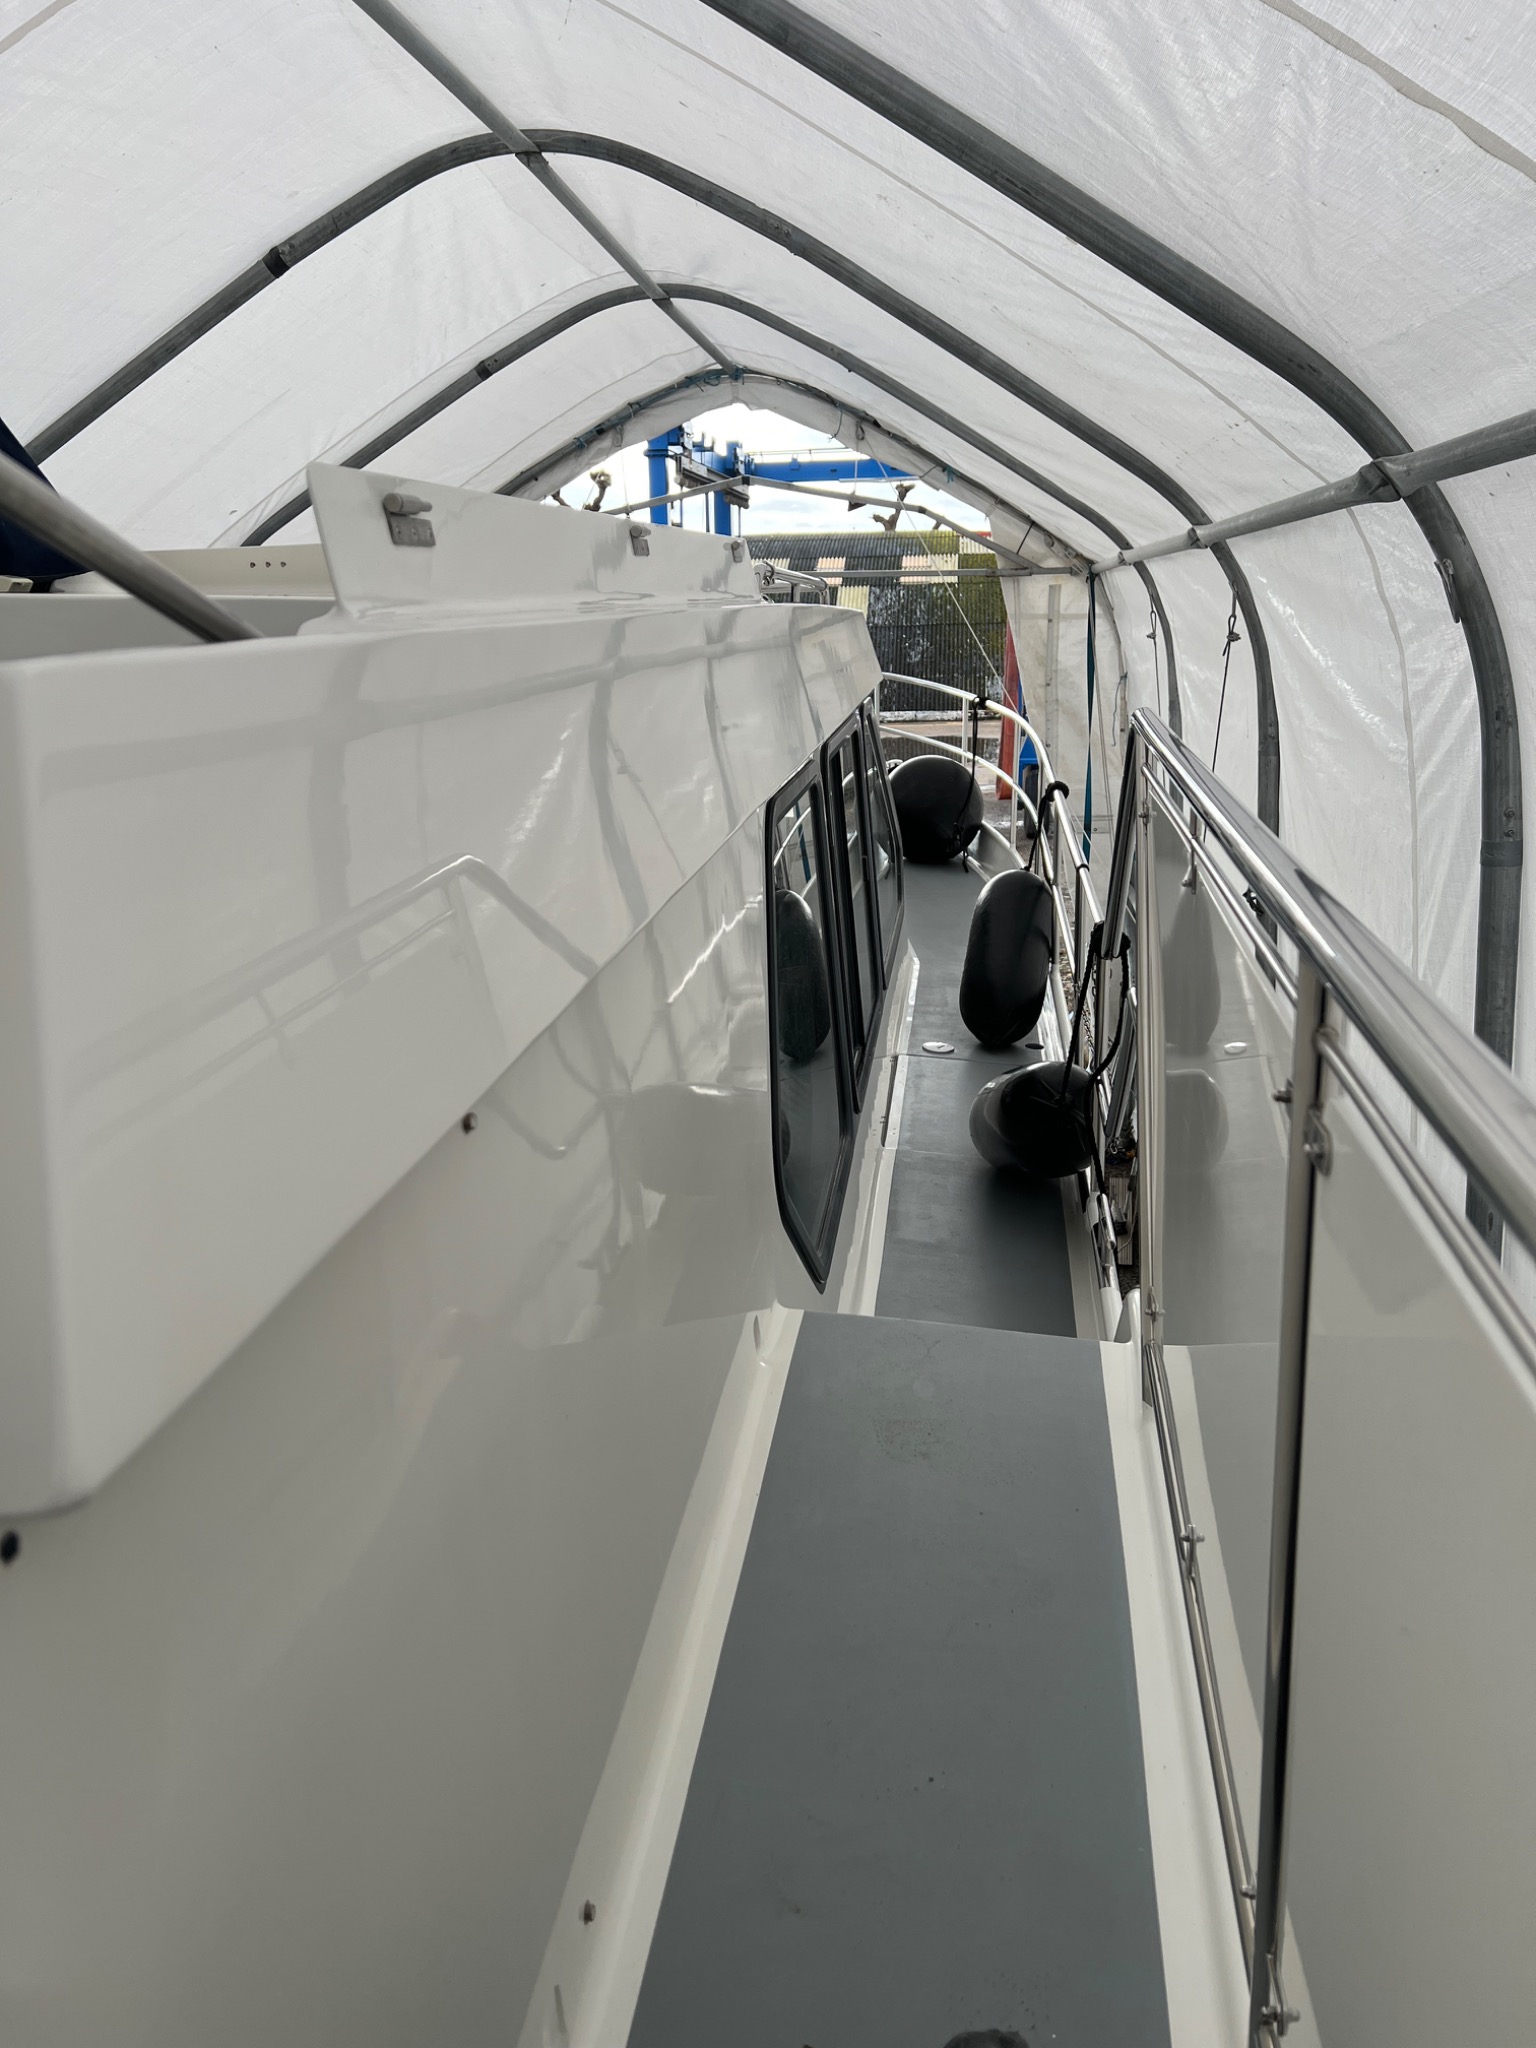
The white cabin side, railings and grey walking surface presented together after the wider programme of exterior work.
Photo 11A renewed side-deck settingThe white cabin side, railings and grey walking surface presented together after the wider programme of exterior work.
A broader camera view of Midnight Blue’s white and navy hull-side finishes, showing the relationship between individual repairs and the vessel’s overall appearance.
Photo 12The vessel as a wholeA broader camera view of Midnight Blue’s white and navy hull-side finishes, showing the relationship between individual repairs and the vessel’s overall appearance.
Behind the finish

Good exterior restoration is cumulative. Each preparation, repair and corrected surface contributes to the overall impression of a vessel that has been cared for properly.

Midnight Blue  /  The final result

A restoration that
brought everything together.

What began as a programme of individual repairs developed into a comprehensive rejuvenation of Midnight Blue’s exterior.

Midnight Blue back on the water. Original Hull Gel project footage.

From the underlying corrosion and damaged paintwork to the radar arch, deck surfaces and final finish, each stage was approached with the same attention to detail.

The objective was never to change the character of this beautifully built cruiser, but to restore and enhance the quality of her appearance while preserving her original design.

With the restoration complete, Midnight Blue was reassembled and relaunched, returning to the water with a renewed finish worthy of her construction.

Your vessel / Our craft

Restoration worth doing properly.

Discuss your vessel